ipywidgets: Interactive Widgets in Jupyter Notebooks (Complete Guide)
Jupyter notebook has become very famous nowadays and has been used by data scientists, researchers, students, and developers worldwide for doing data analysis. Along with that, interactive dashboards and applications are getting quite a common day by day. It has become a need for an hour to create interactive apps and dashboards so that others can analyze further using interactive widgets. Old ways of creating static applications and dashboards won't help much in this fierce competition of everything interactive. Applications and dashboards designed as web apps quite commonly use javascript for interactivity purposes which requires quite a good amount of javascript learning.
"But what if you are a python developer and do not want to invest time in learning another programming language (Javascript, reactjs, etc) but still want to build interactive apps and dashboards?"
"What if you want to add interactivity (interactive widgets) to your jupyter notebooks?"
Python has a library called ipywidgets which can help you with that. It provides a list of widgets quite common in web apps and dashboards like dropdown, checkbox, radio buttons, buttons, and many more. It'll let you code in pure python and will generate UI with interactive widgets for you using javascript underneath. This way you won't need to learn javascript and continue to use python by just learning ipywidgets. You can even give presentations from the Jupyter notebook with interactive widgets enabled. Python has a framework named voila that lets us deploy Jupyter notebooks as web apps. So you can create your interactive dashboard in a notebook and deploy it using voila as well (one more reason to use ipywidgets).
Every widget generated by ipywidgets consists of two components behind the scene:
- Python - It runs in jupyter notebook kernel.
- Javascript - It runs in browser.
Apart from this, ipywidgets is heavily dependent on Python library traitlets for handling events behind the scenes.
One of the best things about ipywidgets is that it can be easily integrated with a lot of other Python libraries like matplotlib, holoviews, bokeh, bqplot, ipyleaflet, ipytree, ipysheet, ipyvolume, ipywebrtc, ipythreejs, and many more. Do check the below links to learn about it.
- Interactive Charts using bqplot and ipywidgets
- Interactive Charts using matplotlib and ipywidgets
- Simple 2D Animation in Python using bqplot and ipywidgets
What can you learn from this Article?
As a part of this tutorial, we have explained how to use the Python library Ipywidgets to create interactive widgets in the Jupyter notebook. The tutorial covers many aspects of using ipywidgets including creating widgets, handling events, linking widgets, layout, and styling of widgets. It even explains various ways of laying out widgets to create interactive UI.
Below, we have listed essential sections of the tutorial to give an overview of the material covered.
Important Sections Of Tutorial
- Getting Started with Widgets Creation
- 1.1 UI consisting of Widgets from function using 'interact()'
- 1.1.1 'fixed()' to Prevent Widgets from Getting Created for Selected Arguments.
- 1.1.2 Table of Function Parameters Mapping to Widgets
- 1.3 Creating Widget using Objects
- Int slider
- Float Slider
- Checkbox
- Button
- Dropdown
- Text area
- 1.4 Widgets using 'interactive()'
- 1.1 UI consisting of Widgets from function using 'interact()'
- Organizing Layout with 'interactive_output()'
- Preventing Fluctuations using 'interact_manual()' and 'continuous_update'
- Output Widget to Direct Results
- Linking Widgets
- Widget Events
- Widget Layout and Styling
- 7.1 Individual Widget Layout using layout attribute
- 7.2 VBox and HBox for arranging widgets Vertically and Horizontally
- 7.3 Box Layout
- 7.4 GridBox for layout
- 7.5 Exposed CSS properties
- 7.6 TwoByTwoLayout Layout Object
- 7.7 AppLayout Layout Object
- 7.8 GridspecLayout Layout Object
- 7.9 "style" attribute for CSS Styling
1. Getting Started with Widgets Creation 
Ipywidgets provides a list of functions that can let us create widgets UI for any of our existing functions. It'll create widgets by itself by looking at the parameters of functions and creating widgets UI with all parameters represented as one widget. It's a very good way to start using ipywidgets. We'll then learn in the future about customizing these widgets further.
We'll start by importing necessary functions which will help us creates widgets UI.
from ipywidgets import interact, interactive, fixed, interact_manual
1.1 UI Consisting of Widgets Directly from Function using interact()
We can pass any of our functions as input to interact() function and it'll create widgets UI by looking at the parameters of the function with proper widgets for each parameter. We'll start converting a few basic functions.
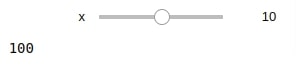
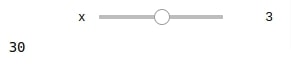
def func1(x):
    return 5*x
interact(func1, x=10);
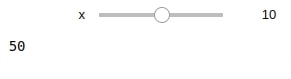
We can see that interact() function detects from our value x=10 that it should create a slider for this parameter. We can modify slider values and it'll recall function with new value and return new output.
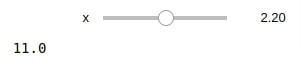
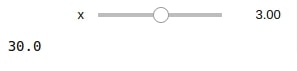
interact(func1, x=2.2);
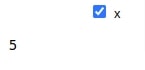
interact(func1, x=True);
interact(func1, x="Hello !!");
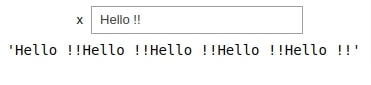
We can see from the above examples that based on the type of argument value passed to a parameter, it'll create a widget that is best suitable to represent that type of argument values. It created slider for float & integer, a checkbox for boolean, text box for a string.
We can even set interact as a decorator and it'll just work the same.
@interact(x=10)
def func1(x):
    return 10 * x
1.1.1 fixed() to Prevent Widgets from Getting Created
Sometimes we have functions with more than one parameter and we might want to explore just a few parameters fixing values of other parameters. We can do that using fixed() which will prevent interact() from creating a widget.
def func2(a,b,c):
    return (a*b) + c
interact(func2, a=5, b=5, c=fixed(10));
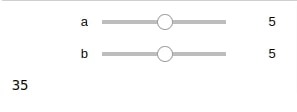
We can see that the slider is only produced for parameters a and b only.
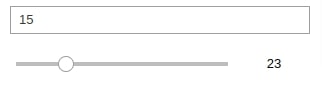
When we pass an integer value to a widget, it creates an integer slider in range(-value, +value *3) with a step value of 1. We can pass more than one value to a parameter in an interactive method to generate a widget according to our min, max values.
interact(func1, x=(1,5));
interact(func1, x=(1,5, 0.5));
1.1.2 Table of Function Parameters Mapping to Widgets
The below table gives an overview of different widget abbreviations (What kind of widget will be created based on default values?):
| Keyword argument | Widget |
| True or False | Checkbox |
| 'Hi there' | Text |
| value or (min,max) or (min,max,step) if integers are passed | IntSlider |
| value or (min,max) or (min,max,step) if floats are passed | FloatSlider |
| ['good','bad'] or [('one', 1), ('two', 2)] | Dropdown |
NOTE
Please make a note that a dropdown is used if a list or a list of tuples is given with discrete choices, and a slider is used if a tuple is given with a range of values.
interact(func1, x=['good ','bad ']);

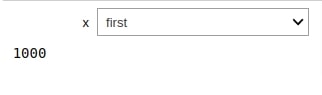
interact(func1, x=[('first', 100), ('second', 200)]);
1.3 Creating Widget using Objects
We can also create widget objects and pass them as a parameter to interact() function according to our needs. It'll prevent interact from taking decisions by itself and create an object which we might not need exactly. Let's start by creating a few widget objects.
The ipywidgets has list of objects for creating widgets like IntSlider, FloatSlider, Dropdown, Text, Checkbox, etc. We can pass description parameter with each widget as it'll create a label next to the widget. We can even pass LateX as a string to the description parameter and it'll create a formula as well.
The below link has a complete list of widgets available from ipywidgets.
import ipywidgets as widgets
1.3.1 Int Slider
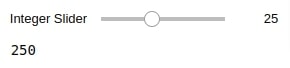
int_slider = widgets.IntSlider(min=10, max=50, value=25, step=2, description="Integer Slider")
int_slider

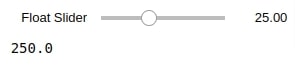
1.3.2 Float Slider
float_slider = widgets.FloatSlider(min=10.0, max=50.0, value=25.0, step=2.5, description="Float Slider")
float_slider

Each widget has a list of a parameter which can be accessed by following dot notation on it.
float_slider.value
float_slider.value = 28
We can access all available attributes of a widget by calling keys() method on it.
print(float_slider.keys)
1.3.3 Checkbox
widgets.Checkbox(value=True, description="Check")

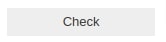
1.3.4 Button
widgets.Button(description="Check")
1.3.5 Dropdown
widgets.Dropdown(options=["A","B","C","D"], description="Select Right Option")

1.3.6 Text Area
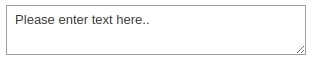
widgets.Textarea(value="Please enter text here..")
We can pass the above-created widgets as a parameter value to interact() and it'll use those widgets instead of creating widgets by itself. We can prevent the default behavior of interact() function this way and force it to use our designed widgets according to our needs.
interact(func1, x= widgets.IntSlider(min=10, max=50, value=25, step=2, description="Integer Slider"));
interact(func1, x= widgets.FloatSlider(min=10.0, max=50.0, value=25.0, step=2.5, description="Float Slider"));
1.4 Widgets using interactive()
The ipywidgets provides another function called interactive() to create the UI of widgets by passing a function to it. Unlike interact() function, interactive() returns objects which does not displays widgets automatically. We need to use IPython function display() to display widgets UI as well as the output of a function.
Apart from widgets, IPython lets us display contents of different types like audio, video, HTML, image, text, latex, etc in the Jupyter notebook. Do check the below link to explore it.
from IPython.display import display

def func3(a,b,c):
    display((a+b)^c)

w = interactive(func3,  a=widgets.IntSlider(min=10, max=50, value=25, step=2),
                        b=widgets.IntSlider(min=10, max=50, value=25, step=2),
                        c=widgets.IntSlider(min=10, max=50, value=25, step=2),
                       )
display(w)

print(type(w))
The interactive object is of type VBox which is a container object of ipywidgets. VBox can layout various widgets according to vertical layout. We can access its children as well as arguments.
w.children
w.kwargs
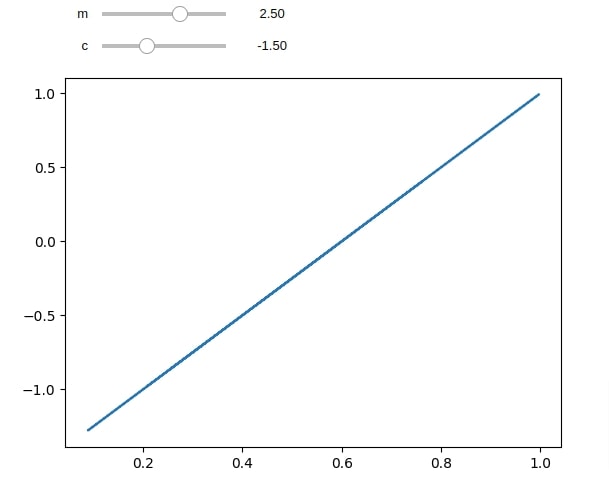
We'll below create a simple example that modifies matplotlib plot according to the values of widgets. We'll be plotting a simple line with the equation y=m*x + c. Our method will have parameters and c while x will be random numbers array. Check the below link for more examples of adding interactivity to matplotlib.
import matplotlib.pyplot as plt
import numpy as np

def plot(m,c):
    x = np.random.rand(10)
    y = m *x + c
    plt.plot(x,y)
    plt.show()
interactive(plot, m=(-10,10, 0.5), c=(-5,5,0.5))
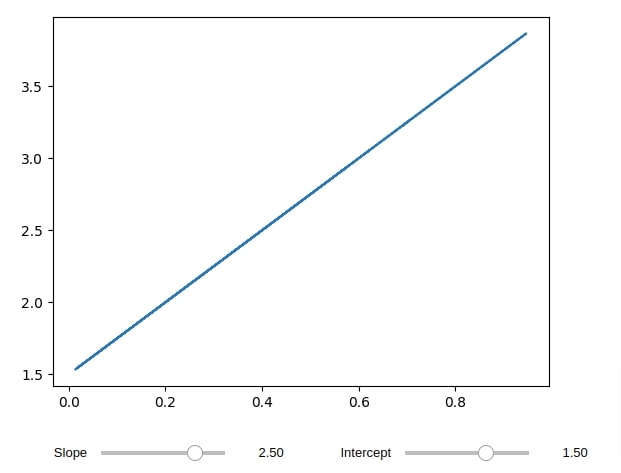
2. Organizing Layout with "interactive_output()" 
The interactive_output() function lets us layout widgets according to our need. The interactive_output() does not generate output UI but it lets us create UI, organize them in a box and pass them to it. This gives us more control over the layout of widgets.
m = widgets.FloatSlider(min=-5,max=5,step=0.5, description="Slope")
c = widgets.FloatSlider(min=-5,max=5,step=0.5, description="Intercept")

# An HBox lays out its children horizontally
ui = widgets.HBox([m, c])

def plot(m, c):
    x = np.random.rand(10)
    y = m *x + c
    plt.plot(x,y)
    plt.show()

out = widgets.interactive_output(plot, {'m': m, 'c': c})

display(out, ui)
NOTE
Please make a not above that UI generated by interact(), interactive(), interactive_output() immediately calls function and updates UI with new output after widget value is changed. This might not be ideal choice as sometimes function can be taking time to calculate its output which might hang UI in case of frequent widget value change.
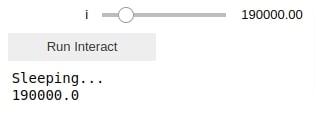
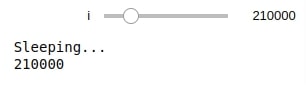
3. Preventing Fluctuations using "interact_manual()" and "continuous_update" 
We can use a function like interact_manual() for preventing UI updates after widget values are changed. The interact_manual() function provides us with button pressing which will run a function after the widget value changes with this new value. This will prevent UI from immediately updating and creating fluctuations.
def cpu_intensive_func(i):
    from time import sleep
    print('Sleeping...')
    sleep(1)
    print(i)

interact_manual(cpu_intensive_func,i=widgets.FloatSlider(min=1e4, max=1e6, step=1e4));
Another way to delay the update of UI after a change in widget value is by setting the continuous_update parameter to False. This will prevent a call to function as long as widget value is changing. Once a person leaves the mouse button, it'll then call a function to update UI with a new widget value.
interact(cpu_intensive_func,i=widgets.IntSlider(min=1e4, max=1e6, step=1e4, continuous_update=False));
4. Output Widget to Direct Results 
The Output widget can capture stdout, stderr, and output generated by widgets UI as well. We can use the Output widget with with statement as well to direct output to it.
out = widgets.Output(layout={"border":"1px solid green"})
out

with out:
    display(widgets.IntSlider())

out

out2 = widgets.Output(layout={"border":"1px solid black"})

with out2:
    print("Testing String Output")
Output of function can also be directed to Output widget using Output widgets as decorator.
out3 = widgets.Output(layout={"border":"1px solid red"})

@out3.capture()
def func1():
    print("Prints Inside Function")

func1()
We can also clear output widgets using clear_output() function on widget.
out3.clear_output()
The interactive_output() function also generates output widgets as a result. We can also organize layout by connecting output with widgets.
a = widgets.IntSlider(description='a')

def f(a):
    print("Square of a : %f is %f"%(a, a*a))

out = widgets.interactive_output(f, {'a': a})
out.layout = {"border":"1px solid red"}

widgets.VBox([a, out])

5. Linking Widgets 
We can link more widgets as well using the linking functionality of ipywidgets so that if the value of one of the widget changes then another one also changes and synchronize with it.
The ipywidgets let us link objects in 2 ways:
- Python Linking - link() and dlink() links widgets using jupyter python kernel
- Javascript Linking = jslink() and jsdlink() links widgets only using javascript and not jupyter kernel involvement.
x = widgets.IntText()
y = widgets.IntSlider()

display(x,y)

two_way_link_python = widgets.link((x, 'value'), (y, 'value'))
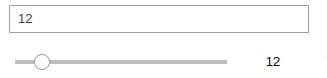
The above link created between x and y is two ways which means that changes in the value of x will change the value of y and vice versa. Please note that we are linking the value property of both objects.
Below we have created a link using only javascript. It'll not require jupyter kernel running to work whereas the above example based on python linking will require jupyter kernel running to see changes.
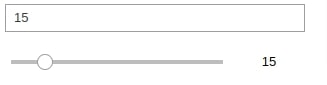
x = widgets.IntText()
y = widgets.IntSlider()

display(x,y)

two_way_link_javascript = widgets.jslink((x, 'value'), (y, 'value'))
Above both links are two ways. If you want to create only a one-way link than you can do it using dlink() and jsdlink().
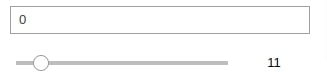
x = widgets.IntText()
y = widgets.IntSlider()

display(x,y)

one_way_link_python = widgets.dlink((x, 'value'), (y, 'value'))
x = widgets.IntText()
y = widgets.IntSlider()

display(x,y)

one_way_link_javascript = widgets.jsdlink((x, 'value'), (y, 'value'))
Above created both links are one direction from x to y only. It means that if we change the value of x then the value of y will change but value change in y will not reflect a change in x because it's one-way links.
We can unlink widgets as well if linking is not needed anymore. we can do it by calling unlink() method on the link object.
two_way_link_javascript.unlink()
two_way_link_python.unlink()
one_way_link_python.unlink()
one_way_link_javascript.unlink()
6. Widget Events 
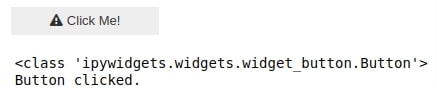
The ipywidgets also lets us execute callback functions based on events. Events can be considered as clicking Button, changing slider values, changing text area value, etc. we might want to execute a particular process when any kind of event is performed. The ipywidgets provide such functionality by calling observe() method and passing it the function which you want to execute as a callback event. we'll explain events with a few examples below. A button allows us to execute the same functionality by passing the method to its on_click() method.
The ipywidgets uses a Python library named traitlets that let us handle these events.
button = widgets.Button(description="Click Me!")
output = widgets.Output()

display(button, output)

@output.capture()
def on_button_clicked(b):
    print(type(b))
    print("Button clicked.")
    b.icon="warning"

button.on_click(on_button_clicked)
label = widgets.Label(value='Text Captured : ')
text = widgets.Text(description="Text")

def text_change(change):
    print(change)
    label.value = "Text Captured : "+change["new"]

text.observe(text_change, names='value')

display(label, text)

We are passing method named text_change to observe() method of text widget so that any change in text value calls text_change() method. We are also passing names=value which will inform observe() that we need to capture changes in value property of Text widget. We are also printing what observe is passing to method when values in text widget changes. Please take a look that it passes the old and new value of widget as state capture for that change.
caption = widgets.Label(value='The values of slider is : ')
slider = widgets.IntSlider(min=-5, max=5, value=0, description='Slider')

def handle_slider_change(change):
    print(change)
    caption.value = 'The values of slider is : ' + str(change.new)

slider.observe(handle_slider_change, names='value')

display(caption, slider)

NOTE
Please make a note that observe() gives us higher level of configuration compared to link(). If we want to only change value of widget based on another widget change then link() is ideal but if you want to do some kind of calculations with every change in widget value then observe() is ideal choice for you.
7. Widget Layout and Styling 
We'll now explain various layouts and styling available with ipywidgets. Various layout methods will let us organize a list of widgets according to different ways whereas the styling attribute of a widget will let us take care of the styling of widgets like height, width, color, button icon, etc.
7.1 Individual Widget Layout using "layout" attribute
Each widget exposes layout attribute which can be given information about its layout. CSS properties quite commonly used in styling and layout can be passed to the layout attribute.
b = widgets.Button(description='Sample Button',
           layout=widgets.Layout(width='30%', height='50px', border='5px dashed blue'))
b

The above button takes 30% of space of the page and 50px as height.
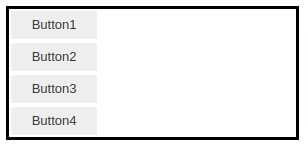
7.2 "VBox" and "HBox" for arranging widgets Vertically and Horizontally
We can utilize VBox and HBox layout objects to layout objects as vertical and horizontal respectively. Below we are creating 4 buttons and all have a width of 30%.
b1 = widgets.Button(description="Button1", layout=widgets.Layout(width="30%"))
b2 = widgets.Button(description="Button2", layout=widgets.Layout(width="30%"))
b3 = widgets.Button(description="Button3", layout=widgets.Layout(width="30%"))
b4 = widgets.Button(description="Button4", layout=widgets.Layout(width="30%"))

h1 = widgets.HBox(children=[b1,b2])
h1

h2 = widgets.HBox(children=[b3,b4])
h2

widgets.VBox(children=[h1,h2])

7.3 "Box" Layout
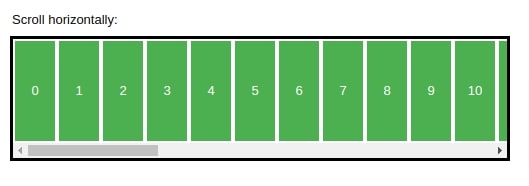
We can layout elements by simply calling Box layout object. It'll lay out all elements next to each other in a row. We can force layout based on passing size information as layout to Box objects to enforce our layout. We are creating Box which takes 30% of available page space and organized four buttons into it as a column. We can see that buttons are taking 30% width of Box layout object which itself takes 30% of the whole page.
layout = widgets.Layout(display='flex',
         flex_flow='column',
         border='solid',
         width='30%')

widgets.Box(children=[b1,b2,b3,b4], layout=layout)
layout = widgets.Layout(display='flex',
         flex_flow='row',
         border='solid',
         width='30%')

widgets.Box(children=[b1,b2,b3,b4], layout=layout)

item_layout = widgets.Layout(height='100px', min_width='40px')

items = [widgets.Button(layout=item_layout, description=str(i), button_style='success') for i in range(40)]

box_layout = widgets.Layout(overflow_x='scroll',
                    border='3px solid black',
                    width='500px',
                    height='',
                    flex_flow='row',
                    display='flex')
carousel = widgets.Box(children=items, layout=box_layout)
widgets.VBox([widgets.Label('Scroll horizontally:'), carousel])
7.4 GridBox for layout
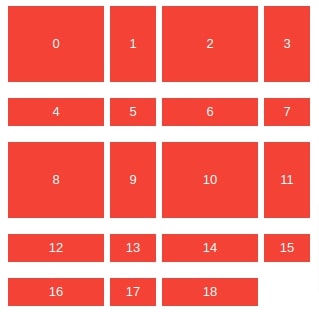
The GridBox is another object provided by ipywidgets which lets us organize things as grids. Grids are like a table with a specified number of rows and columns. We can pass a list of objects to GridBox and then force layout further using Layout object. We need to pass values of parameters grid_template_columns, grid_template_rows and grid_gap for creation of grids. The parameter grid_template_columns helps us specify what should be sizes of various columns whereas parameter grid_template_rows helps us specify sizes of rows in the grid. The parameter grid_gap has 2 values representing the gap between row boxes and column boxes respectively.
widgets.GridBox(children=[widgets.Button(description=str(i), layout=widgets.Layout(width='auto', height='auto'),
                         button_style='danger') for i in range(19)],

                layout=widgets.Layout(
                                    width='60%',
                                    grid_template_columns='100px 50px 100px 50px',
                                    grid_template_rows='80px auto 80px',
                                    grid_gap='12px 2px')
       )
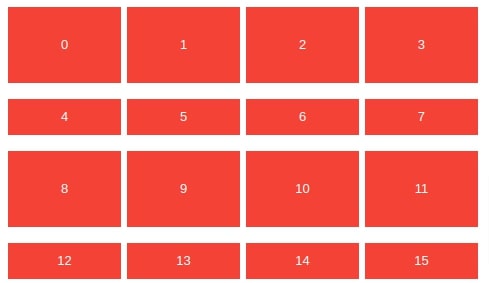
widgets.GridBox(children=[widgets.Button(description=str(i), layout=widgets.Layout(width='auto', height='auto'),
                         button_style='danger') for i in range(16)],

        layout=widgets.Layout(
                            width='60%',
                            grid_template_columns='20% 20% 20% 20%',
                            grid_template_rows='80px 40px 80px 40px',
                            grid_gap='12px 2px')
       )
7.5 Exposed CSS properties Related to Layout and Styling
Below is a list of common CSS properties that are available as parameter names in widget objects.
Sizes
- height
- width
- max_height
- max_width
- min_height
- min_width
Display
- visibility
- display
- overflow
Box model
- border
- margin
- padding
Positioning
- top
- left
- bottom
- right
Flexbox
- order
- flex_flow
- align_items
- flex
- align_self
- align_content
- justify_content
- justify_items
Grid layout
- grid_auto_columns
- grid_auto_flow
- grid_auto_rows
- grid_gap
- grid_template_rows
- grid_template_columns
- grid_template_areas
- grid_row
- grid_column
- grid_area
Please feel free to explore various properties of ipywidgets widget objects to get to know about layout and styling.
7.6 TwoByTwoLayout Layout Object
Another option provided by ipywidgets to organize widgets is TwoByTwoLayout. It gives us four places to put objects and if we do not provide a widget for any place then it keeps that place empty. We are organizing 4 buttons using this layout below. Please make a note that we have created a button with height and width as auto which stretches elements in available space.
b1 = widgets.Button(description="Button1",
                    layout=widgets.Layout(width="auto", height="auto"), button_style="success")
b2 = widgets.Button(description="Button2",
                    layout=widgets.Layout(width="auto", height="auto"), button_style="primary")
b3 = widgets.Button(description="Button3",
                    layout=widgets.Layout(width="auto", height="auto"), button_style="info")
b4 = widgets.Button(description="Button4",
                    layout=widgets.Layout(width="auto", height="auto"), button_style="warning")

widgets.TwoByTwoLayout(top_left=b1,
                       top_right=b2,
                       bottom_left=b3,
                       bottom_right=b4)

If we don't provide any element then it'll stretch other elements to take its space.
widgets.TwoByTwoLayout(top_left=b1,
                       top_right=b2,
                       bottom_right=b4)

We can prevent automatic stretching of the widget by passing False to merge parameter.
widgets.TwoByTwoLayout(top_left=b1,
                       top_right=b2,
                       bottom_right=b4,
                       merge=False
                      )

7.7 AppLayout
AppLayout is another layout strategy that lets us organize widgets like a web app or desktop application layout.
header = widgets.Button(description="Header",
                    layout=widgets.Layout(width="auto", height="auto"), button_style="success")
footer = widgets.Button(description="Footer",
                    layout=widgets.Layout(width="auto", height="auto"), button_style="primary")
left = widgets.Button(description="Left",
                    layout=widgets.Layout(width="auto", height="auto"), button_style="info")
right = widgets.Button(description="Right",
                    layout=widgets.Layout(width="auto", height="auto"), button_style="warning")
center = widgets.Button(description="Center",
                    layout=widgets.Layout(width="auto", height="auto"), button_style="danger")
widgets.AppLayout(header=header,
          left_sidebar=left,
          center=center,
          right_sidebar=right,
          footer=footer)

It'll merge widgets if widget for any place is not provided
widgets.AppLayout(header=header,
          left_sidebar=left,
          center=center,
          footer=footer)

widgets.AppLayout(header=header,
          left_sidebar=left,
          center=center,
          right_sidebar=right,)

widgets.AppLayout(header=header,
          left_sidebar=left,
          right_sidebar=right,
          footer=footer)

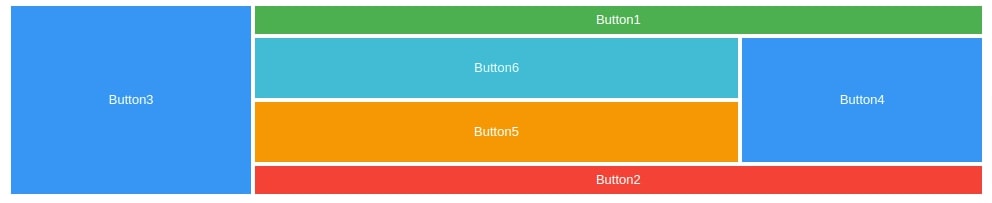
7.8 GridspecLayout
It's another way of laying out widgets which is the same as matplotlib gridspec. It lets us define a grid with a number of rows and columns. We can then put widgets by selecting a single row & column or span them to more rows and columns as well. We'll explain it with a few examples below.
grid = widgets.GridspecLayout(5, 4)

for i in range(5):
    for j in range(4):
        grid[i, j] = widgets.Button(description="[%d, %d]"%(i,j), button_style="primary")
grid

NOTE
Please make a note that if we don't provide layout to Button objects with layout of auto for width and height then it won't stretch for whole size of parent widget.
We can span widgets to several rows and columns as well.
grid = widgets.GridspecLayout(6, 4)

grid[0,1:] = widgets.Button(description="Button1", layout=widgets.Layout(height="auto", width="auto"), button_style="success")

grid[-1,1:] = widgets.Button(description="Button2", layout=widgets.Layout(height="auto", width="auto"), button_style="danger")

grid[:,0] = widgets.Button(description="Button3", layout=widgets.Layout(height="auto", width="auto"), button_style="primary")

grid[1:-1,-1] = widgets.Button(description="Button4", layout=widgets.Layout(height="auto", width="auto"), button_style="primary")

grid[3:-1,1:-1] = widgets.Button(description="Button5", layout=widgets.Layout(height="auto", width="auto"), button_style="warning")

grid[1:3,1:-1] = widgets.Button(description="Button6", layout=widgets.Layout(height="auto", width="auto"), button_style="info")

grid
7.9 "style" attribute for CSS Styling
We can pass CSS styles to the style attribute of a widget and it'll apply that CSS style to a widget. We already applied button_style attribute in the above examples. We can check a list of available style attributes in a widget by calling keys on its style attribute.
b = widgets.Button(description='Stylish Button')
b.style.button_color = 'tomato'
b
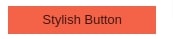
b.style.keys
slider= widgets.FloatSlider(description="Stylish Slider")
slider.style.handle_color="lawngreen"
slider

slider.style.keys
progress_bar = widgets.FloatProgress(value=3, min=0, max=10)
progress_bar.style.bar_color = "purple"
progress_bar

progress_bar.style.keys
This ends our tutorial giving an introduction on how to use interactive widgets in a Jupyter notebook using ipywidgets. Please feel free to let us know your views. We have tried to cover as many topics as possible but the library is quite big and needs further exploration to better understand things further. We'll be creating more tutorials on using ipywidgets with other python libraries.
References
- The Jupyter Interactive Widget Ecosystem | Scipy 2019 Tutorial | Breddels, Craig, Grout, Renou
- Simple 2D Animation in Python using bqplot and ipywidgets
- Interactive Charts using bqplot and ipywidgets
- Tree Widget in Jupyter Notebook
- Interactive Charts using matplotlib and ipywidgets
- Interactive Spreadsheet in Jupyter Notebook using ipysheet
 Sunny Solanki
Sunny Solanki
Intro: Software Developer | Youtuber | Bonsai Enthusiast
About: Sunny Solanki holds a bachelor's degree in Information Technology (2006-2010) from L.D. College of Engineering. Post completion of his graduation, he has 8.5+ years of experience (2011-2019) in the IT Industry (TCS). His IT experience involves working on Python & Java Projects with US/Canada banking clients. Since 2020, he’s primarily concentrating on growing CoderzColumn.
His main areas of interest are AI, Machine Learning, Data Visualization, and Concurrent Programming. He has good hands-on with Python and its ecosystem libraries.
Apart from his tech life, he prefers reading biographies and autobiographies. And yes, he spends his leisure time taking care of his plants and a few pre-Bonsai trees.
Contact: sunny.2309@yahoo.in


![YouTube Subscribe]() Comfortable Learning through Video Tutorials?
Comfortable Learning through Video Tutorials?
If you are more comfortable learning through video tutorials then we would recommend that you subscribe to our YouTube channel.
![Need Help]() Stuck Somewhere? Need Help with Coding? Have Doubts About the Topic/Code?
Stuck Somewhere? Need Help with Coding? Have Doubts About the Topic/Code?
 Stuck Somewhere? Need Help with Coding? Have Doubts About the Topic/Code?
When going through coding examples, it's quite common to have doubts and errors.
If you have doubts about some code examples or are stuck somewhere when trying our code, send us an email at coderzcolumn07@gmail.com. We'll help you or point you in the direction where you can find a solution to your problem.
You can even send us a mail if you are trying something new and need guidance regarding coding. We'll try to respond as soon as possible.
![Share Views]() Want to Share Your Views? Have Any Suggestions?
Want to Share Your Views? Have Any Suggestions?
 Want to Share Your Views? Have Any Suggestions?
If you want to
- provide some suggestions on topic
- share your views
- include some details in tutorial
- suggest some new topics on which we should create tutorials/blogs
 ipywidgets, notebook