Tree Widget in Jupyter Notebook using ipytree
ipytree provides easy to use interface to visualize tree-like data structure. We can also link it with ipywidgets widgets with ipytree tree widget. We'll try to explore it further in this tutorial.
Installation
conda install -c conda-forge ipytree
Basics
We'll start creating a basic tree and displaying it. We'll explain the basic process to add nodes and remove them below.
from ipytree import Tree, Node
tree=Tree()

tree.add_node(Node("Node1"))
tree.add_node(Node("Node2"))
tree.add_node(Node("Node3"))

tree

tree2  = Tree()

node1 = Node("Node1", disabled=True)
tree2.add_node(node1)
tree2.add_node(Node("Node2"))
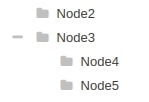
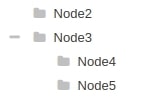
tree2.add_node(Node("Node3", [Node("Node4"), Node("Node5")]))

tree2

tree2.nodes
tree2.remove_node(node1)

tree2

tree2.selected_nodes
Linking Widgets with Tree Nodes
We can also link tree Node with ipywidget widgets as well. We'll explain below with simple example about how to link Node with Text widget.
from ipywidgets import Text, jslink, link, HBox, VBox
node1 = Node("Node1")
node2 = Node("Node2")

text1 = Text(node1.name)
text2 = Text(node2.name)

jslink((node1, "name"), (text1, "value"))
jslink((node2, "name"), (text2, "value"))

tree3 = Tree()
tree3.add_node(node1)
tree3.add_node(node2)
tree3.add_node(Node("Node3"))

HBox(children=[ VBox(children = [text1, text2]),tree3])

Handling Events
We can also catch events on each node when node is clicked. We have same observe() which was available with ipywidgets widgets as well to capture events and then perform necessary actions based on click. We are explaining below it's use with simple example which change name of node when clicked on it and when unselected.
tree4  = Tree()

node1 = Node("Node1")

tree4.add_node(node1)
tree4.add_node(Node("Node2"))
tree4.add_node(Node("Node3", [Node("Node4"), Node("Node5")]))


def handle_click(event):
    event['owner'].name = 'Selected' if event['new'] else 'Not Selected'

node1.observe(handle_click, 'selected')
node1.selected = True

tree4

Node Styling
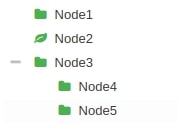
We have attributes available to style nodes as well according to our need. We can change node color using icon_style attribute and change node icon using icon attribute.
tree5 = Tree()

tree5.add_node(Node("root", icon="archive", icon_style="warning"))
tree5.add_node(Node("media", icon="info", icon_style="info"))
tree5.add_node(Node("local", icon="warning", icon_style="success"))
tree5.add_node(Node("home", [Node("Desktop", [Node("File1", icon="copy", icon_style="warning"), Node("File2", icon="plus", icon_style="success")], icon="save", icon_style="info"), Node("Documents", icon="cut", icon_style="danger")], icon="home", icon_style="success"))

tree5

tree6  = Tree()

node1 = Node("Node1", icon_style="success")

tree6.add_node(node1)
tree6.add_node(Node("Node2", icon_style="success", icon="leaf"))
tree6.add_node(Node("Node3", [Node("Node4",icon_style="success"), Node("Node5",icon_style="success")], icon_style="success"))


def handle_click(event):
    event['owner'].icon = "info"  if event['new'] else 'warning'

node1.observe(handle_click, 'selected')

tree6

This concludes our small tutorial on Tree widget available to use in jupyter notebook using ipytree. Please feel free to let us know your views.
References
 Sunny Solanki
![YouTube Subscribe]() Comfortable Learning through Video Tutorials?
Comfortable Learning through Video Tutorials?
If you are more comfortable learning through video tutorials then we would recommend that you subscribe to our YouTube channel.
![Need Help]() Stuck Somewhere? Need Help with Coding? Have Doubts About the Topic/Code?
Stuck Somewhere? Need Help with Coding? Have Doubts About the Topic/Code?
When going through coding examples, it's quite common to have doubts and errors.
If you have doubts about some code examples or are stuck somewhere when trying our code, send us an email at coderzcolumn07@gmail.com. We'll help you or point you in the direction where you can find a solution to your problem.
You can even send us a mail if you are trying something new and need guidance regarding coding. We'll try to respond as soon as possible.
![Share Views]() Want to Share Your Views? Have Any Suggestions?
Want to Share Your Views? Have Any Suggestions?
If you want to
- provide some suggestions on topic
- share your views
- include some details in tutorial
- suggest some new topics on which we should create tutorials/blogs


 Comfortable Learning through Video Tutorials?
 Stuck Somewhere? Need Help with Coding? Have Doubts About the Topic/Code?
 Want to Share Your Views? Have Any Suggestions?
 ipytree, ipywidgets