interpret-text - Interpret NLP Models and Their Predictions
The interpret-text is an open-source library from the Microsoft research team which helps developers with an interactive dashboard explaining their black box model's prediction. The interpret-text is built on top of another open-source library from Microsoft named interpret-ml which is used to explain any machine learning model's predictions whereas interpret-text is designed specifically to explain text data predictions. The interpret-text like interpret-ml is currently in an alpha stage of development and is actively getting developed. The interpret-text currently only works for classification models. The interpret-text lets developers analyze the performance of different models fast by freeing the developer from coding about interpreting results by providing interactive results about predictions. It gives detailed insights about which part of text contributed to predicting a particular label by showing weights hence giving confidence to the developer. The easy and fast interpretation also encourages developers in trying different models/methods as well as gives details insights about model performance and reliability which can be a deciding factor in the final decision. As a part of this tutorial, we'll explain how we can use interpret-text for simple machine learning models available from scikit-learn to interpret their results on individual predictions. We'll be publishing tutorials in the future about complicated deep learning models generated from PyTorch and TensorFlow to explain their predictions.
The interpret-text has three main classes that currently provide explainer instance which will be used to generate an explanation for predictions.
- interpret_text.classical.ClassicalTextExplainer - It supports sklearn linear and tree-based models. It even can handle text preprocessing, encoding, etc.
- interpret_text.unified_information.UnifiedInformationExplainer - It supports Pytorch models including BERT.
- interpret_text.introspective_rationale.IntrospectiveRationaleExplainer - It supports Pytorch models including BIRT and RNNs.
We'll be primarily concentrating on ClassicalTextExplainer as a part of this tutorial as the main aim of this tutorial is to get people started using interpret-text.
The process of generating an explanation using interpret-text is like many other interpretation libraries which starts with the creation of an explainer object and then using that object to create an explanation for individual samples. The same approach is followed by interpret-ml as well.
If you are interested in learning about interpret-ml then please feel free to check our tutorial on the same (link is given in References section at last as well with other useful tutorials on the same topic).
Please make a note that as interpret-text is currently in alpha release, all modules are kept in a module named experimental.
We'll start by importing the necessary libraries which will be used through the tutorial.
import pandas as pd
import numpy as np

import warnings
warnings.filterwarnings("ignore")

import interpret_text
Load Dataset
The dataset that we'll use as a part of this tutorial is a UCI mail dataset which has around 5k+ emails and their labels (spam/ham). We'll be training different models on this dataset by transforming data to predict whether mail is spam or not.
We'll start by downloading and unzipping the dataset. We have then included simple logic that loads individual mail and its label.
!wget https://archive.ics.uci.edu/ml/machine-learning-databases/00228/smsspamcollection.zip
!unzip smsspamcollection.zip
import collections

with open('SMSSpamCollection') as f:
    data = [line.strip().split('\t') for line in f.readlines()]

y, text = zip(*data)

collections.Counter(y)
Example 1: Using Default Model Available From ClassicalTextExplainer Explainer.
As a part of our first example, we'll not be training any model of our own but we'll use the default model which ClassicalTextExplainer uses if we don't provide is model upfront.
In the beginning, we have divided data into train and text sets by using sklearn data splitting utility.
from sklearn.model_selection import train_test_split

text_train, text_test, y_train, y_test = train_test_split(text, y,
                                                          train_size=0.8,
                                                          stratify=y,
                                                          random_state=123)
ClassicalTextExplainer
Below is a list of important parameters of ClassicalTextExplainer which can help us to use it according to our needs.
- preprocessor - It accepts preprocessor which tokenizes and transforms data from text to float. Currently, it only accepts
BOWEncoderavailable from theinterpret-text.classicalmodule. - model - It accepts sklearn linear or tree-based models.
- hyperparam_range - It accepts dictionary of model parameters. It'll be passed to
GridSearchCVfor trying various parameters on models. - is_trained - It accepts boolean specifying whether the model passed to the
modelparameter is trained or not.
We have below created a ClassicalTextExplainer instance without giving any parameter which will use LogisticRegression from sklearn as a classifier. We have then called the fit() method passing it
from interpret_text.experimental.classical import ClassicalTextExplainer, BOWEncoder

explainer = ClassicalTextExplainer()
explainer
Below, we have created a sklearn LabelEncoder instance which will be used to transform a list of labels (spam/ham) from string to a list of integers by assigning integers to each label (0-ham, 1-spam). This is needed by ClassicalTextExplainer as it does not take as an input list of string labels.
from sklearn.preprocessing import LabelEncoder

label_encoder = LabelEncoder()
y_train_encoded = label_encoder.fit_transform(y_train)
y_test_encoded = label_encoder.transform(y_test)
We have now fitted explainer instance with train data. It returns classifier instance and best params after trying a few parameter sequences by itself. We can see from the below results that it returns the sklearn Pipeline instance which has two components. The first estimator is interpret-ml internal encoded which transforms text data to floats and the second estimator is sklearn LogisticRegression which will be fitted on train data.
classifier, best_params = explainer.fit(text_train, y_train_encoded)

print(classifier)
print(best_params)
Below we have assigned our label encoder created earlier to the labelEncoder property of preprocessor of explainer. This is needed in the future by explainer instance hence added from future failures.
explainer.preprocessor.labelEncoder = label_encoder
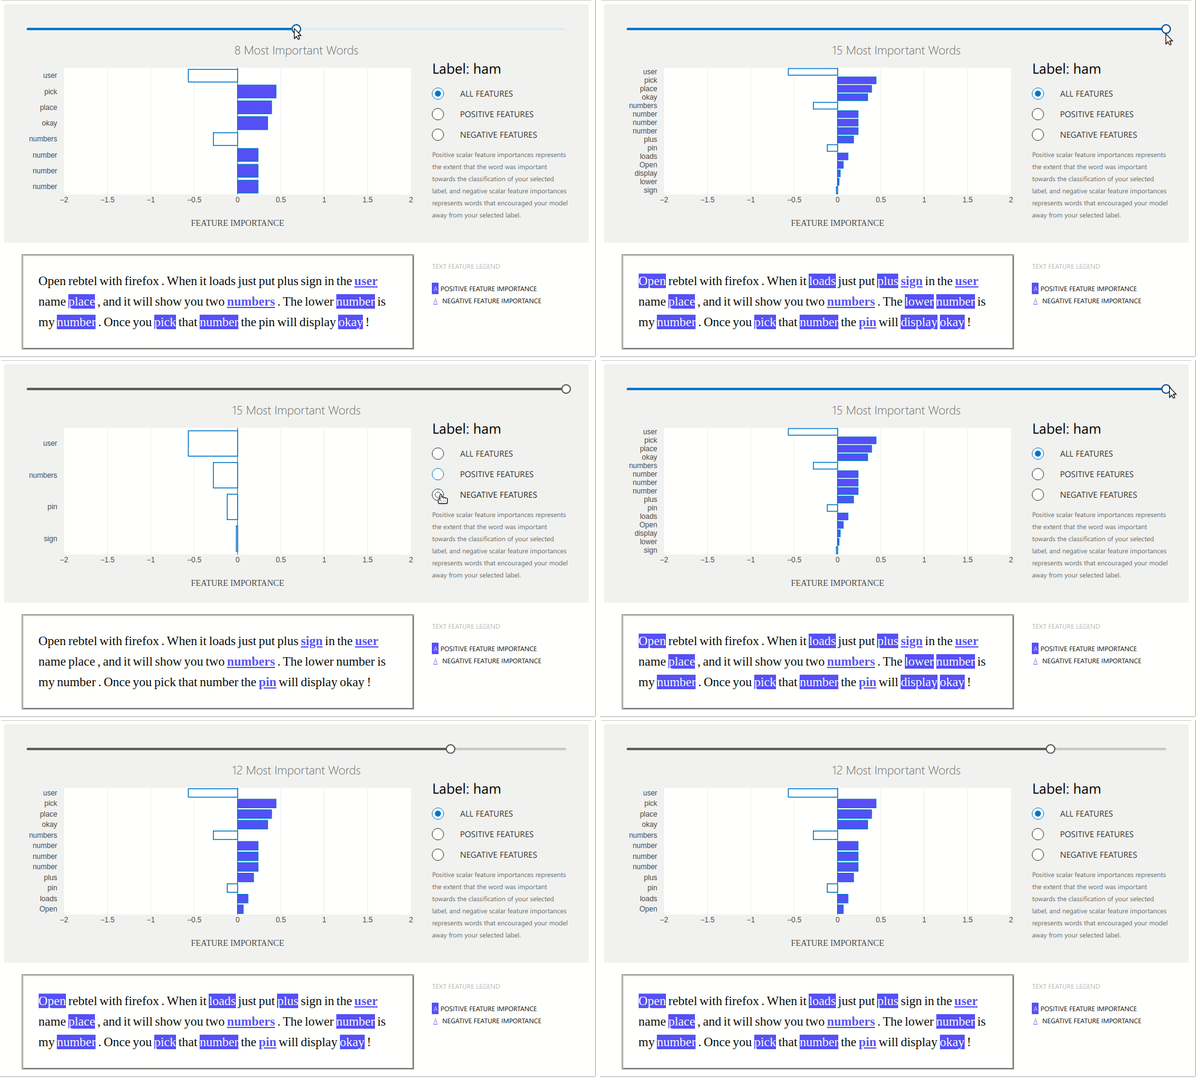
Below we have taken a random text sample from the test dataset. We have then called the explain_local() method on our explainer instance passing it actual text sample and predicted label for that sample. It'll then generate an explanation instance which will be used to explain that prediction of the model.
import random

idx = random.randint(1, len(text_test))

prediction = label_encoder.classes_[classifier.predict(text_test[idx])[0]]

print("Selected Sample     : ",text_test[idx])
print("\nActual Target Value : ", y_test[idx])
print("Prediction          : ", prediction)

explanation = explainer.explain_local(text_test[idx], prediction)
explanation
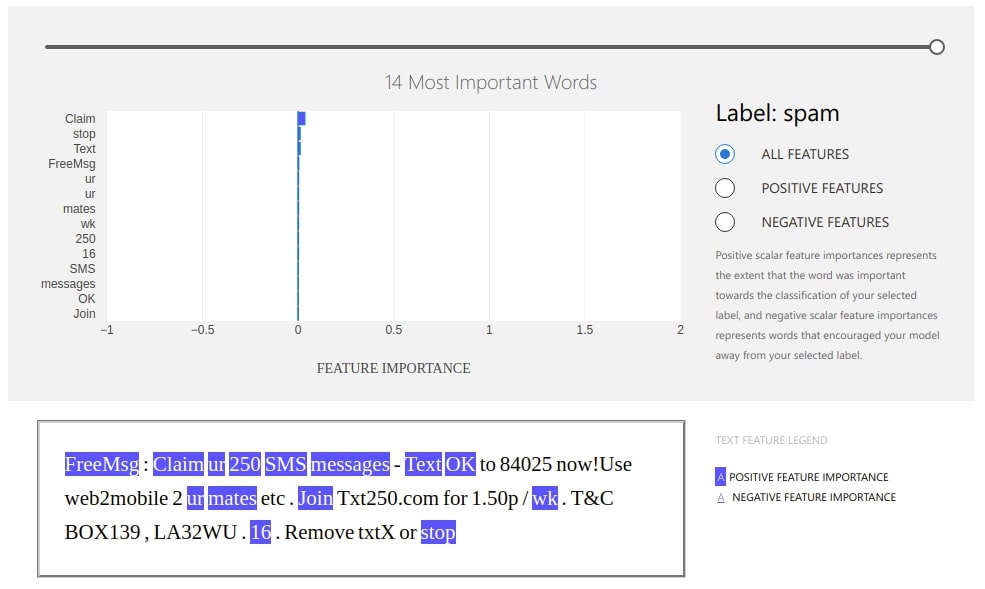
The ExplanationDashboard class from the widget module accepts the explanation instance created from the previous step and generates a dashboard out of it explaining prediction.
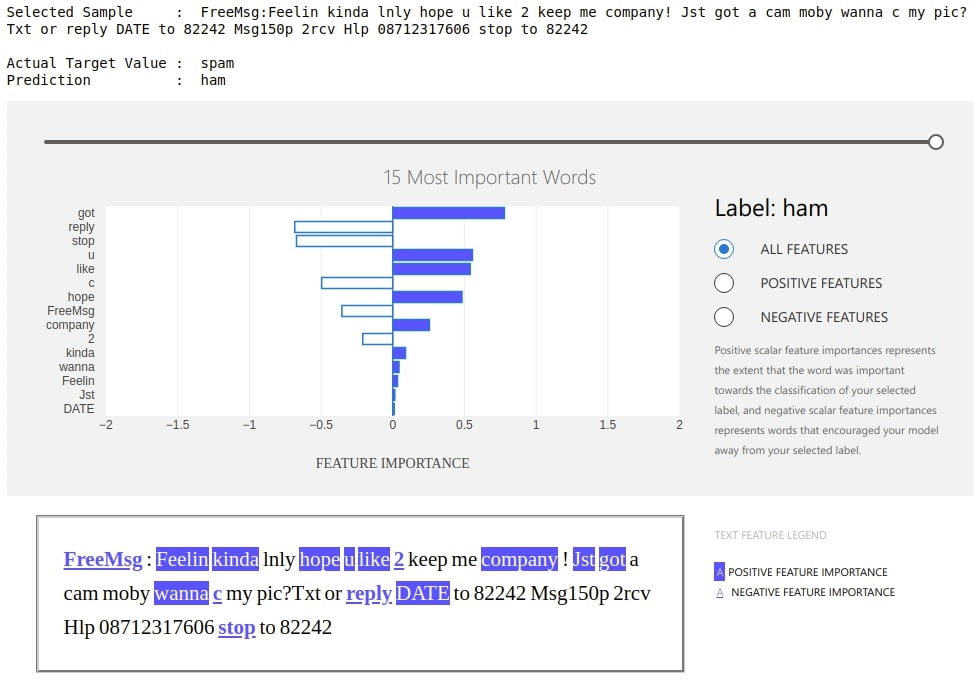
Below we can see that dashboard is explaining prediction with weights contributed by words of that text. It also shows which labels contributed positively and which contributed negatively. It even shows original text with words highlighted according to their contribution. We can even change the slider showing the number of important words that we want to see.
from interpret_text.experimental.widget import ExplanationDashboard

ExplanationDashboard(explanation);
Below we have created a dashboard with another example where we are showing prediction which went wrong by our model. This can give us even more insights.
preds = classifier.predict(text_test)
wrong_pred_idx = np.argwhere(preds!=y_test_encoded).flatten()

idx = random.choice(wrong_pred_idx)

prediction = label_encoder.classes_[classifier.predict(text_test[idx])[0]]

print("Selected Sample     : ",text_test[idx])
print("\nActual Target Value : ", y_test[idx])
print("Prediction          : ", prediction)

explanation = explainer.explain_local(text_test[idx], prediction)

ExplanationDashboard(explanation);
Example 2: Generating Dashboard From Tree-based Trained Model
As a part of our second example, we'll explain how to generate an explanation using a tree-based model which we have already trained using sklearn. We have first transformed text data into the floating matrix using the Tf-IDF vectorizer. We have then divided data into train and test sets. After dividing data, we have fitted train data to random forest classier and printed a few classification metrics on test data.
If you do not have a background on feature extraction from text data that we have performed below and is interested in learning about it then please feel free to check our tutorial on the same.
from sklearn.model_selection import train_test_split
from sklearn.feature_extraction.text import TfidfVectorizer
from sklearn.ensemble import RandomForestClassifier, GradientBoostingClassifier
from sklearn.metrics import confusion_matrix, classification_report


tfidf_vectorizer = TfidfVectorizer(analyzer="word", stop_words='english')
transformed_text = tfidf_vectorizer.fit_transform(text)

text_train, text_test, y_train, y_test = train_test_split(text, y,
                                                          random_state=123,
                                                          train_size=0.80,
                                                          stratify=y,
                                                          )

X_train_tfidf, X_test_tfidf, y_train, y_test = train_test_split(transformed_text, y,
                                                                random_state=123,
                                                                train_size=0.80,
                                                                stratify=y,
                                                                )


print("Train/Test Vector Size : ", X_train_tfidf.shape, X_test_tfidf.shape)

rf_classif = RandomForestClassifier()

rf_classif.fit(X_train_tfidf, y_train)

print("Test  Accuracy : %.2f"%rf_classif.score(X_test_tfidf, y_test))
print("Train Accuracy : %.2f"%rf_classif.score(X_train_tfidf, y_train))
print()
print("Confusion Matrix : ")
print(confusion_matrix(y_test, rf_classif.predict(X_test_tfidf)))
print()
print("Classification Report")
print(classification_report(y_test, rf_classif.predict(X_test_tfidf)))
BOWEncoder
Below we have created BOWEncoder which will be used to encode text data.
from interpret_text.experimental.classical import BOWEncoder

bow_encoder = BOWEncoder()
bow_encoder
Below we have created LabelEncoder like earlier. We have also assigned our encoder and TF-IDF vectorizer instances to bow encoder properties.
from sklearn.preprocessing import LabelEncoder

label_encoder = LabelEncoder()
y_encoded = label_encoder.fit_transform(y)

bow_encoder.labelEncoder = label_encoder
bow_encoder.vectorizer = tfidf_vectorizer
We have now created our instance of ClassicalTextExplainer using bow encoder as a preprocessor and random forest classifier as a model. We have also set is_trained to False because our model is already trained and we don't need to train again.
from interpret_text.experimental.classical import ClassicalTextExplainer

explainer = ClassicalTextExplainer(preprocessor=bow_encoder, model=rf_classif, is_trained=True)
explainer
Below we have taken a random sample from test data and generated an explanation for it using the explain_local() method.
import random

idx = random.randint(1, len(text_test))

vectorized_doc = tfidf_vectorizer.transform([text_test[idx]])
prediction = rf_classif.predict(vectorized_doc)[0]

print("Selected Sample     : ",text_test[idx])
print("\nActual Target Value : ", y_test[idx])
print("Prediction          : ", prediction)

explanation = explainer.explain_local(text_test[idx], prediction)

explanation
from interpret_text.experimental.widget import ExplanationDashboard

ExplanationDashboard(explanation);
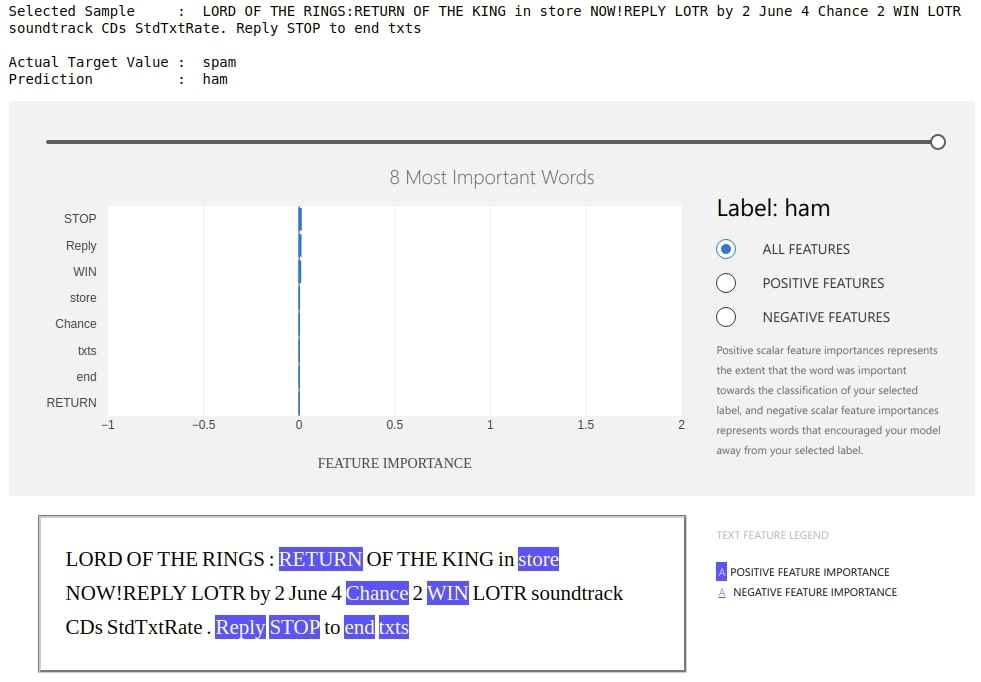
Below is another example of an explanation where our model is making mistake.
preds = rf_classif.predict(X_test_tfidf)
wrong_pred_idx = np.argwhere(preds!=y_test).flatten()

idx = random.choice(wrong_pred_idx)

prediction = rf_classif.predict(tfidf_vectorizer.transform([text_test[idx]]))[0]

print("Selected Sample     : ",text_test[idx])
print("\nActual Target Value : ", y_test[idx])
print("Prediction          : ", prediction)

explanation = explainer.explain_local(text_test[idx], prediction)

ExplanationDashboard(explanation);
Example 3: Generating Dashboard from Tree-based Untrained Model with Hyperparameter Tunning.
As a part of our third example, we'll explain how we can generate explanations from the untrained tree-based model. The majority of steps will be almost the same as the previous example with one minor change.
We'll start by creating a TF-IDF vectorizer and transform text data to float. We have then divided data into train and test sets.
tfidf_vectorizer = TfidfVectorizer(analyzer="word", stop_words='english')
transformed_text = tfidf_vectorizer.fit_transform(text)

text_train, text_test, y_train, y_test = train_test_split(text, y,
                                                          random_state=123,
                                                          train_size=0.80,
                                                          stratify=y,
                                                          )

X_train_tfidf, X_test_tfidf, y_train, y_test = train_test_split(transformed_text, y,
                                                                random_state=123,
                                                                train_size=0.80,
                                                                stratify=y,
                                                                )
Below we have created a bow encoder as earlier and have set label encoder and TF-IDF vectorizer on it.
from interpret_text.experimental.classical import BOWEncoder
from sklearn.preprocessing import LabelEncoder

bow_encoder = BOWEncoder()


label_encoder = LabelEncoder()
y_encoded = label_encoder.fit_transform(y)

bow_encoder.labelEncoder = label_encoder
bow_encoder.vectorizer = tfidf_vectorizer
As a part of this example, we have used the GradientBoostingClassifier as our model. We have also passed a dictionary with a list of max depths that we want to try to hyperparam_range parameter of ClassicalTextExplainer. We have also set is_trained to False this time because we'll be training it next.
from interpret_text.experimental.classical import ClassicalTextExplainer
from sklearn.ensemble import GradientBoostingClassifier

explainer = ClassicalTextExplainer(preprocessor=bow_encoder,
                                   model=GradientBoostingClassifier(),
                                   hyperparam_range={"max_depth":[3,5,8,10,12,15]},
                                   is_trained=False)
explainer
As our model is untrained, we have to call the fit() method on explainer instance to train it with train data. As earlier, it'll return the classifier and best params.
classifier, best_params = explainer.fit(text_train, y_train)

print(classifier)
print(best_params)
We have now generated a dashboard from a random test sample below. The code is almost the same as previous examples.
from interpret_text.experimental.widget import ExplanationDashboard
import random

idx = random.randint(1, len(text_test))

prediction = classifier.predict(text_test[idx])[0]

print("Selected Sample     : ",text_test[idx])
print("\nActual Target Value : ", y_test[idx])
print("Prediction          : ", prediction)

explanation = explainer.explain_local(text_test[idx], prediction)

ExplanationDashboard(explanation);
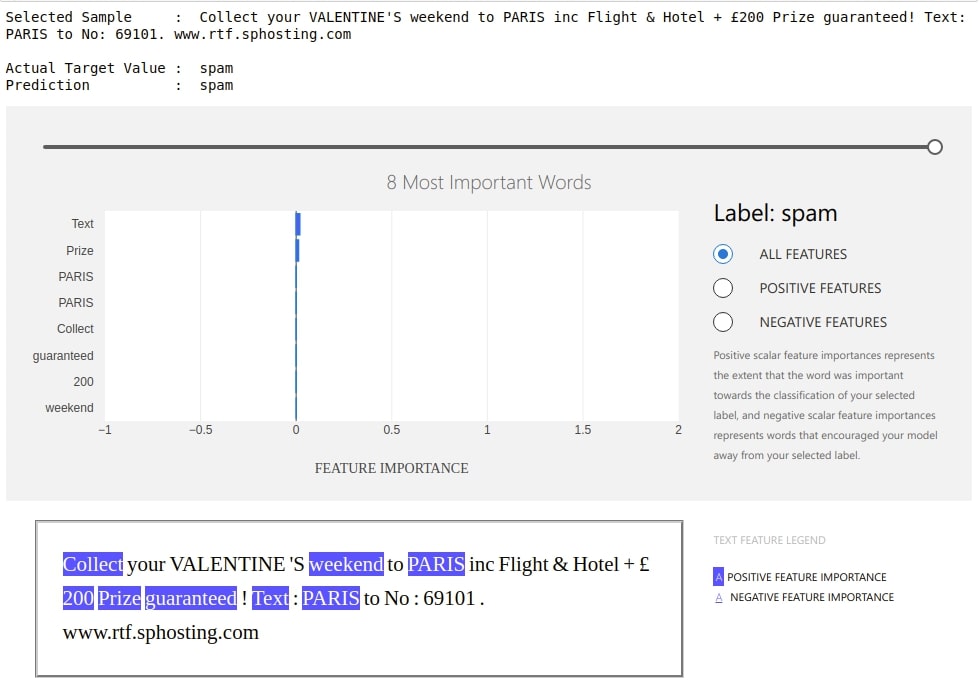
Below is another example where our model is making mistake.
preds = classifier.predict(text_test)
wrong_pred_idx = np.argwhere(preds!=y_test).flatten()

idx = random.choice(wrong_pred_idx)

prediction = classifier.predict(text_test[idx])[0]

print("Selected Sample     : ",text_test[idx])
print("\nActual Target Value : ", y_test[idx])
print("Prediction          : ", prediction)

explanation = explainer.explain_local(text_test[idx], prediction)

ExplanationDashboard(explanation);
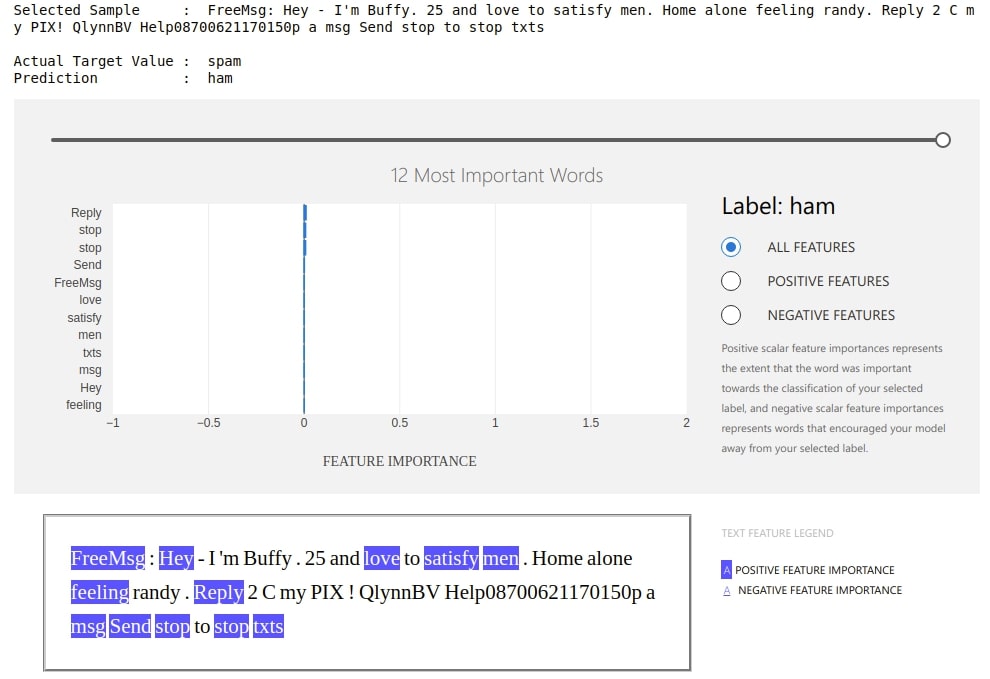
Example 4: Generating Dashboard from Explanation Created using treeinterpreter
As part of our fourth example, we'll explain how interpret-text lets us feature contributions generated from a different library. We have used treeinterpreter for generating contributions for our samples. The treeinterpreter is another wonderful library that lets us generate feature contributions of data for tree-based sklearn models. If you are interested in learning about it then please feel free to check our tutorial on the same.
from treeinterpreter import treeinterpreter
The below code is exactly the same code as that used in example 2. We have transformed data using the TF-IDF vectorizer, trained a random forest classifier on train data, and generated a few classification metrics on test data.
from sklearn.model_selection import train_test_split
from sklearn.feature_extraction.text import TfidfVectorizer
from sklearn.ensemble import RandomForestClassifier, GradientBoostingClassifier
from sklearn.metrics import confusion_matrix, classification_report


tfidf_vectorizer = TfidfVectorizer(analyzer="word", stop_words='english')
transformed_text = tfidf_vectorizer.fit_transform(text)

text_train, text_test, y_train, y_test = train_test_split(text, y,
                                                          random_state=123,
                                                          train_size=0.80,
                                                          stratify=y,
                                                          )

X_train_tfidf, X_test_tfidf, y_train, y_test = train_test_split(transformed_text, y,
                                                                random_state=42,
                                                                test_size=0.25,
                                                                stratify=y,
                                                               )


print("Train/Test Vector Size : ", X_train_tfidf.shape, X_test_tfidf.shape)

rf_classif = RandomForestClassifier()

rf_classif.fit(X_train_tfidf, y_train)

print("Test  Accuracy : %.2f"%rf_classif.score(X_test_tfidf, y_test))
print("Train Accuracy : %.2f"%rf_classif.score(X_train_tfidf, y_train))
print()
print("Confusion Matrix : ")
print(confusion_matrix(y_test, rf_classif.predict(X_test_tfidf)))
print()
print("Classification Report")
print(classification_report(y_test, rf_classif.predict(X_test_tfidf)))
Below we have generated feature contribution of the random test sample using treeinterpreter. We'll be using it to generate an explanation in the next step.
import random

idx = random.randint(1, len(text_test))

vectorized_doc = tfidf_vectorizer.transform([text_test[idx]])
pred_label = rf_classif.predict(vectorized_doc)[0]

print("Selected Sample     : ",text_test[idx])
print("\nActual Target Value : ", y_test[idx])
print("Prediction          : ", pred_label)

prediction, bias, feature_contributions = treeinterpreter.predict(rf_classif, X_test_tfidf[idx])

print("\nBias : ", bias) ## Please make a note that 0th index is for Ham and 1st for Spam
print("Feature Contributions Size : ", feature_contributions.shape)
_create_local_explanation()
The interpret-text provides us with method named _create_local_explanation() which lets us create dashboard using our explanations. We have below created explanations using feature explanations/contributions generated using treeinterpreter. We have given as input feature names which are our word tokens, feature importances generated using tree interpreter, prediction label, etc to a method to generate explanation.
Please make a note that this method has one drawback that it can't generate the text part of the dashboard properly because we have lost sequence when transforming and there is no way to regenerate the original sequence.
from interpret_text.experimental.explanation import _create_local_explanation

arg = np.argmax(prediction)

local_explanantion = _create_local_explanation(
    expected_values=bias,
    classification=True,
    text_explanation=True,
    local_importance_values=feature_contributions[0][:, arg],
    method=rf_classif.__class__.__name__,
    model_task="classification",
    features=tfidf_vectorizer.get_feature_names(),
    classes=[pred_label],
)
from interpret_text.experimental.widget import ExplanationDashboard

dashboard = ExplanationDashboard(local_explanantion);
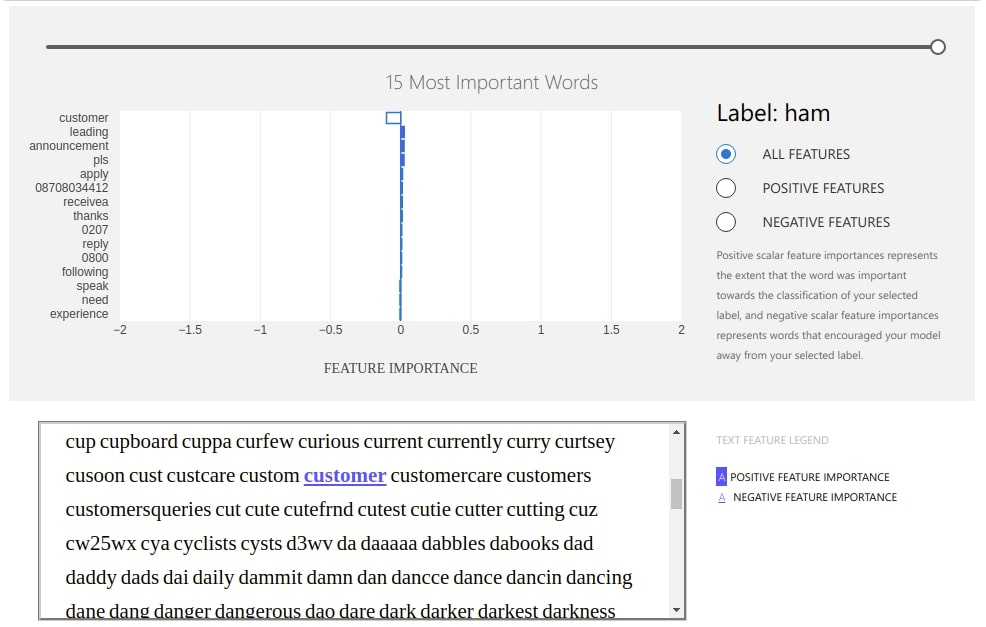
This ends our simple and small tutorial explaining the usage of interpret-text to understand predictions for text data. Please feel free to let us know your views in the comments section.
References
- Feature Extraction from Text Data using Scikit-Learn
- Treeinterpreter - Interpreting Tree-based Model's Prediction of Individual Sample
- interpret-ml - Explain Machine Learning Models and Their Predictions
- How to Use eli5 to Understand Sklearn Models, their Performance and their Predictions?
- How to Use lime to Understand Sklearn Model's Predictions?
- SHAP - Explain Machine Learning Model's Predictions using Game-Theoretic Approach
- Yellowbrick - Visualize Sklearn Classification and Regression Metrics in Python
- Yellowbrick - Text Data Visualizations
- Scikit-Plot - Visualizing Machine Learning Algorithm Results and Performance
- Model Evaluation and Scoring Metrics from Sklearn
- dice-ml - Diverse Counterfactual Explanations for ML Models
 Sunny Solanki
![YouTube Subscribe]() Comfortable Learning through Video Tutorials?
Comfortable Learning through Video Tutorials?
If you are more comfortable learning through video tutorials then we would recommend that you subscribe to our YouTube channel.
![Need Help]() Stuck Somewhere? Need Help with Coding? Have Doubts About the Topic/Code?
Stuck Somewhere? Need Help with Coding? Have Doubts About the Topic/Code?
When going through coding examples, it's quite common to have doubts and errors.
If you have doubts about some code examples or are stuck somewhere when trying our code, send us an email at coderzcolumn07@gmail.com. We'll help you or point you in the direction where you can find a solution to your problem.
You can even send us a mail if you are trying something new and need guidance regarding coding. We'll try to respond as soon as possible.
![Share Views]() Want to Share Your Views? Have Any Suggestions?
Want to Share Your Views? Have Any Suggestions?
If you want to
- provide some suggestions on topic
- share your views
- include some details in tutorial
- suggest some new topics on which we should create tutorials/blogs


 Comfortable Learning through Video Tutorials?
 Stuck Somewhere? Need Help with Coding? Have Doubts About the Topic/Code?
 Want to Share Your Views? Have Any Suggestions?
 interpret-text, nlp, interpret-ml-models