MXNet (GluonCV): Image Classification using Pre-Trained Models
What is Image Classification?
Image classification is a task in computer vision that takes the whole image as one and classifies it into a particular target category.
Over the years many, deep learning models have been developed to solve image classification tasks. These models have quite a high accuracy.
Imagenet is an organization that has a very large database of images and regularly organizes image classification competitions. The models that win these competitions like VGG, ResNet, InceptionNet, MobileNet, etc are extremely well-performing. Imagenet has nearly 1000 categories of images which includes various animals, sea life, daily use things, etc.
Many deep learning libraries (PyTorch, MXNet (GluonCV), OpenCV, etc) nowadays provides these famous models which we can download and use directly for our image classification task. We can either use these models as it is if our images fall into some of those categories. If our images have different class labels then also we can use them by adding a few dense layers at the end to make them work for our task.
What can you learn from this article?
As a part of this tutorial, we have explained how we can use pre-trained image classification models available from Python library GluonCV (MXNet). GluonCV is a helper library of MXNet networks for computer vision related tasks. GluonCV currently provides models trained on Imagenet and CIFAR datasets. Below, we have listed some of the available models for reference purposes.
Imagenet Models
- ResNet
- ResNext
- ResNeSt
- MobileNet
- VGG
- SqueezeNet
- DenseNet
- AlexNet
- InceptionV3
- GoogLeNet
Below, we have listed import sections of the tutorial to give an overview of the material covered.
Important Sections Of Tutorial
- Prepare Images
- 1.1 Download Images
- 1.2 Transform Images to ND Arrays and Normalize Them
- Load Models
- 2.1 ResNet101
- 2.2 VGG19 with Batch Normalization
- Make Predictions
- Retrieve Target Labels
- Visualize Results
- 5.1 RestNet Predictions Visualization
- 5.2 VGG Predictions Visualization
- Try Other Models
Below, we have imported the necessary Python libraries and printed the versions that we have used in our tutorial.
Install MXNet & GluonCV
- !pip install --upgrade mxnet gluoncv
import mxnet

print("MXNet Version : {}".format(mxnet.__version__))
import gluoncv

print("GluonCV Version : {}".format(gluoncv.__version__))
device = mxnet.gpu() if mxnet.test_utils.list_gpus() else mxnet.cpu()

device

1. Prepare Images 
In this section, we are preparing images to be given to pre-train MXNet networks for an image classification task. We have downloaded six images from the internet and converted them to MXNet ND arrays.
1.1 Download Images
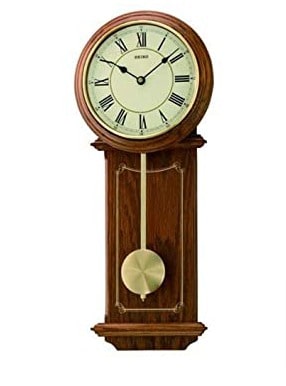
Below, we have simply downloaded six images from the internet using download() utility function provided by GluonCV. The download() function lets us modify the image's file name and returns it. All files have just one object in them as networks are trained with one object image. The downloaded images have objects like panda, koala, lion, sea lion, wall clock, and digital clock. We'll be predicting these objects using the network.
After downloading all images, we loaded the wall clock image in memory using Python library Pillow and displayed it for reference purposes.
from gluoncv import utils

panda = utils.download("https://upload.wikimedia.org/wikipedia/commons/thumb/3/3c/Giant_Panda_2004-03-2.jpg/1200px-Giant_Panda_2004-03-2.jpg", "panda.jpg")
koala = utils.download("https://cdn-wordpress-info.futurelearn.com/wp-content/uploads/unique-animals-australia.jpg", "koala.jpg")
lion = utils.download("https://upload.wikimedia.org/wikipedia/commons/7/7d/Wildlife_at_Maasai_Mara_%28Lion%29.jpg", "lion.jpg")
sea_lion = utils.download("https://149366112.v2.pressablecdn.com/wp-content/uploads/2016/11/1280px-monachus_schauinslandi.jpg", "sea_lion.jpg")
wall_clock = utils.download("https://m.media-amazon.com/images/I/51RxQK7kK0L._SY355_.jpg", "wall_clock.jpg")
digital_clock = utils.download("https://cdn.shopify.com/s/files/1/0024/9803/5810/products/583309-Product-0-I-637800179303038345.jpg", "digital_clock.jpg")
from PIL import Image

Image.open("wall_clock.jpg")
1.2 Transform Images to ND Arrays and Normalize Them
In this section, we have imported all images in memory as ND Arrays and then transformed them to be given to a pre-trained network for processing.
MXNet provides imread() function as a part of 'image' sub-module that let us load images in memory as ND Arrays. The function takes the image name and returns ND Array of shape (3, height, weight) representing a color image. Please make a NOTE that all models are trained on color images. The ND Array has integer values representing color images in the range 0-255.
After loading images as ND Arrays, we have transformed them using transform_eval() function available from GluonCV. This function takes a list of ND Array images, resizes them to shape (3, 224, 244), and then normalizes them (subtract by mean and divide the result by standard deviation). The mean ([0.485, 0.456, 0.406]) and standard deviation ([0.229, 0.224, 0.225]) used to normalize images are Imagenet images mean and standard deviation. Its common practice to normalize images using them. The function also adds an extra batch dimension at the beginning as required by the model.
from gluoncv.data.transforms.presets.imagenet import transform_eval
from mxnet import nd

panda_arr = mxnet.image.imread(panda)
koala_arr = mxnet.image.imread(koala)
lion_arr = mxnet.image.imread(lion)
sea_lion_arr = mxnet.image.imread(sea_lion)
wall_clock_arr = mxnet.image.imread(wall_clock)
digital_clock_arr = mxnet.image.imread(digital_clock)

print(panda_arr.dtype)

panda_arr, koala_arr, lion_arr, sea_lion_arr, wall_clock_arr, digital_clock_arr = transform_eval([panda_arr,
                                                                                                  koala_arr,
                                                                                                  lion_arr,
                                                                                                  sea_lion_arr,
                                                                                                  wall_clock_arr,
                                                                                                  digital_clock_arr])

print(panda_arr.dtype)

panda_arr.shape, koala_arr.shape, lion_arr.shape, sea_lion_arr.shape, wall_clock_arr.shape, digital_clock_arr.shape
2. Load Models 
Here, we have simply loaded models from GluonCV Model Zoo. The model zoo is commonly used in the ML community to refer to the repository of pre-trained networks of common problems. Below, we have first retrieved the list of models available from Model zoo and filtered it to print only ResNet (2015 release) and VGG (2014 release) versions. We can use the names listed here to load models.
For our explanation purpose, we have loaded RestNet101 and VGG19 with Batch Normalization using get_model() method of model zoo. We need to provide parameter pretrained as True in order to load pre-trained weights. If we don't provide it as True then it'll only load model architecture without weights. Load model without weights if you are planning to train it from scratch and you have a lot of data for it.
from gluoncv import model_zoo

models_list = model_zoo.get_model_list()

list([model_name for model_name in models_list if model_name.startswith('resnet')])[:10], list([model_name for model_name in models_list if model_name.startswith('vgg')])[:10]
2.1 ResNet101
resnet = model_zoo.get_model("resnet101_v1", pretrained=True, ctx=mxnet.Context(device))
2.2 VGG19 with Batch Normalization
vgg = model_zoo.get_model("vgg19_bn", pretrained=True, ctx=mxnet.Context(device))
3. Make Predictions 
In this section, we have simply made predictions on our images using both pre-trained models. The output shape of each prediction is (1,1000). It represents 1000 probabilities as all networks are trained on imagenet datasets which have 1000 image categories.
panda_pred1 = resnet(panda_arr)
koala_pred1 = resnet(koala_arr)
lion_pred1 = resnet(lion_arr)
sea_lion_pred1 = resnet(sea_lion_arr)
wall_clock_pred1 = resnet(wall_clock_arr)
digital_clock_pred1 = resnet(digital_clock_arr)

panda_pred1.shape
panda_pred2 = vgg(panda_arr)
koala_pred2 = vgg(koala_arr)
lion_pred2 = vgg(lion_arr)
sea_lion_pred2 = vgg(sea_lion_arr)
wall_clock_pred2 = vgg(wall_clock_arr)
digital_clock_pred2 = vgg(digital_clock_arr)

panda_pred2.shape
4. Retrieve Target Labels 
Below, we have retrieved actual target labels for images. We have sorted predictions from high probabilities to low and taken the first 5 highest probabilities. Then, we have retrieved labels for those top 5 probabilities using classes attribute of models. It has 1000 names of images. We can simply perform integer indexing on them to retrieve the image name. We are retrieving the first 5 target labels for all images and printing them as well.
panda_idx = mxnet.nd.topk(panda_pred1, k=5)[0].astype('int').asnumpy().tolist()
panda_pred1 = [resnet.classes[idx] for idx in panda_idx]
print(panda_pred1)

koala_idx = mxnet.nd.topk(koala_pred1, k=5)[0].astype('int').asnumpy().tolist()
koala_pred1 = [resnet.classes[idx] for idx in koala_idx]
print(koala_pred1)

lion_idx = mxnet.nd.topk(lion_pred1, k=5)[0].astype('int').asnumpy().tolist()
lion_pred1 = [resnet.classes[idx] for idx in lion_idx]
print(lion_pred1)

sea_lion_idx = mxnet.nd.topk(sea_lion_pred1, k=5)[0].astype('int').asnumpy().tolist()
sea_lion_pred1 = [resnet.classes[idx] for idx in sea_lion_idx]
print(sea_lion_pred1)

wall_clock_idx = mxnet.nd.topk(wall_clock_pred1, k=5)[0].astype('int').asnumpy().tolist()
wall_clock_pred1 = [resnet.classes[idx] for idx in wall_clock_idx]
print(wall_clock_pred1)

digital_clock_idx = mxnet.nd.topk(digital_clock_pred1, k=5)[0].astype('int').asnumpy().tolist()
digital_clock_pred1 = [resnet.classes[idx] for idx in digital_clock_idx]
print(digital_clock_pred1)
panda_idx = mxnet.nd.topk(panda_pred2, k=5)[0].astype('int').asnumpy().tolist()
panda_pred2 = [vgg.classes[idx] for idx in panda_idx]
print(panda_pred2)

koala_idx = mxnet.nd.topk(koala_pred2, k=5)[0].astype('int').asnumpy().tolist()
koala_pred2 = [vgg.classes[idx] for idx in koala_idx]
print(koala_pred2)

lion_idx = mxnet.nd.topk(lion_pred2, k=5)[0].astype('int').asnumpy().tolist()
lion_pred2 = [vgg.classes[idx] for idx in lion_idx]
print(lion_pred2)

sea_lion_idx = mxnet.nd.topk(sea_lion_pred2, k=5)[0].astype('int').asnumpy().tolist()
sea_lion_pred2 = [vgg.classes[idx] for idx in sea_lion_idx]
print(sea_lion_pred2)

wall_clock_idx = mxnet.nd.topk(wall_clock_pred2, k=5)[0].astype('int').asnumpy().tolist()
wall_clock_pred2 = [vgg.classes[idx] for idx in wall_clock_idx]
print(wall_clock_pred2)

digital_clock_idx = mxnet.nd.topk(digital_clock_pred2, k=5)[0].astype('int').asnumpy().tolist()
digital_clock_pred2 = [vgg.classes[idx] for idx in digital_clock_idx]
print(digital_clock_pred2)
5. Visualize Results 
In this section, we have simply visualized all images and printed top labels predicted by the model above them using matplotlib. The visualization is created for predictions made by both models.
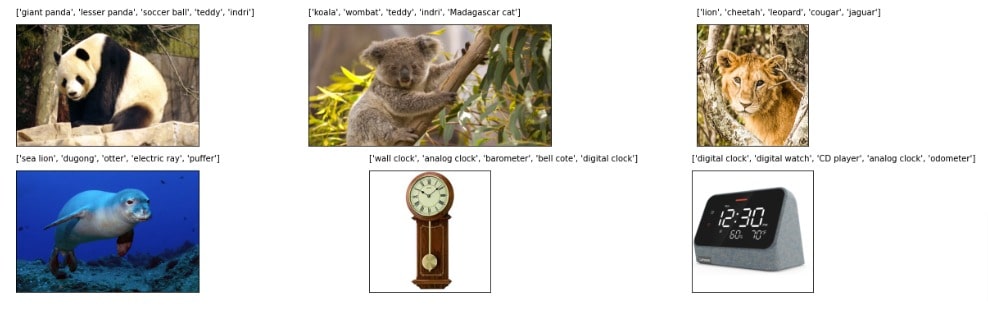
5.1 RestNet Predictions Visualization
We can notice from the visualization that the first predicted label using ResNet is correct for all images. The labels after first are also of objects which are somewhat near to the actual prediction.
import matplotlib.pyplot as plt

fig = plt.figure(figsize=(20,6))

for i, (img, pred) in enumerate(zip([panda, koala, lion, sea_lion, wall_clock, digital_clock], [panda_pred1, koala_pred1, lion_pred1, sea_lion_pred1, wall_clock_pred1, digital_clock_pred1])):
    ax = fig.add_subplot(2,3,i+1)
    ax.imshow(Image.open(img))
    ax.set_xticks([],[]); ax.set_yticks([],[]);
    ax.text(0,0, "{}\n".format(pred))
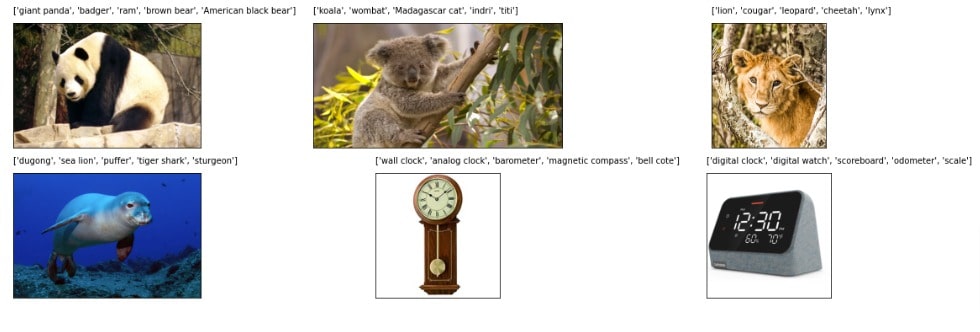
5.2 VGG Predictions Visualization
Here, we can notice that our VGG model has made a little mistake in the case of sea lion. It predicted all other images correctly. With sea lion prediction, the second target label is the sea lion.
import matplotlib.pyplot as plt

fig = plt.figure(figsize=(20,6))

for i, (img, pred) in enumerate(zip([panda, koala, lion, sea_lion, wall_clock, digital_clock], [panda_pred2, koala_pred2, lion_pred2, sea_lion_pred2, wall_clock_pred2, digital_clock_pred2])):
    ax = fig.add_subplot(2,3,i+1)
    ax.imshow(Image.open(img))
    ax.set_xticks([],[]); ax.set_yticks([],[]);
    ax.text(0,0, "{}\n".format(pred))
6. Try Other Models 
If you are not getting good results using the above models then we would recommend that you try other models available from GluonCV for image classification. We have listed some of them below.
Please make a NOTE that models trained on CIFAR dataset starts with string 'cifar_'.
list([model_name for model_name in models_list if model_name.startswith('resnext')])[:10]
list([model_name for model_name in models_list if model_name.startswith('resnest')])[:10]
list([model_name for model_name in models_list if model_name.startswith('mobilenet')])[:10]
list([model_name for model_name in models_list if model_name.startswith('squeezenet')])[:10]
list([model_name for model_name in models_list if model_name.startswith('densenet')])[:10]
list([model_name for model_name in models_list if model_name.startswith('alexnet')])[:10]
list([model_name for model_name in models_list if model_name.startswith('darknet')])[:10]
list([model_name for model_name in models_list if model_name.startswith('inception')])[:10]
list([model_name for model_name in models_list if model_name.startswith('googlenet')])[:10]
list([model_name for model_name in models_list if model_name.startswith('xception')])[:10]
list([model_name for model_name in models_list if model_name.startswith('senet')])[:10]
list([model_name for model_name in models_list if model_name.startswith('cifar_')])[:10]
 Sunny Solanki
Sunny Solanki
Intro: Software Developer | Youtuber | Bonsai Enthusiast
About: Sunny Solanki holds a bachelor's degree in Information Technology (2006-2010) from L.D. College of Engineering. Post completion of his graduation, he has 8.5+ years of experience (2011-2019) in the IT Industry (TCS). His IT experience involves working on Python & Java Projects with US/Canada banking clients. Since 2020, he’s primarily concentrating on growing CoderzColumn.
His main areas of interest are AI, Machine Learning, Data Visualization, and Concurrent Programming. He has good hands-on with Python and its ecosystem libraries.
Apart from his tech life, he prefers reading biographies and autobiographies. And yes, he spends his leisure time taking care of his plants and a few pre-Bonsai trees.
Contact: sunny.2309@yahoo.in


![YouTube Subscribe]() Comfortable Learning through Video Tutorials?
Comfortable Learning through Video Tutorials?
If you are more comfortable learning through video tutorials then we would recommend that you subscribe to our YouTube channel.
![Need Help]() Stuck Somewhere? Need Help with Coding? Have Doubts About the Topic/Code?
Stuck Somewhere? Need Help with Coding? Have Doubts About the Topic/Code?
 Stuck Somewhere? Need Help with Coding? Have Doubts About the Topic/Code?
When going through coding examples, it's quite common to have doubts and errors.
If you have doubts about some code examples or are stuck somewhere when trying our code, send us an email at coderzcolumn07@gmail.com. We'll help you or point you in the direction where you can find a solution to your problem.
You can even send us a mail if you are trying something new and need guidance regarding coding. We'll try to respond as soon as possible.
![Share Views]() Want to Share Your Views? Have Any Suggestions?
Want to Share Your Views? Have Any Suggestions?
 Want to Share Your Views? Have Any Suggestions?
If you want to
- provide some suggestions on topic
- share your views
- include some details in tutorial
- suggest some new topics on which we should create tutorials/blogs
 gluoncv, image-classification, pre-trained-networks