PyTorch: Image Classification using Pre-Trained Models
Image classification is an active area of research in computer vision where we look at an image and assign a label to it. Image classification tasks generally have images with one object present in them which they classify into a particular category. Over the years, many competitions are organized by Imagenet for producing a high-quality image classifier. The winner of these competitions are complicated models that are quite good at the task. Imagenet dataset has nearly 1000 target categories which include different kinds of animals, sea life, daily use objects (clock, paper, etc), etc. These models are so good at image classification tasks that nowadays rarely does someone design a new network for their purpose. We can directly use one of the pre-trained networks available from deep learning libraries like PyTorch.
What can you learn from this Article?
As a part of this tutorial, we have covered how to use pre-trained networks/models available from Python library PyTorch (torchvision) to solve image classification task. PyTorch has a helper module named torchvision specifically designed for computer vision tasks, providing these pre-trained networks with weights. We have an option to load these network architectures without weights if we have enough data and computing resources to train the network. Below, we have listed some of the models provided by torchvision module.
- VGG
- AlexNet
- ConvNeXt
- DenseNet
- EfficientNet
- EfficientNetV2
- GoogLeNet
- Inception V3
- MNASNet
- MobileNet V2
- MobileNet V3
- RegNet
- ResNet
- ResNeXt
- ShuffleNet V2
- SqueezeNet
Below, we have listed essential sections of the Tutorial to give an overview of the material covered.
Important Sections Of Tutorial
- Load Images
- 1.1 Download Images from the Internet
- 1.2 Load Images in Memory using Pillow Library
- 1.3 Convert Pillow Images to Torch Tensors
- Load Model with Pre-Trained Weights
- Preprocess Images and Make Predictions
- Rerieve Target Labels
- Visualize Results
- 5.1 RestNet Predictions Visualization
- 5.2 MobileNet Predictions Visualization
- Try Other Models
Below, we have imported the necessary libraries that we have used in our tutorial and printed the versions of them.
Install Latest torchvision
- !pip install -U torchvision
import torch

print("PyTorch Version : {}".format(torch.__version__))
import torchvision

print("TorchVision Version : {}".format(torchvision.__version__))
import gc
1. Load Images 
In this section, we have simply downloaded a few random images from the internet and loaded them in memory. We have converted them to torch tensors as well for image classification through Pytorch networks.
1.1 Download Images from Internet
Below, we have downloaded 6 images from the internet. The images are of panda, koala, lion, sea lion, wall_clock, and digital clock. The images are downloaded using the shell command wget. Please feel free to download other images if you want to try them. Just make sure that images have just one object in them else it can confuse the classifier.
!wget https://upload.wikimedia.org/wikipedia/commons/thumb/3/3c/Giant_Panda_2004-03-2.jpg/1200px-Giant_Panda_2004-03-2.jpg
!wget https://cdn-wordpress-info.futurelearn.com/wp-content/uploads/unique-animals-australia.jpg
!wget https://upload.wikimedia.org/wikipedia/commons/7/7d/Wildlife_at_Maasai_Mara_%28Lion%29.jpg
!wget https://149366112.v2.pressablecdn.com/wp-content/uploads/2016/11/1280px-monachus_schauinslandi.jpg
!wget https://m.media-amazon.com/images/I/51RxQK7kK0L._SY355_.jpg
!wget https://cdn.shopify.com/s/files/1/0024/9803/5810/products/583309-Product-0-I-637800179303038345.jpg
%ls
1.2 Load Images in Memory using Pillow Library
Below, we have simply loaded images in memory using the Python library Pillow. The Pillow provides us with lots of functionalities to work with images like loading, cropping, resizing, filtering, etc. Do check the below link in your free time.
from PIL import Image
from IPython import display
import ipywidgets

panda = Image.open("1200px-Giant_Panda_2004-03-2.jpg")
koala = Image.open("unique-animals-australia.jpg")
lion = Image.open("Wildlife_at_Maasai_Mara_(Lion).jpg")
sea_lion = Image.open("1280px-monachus_schauinslandi.jpg")
wall_clock = Image.open("51RxQK7kK0L._SY355_.jpg")
digital_clock = Image.open("583309-Product-0-I-637800179303038345.jpg")
wall_clock

1.3 Convert Pillow Images to Torch Tensors
Here, we have converted our Pillow images to torch tensors. The torchvision library provides a functional API to convert images to tensors and vice-versa. The function pil_to_tensor() is used to convert Pillow image to torch tensor and to_pil_image() is used to convert torch tensor to pillow image.
from torchvision.transforms.functional import to_pil_image, pil_to_tensor

panda_int = pil_to_tensor(panda)
koala_int = pil_to_tensor(koala)
lion_int = pil_to_tensor(lion)
sea_lion_int = pil_to_tensor(sea_lion)
wall_clock_int = pil_to_tensor(wall_clock)
digital_clock_int = pil_to_tensor(digital_clock)

panda_int.shape, koala_int.shape, lion_int.shape, sea_lion_int.shape, wall_clock_int.shape, digital_clock_int.shape
2. Load Model with Pre-Trained Weights 
In this section, we have loaded pre-trained PyTorch image classifiers available from torchvision. The models are available from "models" sub-module of torchvision.
We have loaded two models for our experimentation purpose.
- ResNet101
- MobileNet V3
We just need to create an instance of these models by loading them. By default, weights parameter of the constructor is None which means that no weights will be loaded (only architecture). In order to load weights, we need to import model_name_Weights object. It has an attribute named DEFAULT which will load default weights as there is more than one version of weights for the model (E.g., for Resnet there are V1 and V2 weights as well).
After loading models, we have set them in evaluation mode by calling eval() on them. This will deactivate batch normalization and dropout layers.
As we had said earlier, if you have enough images then you can train the model as well. In that case, you have options like training the whole network (do not load pre-trained weights) and fine-tuning existing weights (transfer learning).
from torchvision.models import resnet101, ResNet101_Weights

resnet = resnet101(weights=ResNet101_Weights.DEFAULT, progress=False)

resnet.eval();
from torchvision.models import mobilenet_v3_small, MobileNet_V3_Small_Weights

mobilenet = mobilenet_v3_small(weights=MobileNet_V3_Small_Weights.DEFAULT, progress=False)

mobilenet.eval();
3. Preprocess Images and Make Predictions 
In this section, we are making predictions using our loaded models.
All these models are trained with specific image sizes and can make predictions on that size only. So, we'll need to resize images and also normalize them.
To resize and normalize the image, the weights object that we loaded earlier provides us with transform() method. It returns a PyTorch transformation that can be applied to the Pillow image. It'll resize the image as well as normalize it. We can give this processed image directly to the network for prediction.
After transforming images, we have made predictions on all 6 images using both models. As both models are trained on ImageNet dataset, they have 1000 output probabilities per example. The category with the highest probability will be the predicted target label.
Below, we have listed transformation applied by RestNet weights for reference purposes.
crop_size=[224]
resize_size=[256]
mean=[0.485, 0.456, 0.406]
std=[0.229, 0.224, 0.225]
interpolation=InterpolationMode.BILINEAR
preprocess_img = ResNet101_Weights.DEFAULT.transforms()

preprocess_img(panda_int).unsqueeze(dim=0).shape
panda_preds1 = resnet(preprocess_img(panda_int).unsqueeze(dim=0))
koala_preds1 = resnet(preprocess_img(koala_int).unsqueeze(dim=0))
lion_preds1 = resnet(preprocess_img(lion_int).unsqueeze(dim=0))
sea_lion_preds1 = resnet(preprocess_img(sea_lion_int).unsqueeze(dim=0))
wall_clock_preds1 = resnet(preprocess_img(wall_clock_int).unsqueeze(dim=0))
digital_clock_preds1 = resnet(preprocess_img(digital_clock_int).unsqueeze(dim=0))

panda_preds1.shape
preprocess_img = MobileNet_V3_Small_Weights.DEFAULT.transforms()

preprocess_img(panda_int).unsqueeze(dim=0).shape
panda_preds2 = resnet(preprocess_img(panda_int).unsqueeze(dim=0))
koala_preds2 = resnet(preprocess_img(koala_int).unsqueeze(dim=0))
lion_preds2 = resnet(preprocess_img(lion_int).unsqueeze(dim=0))
sea_lion_preds2 = resnet(preprocess_img(sea_lion_int).unsqueeze(dim=0))
wall_clock_preds2 = resnet(preprocess_img(wall_clock_int).unsqueeze(dim=0))
digital_clock_preds2 = resnet(preprocess_img(digital_clock_int).unsqueeze(dim=0))

panda_preds2.shape
4. Rerieve Target Labels 
Here, we have retrieved the predicted target label for images by our models.
As we said earlier, the prediction made by networks is a thousand probabilities per image. We need to retrieve target labels using these probabilities.
First, we have sorted probabilities from maximum to minimum and taken indexes of the first 3 probabilities.
Then, we retrieved the target label using these 3 probability indexes. The actual target label for all thousand classes is available through meta dictionaries' "categories" key.
After retrieving the predicted target labels, we have printed them as well.
from torch.nn.functional import softmax

cats = ResNet101_Weights.DEFAULT.meta["categories"]

preds1 = []
preds1.append([cats[idx] for idx in panda_preds1.argsort()[0].numpy()][::-1][:3])
preds1.append([cats[idx] for idx in koala_preds1.argsort()[0].numpy()][::-1][:3])
preds1.append([cats[idx] for idx in lion_preds1.argsort()[0].numpy()][::-1][:3])
preds1.append([cats[idx] for idx in sea_lion_preds1.argsort()[0].numpy()][::-1][:3])
preds1.append([cats[idx] for idx in wall_clock_preds1.argsort()[0].numpy()][::-1][:3])
preds1.append([cats[idx] for idx in digital_clock_preds1.argsort()[0].numpy()][::-1][:3])

for pred in preds1:
    print(pred)
cats = MobileNet_V3_Small_Weights.DEFAULT.meta["categories"]

preds2 = []
preds2.append([cats[idx] for idx in panda_preds2.argsort()[0].numpy()][::-1][:3])
preds2.append([cats[idx] for idx in koala_preds2.argsort()[0].numpy()][::-1][:3])
preds2.append([cats[idx] for idx in lion_preds2.argsort()[0].numpy()][::-1][:3])
preds2.append([cats[idx] for idx in sea_lion_preds2.argsort()[0].numpy()][::-1][:3])
preds2.append([cats[idx] for idx in wall_clock_preds2.argsort()[0].numpy()][::-1][:3])
preds2.append([cats[idx] for idx in digital_clock_preds2.argsort()[0].numpy()][::-1][:3])

for pred in preds2:
    print(pred)
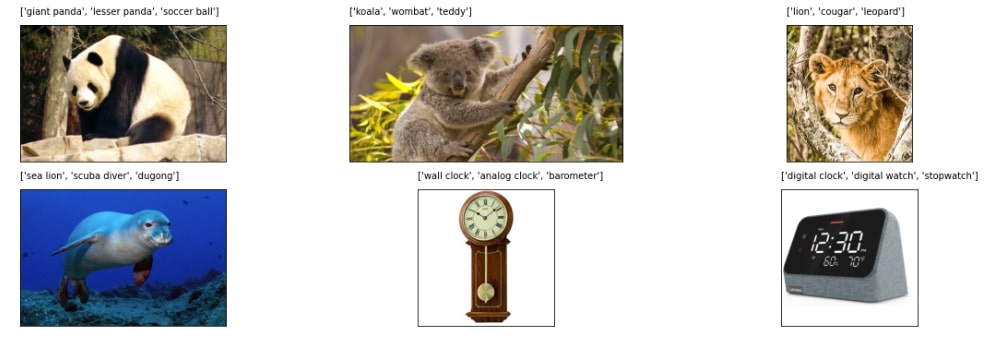
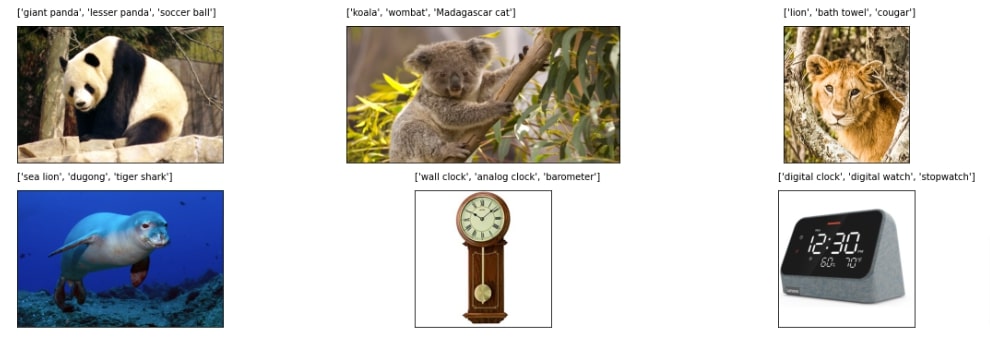
5. Visualize Results 
At last, in this section, we have visualized the prediction of our models.
5.1 RestNet Predictions Visualization
Below, we have visualized prediction made by ResNet101 model using matplotlib. We can notice from the results that the first label is the correct label for all images. Hence, we can conclude that ResNet101's results are quite good.
import matplotlib.pyplot as plt

fig = plt.figure(figsize=(20,6))

for i, img in enumerate([panda, koala, lion, sea_lion, wall_clock, digital_clock]):
    ax = fig.add_subplot(2,3,i+1)
    ax.imshow(img)
    ax.set_xticks([],[]); ax.set_yticks([],[]);
    ax.text(0,0, "{}\n".format(preds1[i]))
5.2 MobileNet Predictions Visualization
Here, we have visualized predictions of MobileNet V3 predictions. We can notice from the results that all images are correctly identified by the classifier. It seems that both classifiers are quite good at the job.
import matplotlib.pyplot as plt

fig = plt.figure(figsize=(20,6))

for i, img in enumerate([panda, koala, lion, sea_lion, wall_clock, digital_clock]):
    ax = fig.add_subplot(2,3,i+1)
    ax.imshow(img)
    ax.set_xticks([],[]); ax.set_yticks([],[]);
    ax.text(0,0, "{}\n".format(preds2[i]))
6. Try Other Models 
Here, we have listed many other pre-trained image classifiers available from PyTorch. If you are not getting good results using the above models then you should try one of the below.
from torchvision.models import alexnet, convnext, densenet,\
                               efficientnet, googlenet, inception,\
                               mobilenet, regnet, resnext101_32x8d,\
                               shufflenetv2, squeezenet, vgg
 Sunny Solanki
Sunny Solanki
Intro: Software Developer | Youtuber | Bonsai Enthusiast
About: Sunny Solanki holds a bachelor's degree in Information Technology (2006-2010) from L.D. College of Engineering. Post completion of his graduation, he has 8.5+ years of experience (2011-2019) in the IT Industry (TCS). His IT experience involves working on Python & Java Projects with US/Canada banking clients. Since 2020, he’s primarily concentrating on growing CoderzColumn.
His main areas of interest are AI, Machine Learning, Data Visualization, and Concurrent Programming. He has good hands-on with Python and its ecosystem libraries.
Apart from his tech life, he prefers reading biographies and autobiographies. And yes, he spends his leisure time taking care of his plants and a few pre-Bonsai trees.
Contact: sunny.2309@yahoo.in


![YouTube Subscribe]() Comfortable Learning through Video Tutorials?
Comfortable Learning through Video Tutorials?
If you are more comfortable learning through video tutorials then we would recommend that you subscribe to our YouTube channel.
![Need Help]() Stuck Somewhere? Need Help with Coding? Have Doubts About the Topic/Code?
Stuck Somewhere? Need Help with Coding? Have Doubts About the Topic/Code?
 Stuck Somewhere? Need Help with Coding? Have Doubts About the Topic/Code?
When going through coding examples, it's quite common to have doubts and errors.
If you have doubts about some code examples or are stuck somewhere when trying our code, send us an email at coderzcolumn07@gmail.com. We'll help you or point you in the direction where you can find a solution to your problem.
You can even send us a mail if you are trying something new and need guidance regarding coding. We'll try to respond as soon as possible.
![Share Views]() Want to Share Your Views? Have Any Suggestions?
Want to Share Your Views? Have Any Suggestions?
 Want to Share Your Views? Have Any Suggestions?
If you want to
- provide some suggestions on topic
- share your views
- include some details in tutorial
- suggest some new topics on which we should create tutorials/blogs
 pytorch, image-classification, pre-trained-models