PyTorch: Object Detection using Pre-Trained Models
Object detection is an active research area of computer vision and image processing that finds out objects present in an image of certain classes. It generally detects objects present in an image, draws a bounding box around it, and labels it. It has many applications like image annotation, face detection, object tracking, vehicle counting, etc. Over time, many approaches are developed for solving object detection using neural networks and without them as well. The approaches using deep neural networks have quite a high accuracy though these networks are quite complicated and require a lot of data to train. Due to this, many deep learning libraries (PyTorch, MXNet (GluonCV), Tensorflow, OpenCV, etc) provide an implementation of these networks which has pre-trained networks that can be directly used for our purpose if our classes fall into their classes else we can fine-tune their network by training little on our dataset with small categories as well.
As a part of the article, we have explained how to use pre-trained Object detection networks available from PyTorch. The tutorial explains how we can take any random image from the network and try to look for objects in it using these pre-trained PyTorch models. We can load these networks with pre-trained weights or even without them if we have enough data to train these architectures. Currently, PyTorch provides the below-mentioned models for object detection.
- Faster R-CNN
- FCOS (Fully Convolutional One-Stage Object Detection)
- RetinaNet
- SSD (Single Shot MultiBox Detector)
- SSDlite
These pre-trained networks make the task of object detection quite easy if you don't want to train complicated neural networks. These networks use pre-trained image classification neural networks like RestNet, MobileNet, VGG, etc for retrieving object features. Majority of object detection networks are trained on COCO dataset and image classification networks are trained on ImageNet dataset.
Below, we have listed essential tutorial sections to give an overview of the material covered.
Important Sections Of Tutorial
- Load Sample Images
- 1.1 Download Sample Images
- 1.2 Load Images as Pillow Images
- 1.3 Convert Pillow Images to Torch Tensors
- 1.4 Add Batch Dimension
- 1.5 Convert Images Represented as Integer (0-255) to Floats (0-1)
- Load Pre-Trained PyTorch Model (Faster R-CNN with ResNet50 Backbone)
- Make Predictions
- Visualize Results
- 4.1 Load Target Classes Mapping
- 4.2 Map Target Category Ids to Labels
- 4.3 Visualize Bounding Boxes On Original Images
- Try Other Pre-Trained Models
Below, we have imported the necessary Python libraries that we'll use for our tutorial. We have also printed the versions that we have used in our tutorial.
import torch

print("PyTorch Version : {}".format(torch.__version__))
import torchvision

print("TorchVision Version : {}".format(torchvision.__version__))
Pycocotools Installation
- !pip install pycocotools
import pycocotools
1. Load Sample Images 
In this section, we have simply downloaded a few images from the internet, load them as Pillow images, and then converted them to torch tensors for giving them to model for prediction. We need to convert images to tensors before giving them to the network for predictions always as they word on tensors only.
1.1 Download Sample Images
Below, we have simply downloaded two images from the Internet using wget shell command. We have selected images randomly. Please feel free to use your images if you have some ready that you want to try.
!wget https://images.click.in/classifieds/images/95/30_12_2017_15_58_25_562aaa7a9b6593ce55f7e59cae781674_vpwodzncbi.jpg
!wget https://gumlet.assettype.com/freepressjournal/import/2016/07/kids-playing.jpg
!mv 30_12_2017_15_58_25_562aaa7a9b6593ce55f7e59cae781674_vpwodzncbi.jpg holiday.jpg

%ls
1.2 Load Images as Pillow Images
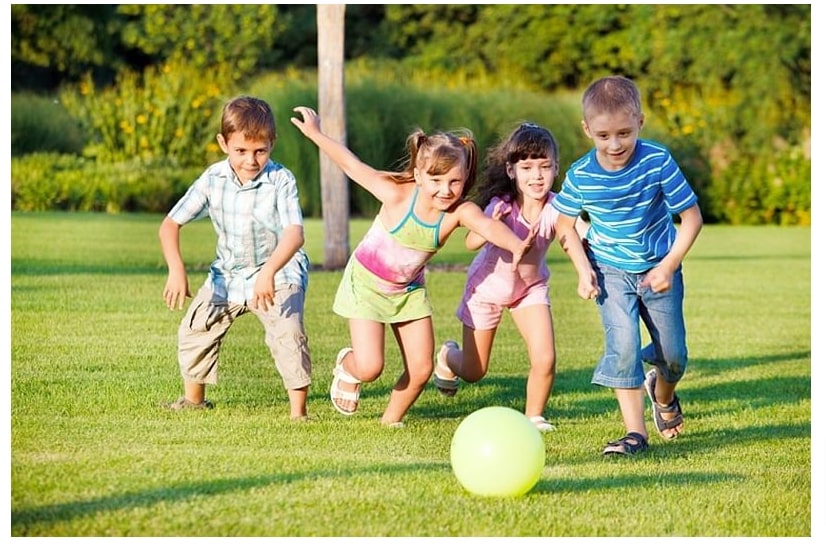
In this section, we have loaded images in memory using Python module pillow. After loading images, we have also displayed them. Both images have people in them. The first image is of the family on vacation and the second image has children playing ball. Next, we'll convert these images to torch tensors.
from PIL import Image

holiday = Image.open("holiday.jpg")

holiday

kids_playing = Image.open("kids-playing.jpg")

kids_playing
1.3 Convert Pillow Images to Torch Tensors
In this section, we have simply converted Pillow images to torch tensors. We have used the functional API of torchvision module to convert images to tensors. The transforms sub-module of torchvision has a method named pil_to_tensor() that can help us convert images to tensors. The tensors have shape (channels, height, width). As our images are RGB, we have 3 channels.
from torchvision.transforms.functional import pil_to_tensor

holiday_tensor_int = pil_to_tensor(holiday)
kids_playing_tensor_int = pil_to_tensor(kids_playing)

holiday_tensor_int.shape, kids_playing_tensor_int.shape
1.4 Add Batch Dimension
In this section, we have simply added one dimension at the beginning of our images which is the batch dimension. We added this dimension because models work on batches of images.
holiday_tensor_int = holiday_tensor_int.unsqueeze(dim=0)
kids_playing_tensor_int = kids_playing_tensor_int.unsqueeze(dim=0)

holiday_tensor_int.shape, kids_playing_tensor_int.shape
1.5 Convert Images Represented as Integer (0-255) to Floats (0-1)
By default, the image tensors are integer tensors that have values in the range 0-255. The PyTorch pre-trained models are generally trained on images represented as float tensors. So, we have created new copies of our images represented as float tensors by dividing integer tensors by 255. We'll require integer tensors in features when plotting it again with bounding boxes.
print(holiday_tensor_int.min(), holiday_tensor_int.max())

holiday_tensor_float = holiday_tensor_int / 255.0
kids_playing_tensor_float = kids_playing_tensor_int / 255.0

print(holiday_tensor_float.min(), holiday_tensor_float.max())
2. Load Pre-Trained PyTorch Model (Faster R-CNN with ResNet50 Backbone) 
In this section, we have loaded our first pre-trained PyTorch model. The pre-trained models are available from sub-modules of models module of torchvision library. Pytorch has a separate library torchvision for working with vision-related tasks. It provides helper functions to simplify tasks related to computer vision.
The sub-module named detection provides us with various methods that can be called to load pre-trained object detection models. We have loaded the Faster R-CNN model for our purpose. It uses ResNet-50-FPN (Feature Pyramid Network) network for detecting important features in images. We have loaded network by calling method fasterrcnn_resnet50_fpn(). We have provided it with parameters pretrained set to True because we want a network with trained parameters. Currently, by default, they load weights of a model trained on COCO dataset which has around 91 categories of objects.
If you have enough data and you can train the network by yourself then you can load just architecture by setting pretrained to False.
After loading the model, we have set it in evaluation mode by calling eval() method. This will prevent the calculation of gradients which happens during the training phase which is set by default.
from torchvision.models.detection import fasterrcnn_resnet50_fpn

object_detection_model = fasterrcnn_resnet50_fpn(pretrained=True, progress=False)

object_detection_model.eval(); ## Setting Model for Evaluation/Prediction
3. Make Predictions 
Here, we have made predictions on our images using our train model. We have made predictions on both images. The output of the model is a dictionary with three keys.
- boxes - It has shape (no_of_objects, 4). The 4 numbers for each object represents bounding box covering object represented as (top-x, top-y, bottom-x, bottom-y).
- labels - It has a list of labels of detected objects. Currently, it'll be integer values but we'll convert them to target labels by loading mapping from COCO website.
- scores - It has probabilities of detected objects saying how much confident the model was in detecting these objects.
After making predictions, we have removed objects where the model has a prediction probability less than 0.8.
holiday_preds = object_detection_model(holiday_tensor_float)

holiday_preds
holiday_preds[0]["boxes"] = holiday_preds[0]["boxes"][holiday_preds[0]["scores"] > 0.8]
holiday_preds[0]["labels"] = holiday_preds[0]["labels"][holiday_preds[0]["scores"] > 0.8]
holiday_preds[0]["scores"] = holiday_preds[0]["scores"][holiday_preds[0]["scores"] > 0.8]

holiday_preds
kids_preds = object_detection_model(kids_playing_tensor_float)

kids_preds
kids_preds[0]["boxes"] = kids_preds[0]["boxes"][kids_preds[0]["scores"] > 0.8]
kids_preds[0]["labels"] = kids_preds[0]["labels"][kids_preds[0]["scores"] > 0.8]
kids_preds[0]["scores"] = kids_preds[0]["scores"][kids_preds[0]["scores"] > 0.8]

kids_preds
4. Visualize Results 
Now, at last, we'll visualize prediction results. In order to do that, we first need to retrieve the mapping of integer target labels to their actual string target labels. We'll download and load mapping from COCO website first.
4.1 Load Target Classes Mapping
Below, we have downloaded annotations from COCO website as a zip file and then unzipped it. You'll need unzip command installed on your computer for running the below cell. If you don't have unzip installed and you want to do it using Python then you can use zipfile module as well.
!wget http://images.cocodataset.org/annotations/annotations_trainval2017.zip
!unzip annotations_trainval2017.zip
Below, we have created an instance of COCO from pycocotools library. We had provided information for installing this library earlier. It provides an API to access various datasets and annotation files available from COCO. This coco object has various methods that can be very helpful. We'll use one such method next to retrieve the actual labels of our target classes.
from pycocotools.coco import COCO

annFile='annotations/instances_val2017.json'

coco=COCO(annFile)
4.2 Map Target Category Ids to Labels
Below, we have retrieved actual string target labels by calling loadCats() method on COCO object. We have provided original integer labels to the method. Next, we'll use these string labels when displaying predictions.
holiday_labels = coco.loadCats(holiday_preds[0]["labels"].numpy())

holiday_labels
kids_labels = coco.loadCats(kids_preds[0]["labels"].numpy())

kids_labels
4.3 Visualize Bounding Boxes On Original Images
Here, we are visualizing images with objects detected by the model surrounded by bounding boxes and a title at the top with a score. We have first below merger labels and their score to create new labels.
Then, we have called utility visualization function named draw_bounding_boxes() provided by torchvision module's utils sub-module. We have provided function with our image (as integer tensor), bounding boxes, modified labels, and color guide. We have asked to color "person" object red and all other objects green. The output of the function is a torch tensor which has bounding boxes and labels included in them.
To visualize image, we have converted tensors to Pillow images by calling to_pil_image() function available functional API of torchvision.
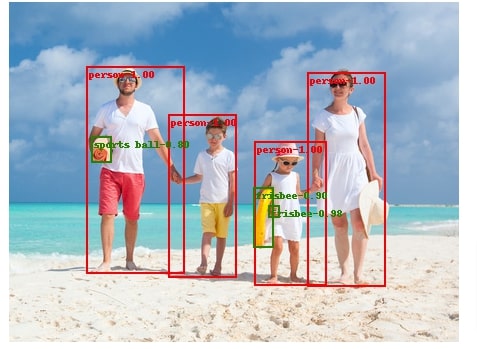
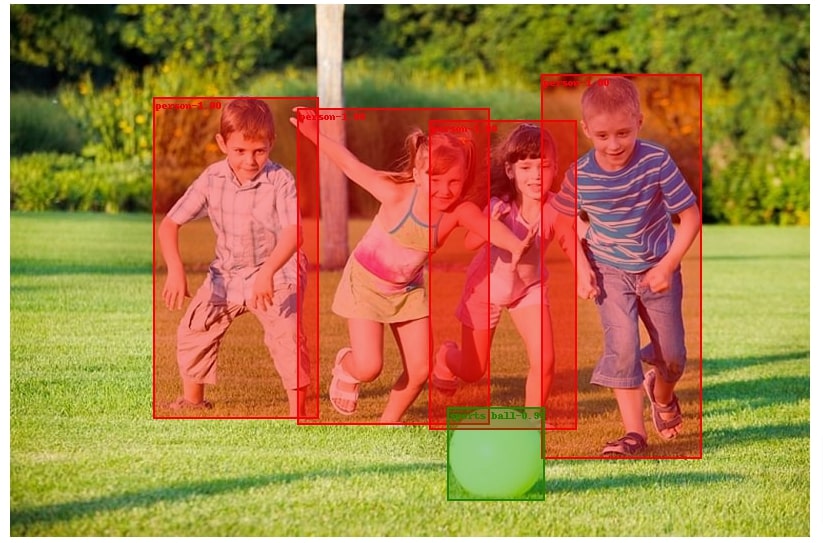
We have visualized both images. We can notice that in the case of the first image, it correctly predicts "person" objects. It is even making a few mistakes like predicting mat as sports ball, float tube as Frisbee, and not recognizing hat. For the second image, it correctly detects all objects. It is able to detect a child partly hidden behind other children.
from torchvision.utils import draw_bounding_boxes

holiday_annot_labels = ["{}-{:.2f}".format(label["name"], prob) for label, prob in zip(holiday_labels, holiday_preds[0]["scores"].detach().numpy())]

holiday_output = draw_bounding_boxes(image=holiday_tensor_int[0],
                             boxes=holiday_preds[0]["boxes"],
                             labels=holiday_annot_labels,
                             colors=["red" if label["name"]=="person" else "green" for label in holiday_labels],
                             width=2
                            )

holiday_output.shape
from torchvision.transforms.functional import to_pil_image

to_pil_image(holiday_output)
from torchvision.utils import draw_bounding_boxes

kids_annot_labels = ["{}-{:.2f}".format(label["name"], prob) for label, prob in zip(kids_labels, kids_preds[0]["scores"].detach().numpy())]

kids_output = draw_bounding_boxes(image=kids_playing_tensor_int[0],
                             boxes=kids_preds[0]["boxes"],
                             labels=kids_annot_labels,
                             colors=["red" if label["name"]=="person" else "green" for label in kids_labels],
                             width=2,
                             font_size=16,
                             fill=True
                            )

to_pil_image(kids_output)
5. Try Other Pre-Trained Models 
PyTorch torchvision module provides an implementation of other models as well which we have imported below. We'll suggest readers to try them if the above model is not giving that much good results.
from torchvision.models.detection import fasterrcnn_mobilenet_v3_large_320_fpn,\
                                         fasterrcnn_mobilenet_v3_large_fpn,\
                                         fcos_resnet50_fpn,\
                                         ssdlite320_mobilenet_v3_large,\
                                         ssd300_vgg16,\
                                         retinanet_resnet50_fpn
References
 Sunny Solanki
Sunny Solanki
Intro: Software Developer | Youtuber | Bonsai Enthusiast
About: Sunny Solanki holds a bachelor's degree in Information Technology (2006-2010) from L.D. College of Engineering. Post completion of his graduation, he has 8.5+ years of experience (2011-2019) in the IT Industry (TCS). His IT experience involves working on Python & Java Projects with US/Canada banking clients. Since 2020, he’s primarily concentrating on growing CoderzColumn.
His main areas of interest are AI, Machine Learning, Data Visualization, and Concurrent Programming. He has good hands-on with Python and its ecosystem libraries.
Apart from his tech life, he prefers reading biographies and autobiographies. And yes, he spends his leisure time taking care of his plants and a few pre-Bonsai trees.
Contact: sunny.2309@yahoo.in


![YouTube Subscribe]() Comfortable Learning through Video Tutorials?
Comfortable Learning through Video Tutorials?
If you are more comfortable learning through video tutorials then we would recommend that you subscribe to our YouTube channel.
![Need Help]() Stuck Somewhere? Need Help with Coding? Have Doubts About the Topic/Code?
Stuck Somewhere? Need Help with Coding? Have Doubts About the Topic/Code?
 Stuck Somewhere? Need Help with Coding? Have Doubts About the Topic/Code?
When going through coding examples, it's quite common to have doubts and errors.
If you have doubts about some code examples or are stuck somewhere when trying our code, send us an email at coderzcolumn07@gmail.com. We'll help you or point you in the direction where you can find a solution to your problem.
You can even send us a mail if you are trying something new and need guidance regarding coding. We'll try to respond as soon as possible.
![Share Views]() Want to Share Your Views? Have Any Suggestions?
Want to Share Your Views? Have Any Suggestions?
 Want to Share Your Views? Have Any Suggestions?
If you want to
- provide some suggestions on topic
- share your views
- include some details in tutorial
- suggest some new topics on which we should create tutorials/blogs
 pytorch, object-detection, pre-trained-models