List of Useful Magic Commands in Jupyter Notebook/Lab
Jupyter Notebook/Lab is the go-to tool used by data scientists and developers worldwide to perform data analysis nowadays. It provides a very easy-to-use interface and lots of other functionalities like markdown, latex, inline plots, etc.
Apart from these, it even provides a list of useful magic commands which let us perform a bunch of tasks from the jupyter notebook itself which otherwise need to be done in the command prompt/shell.
> Categories of Magic Commands
There are two types of magic commands available with Jupyter Notebook/Lab:
- Line Magic Commands: It applies the command to one line of the Jupyter cell as its name suggests.
- Cell Magic Commands: It applies the command to the whole cell of the notebook and needs to be kept at the beginning of the cell.
> What Can You Learn From This Article?
As a part of this tutorial, we have explained how to use magic commands in jupyter notebooks with simple examples. We have explained line magic commands as well as cell magic commands. Tutorial has covered majority of useful magic commands available.
Download Magic Commands Checklist
Below we have listed important sections of Tutorial to give an overview of material covered.
Important Sections Of Tutorial
- Line Magic Commands (Starting with "%")
- "%lsmagic" - List All Available Magic Commands
- "%magic" - Print Information About Magic Commands System
- "%quickref" - Cheat-Sheet of Magic Commands
- "%alias_magic" - Give Any Magic Command Alias Name
- "%autocall" - Call Functions without Parenthesis
- "%automagic" - Call Line Magic Commands without "%" Prefix
- "%pwd" - Prints Present Working Directory
- "%cd" - Change Working Directory in Notebook
- "%system" - Execute Unix Shell Commands in Jupyter Notebook
- "%sx" - Execute Unix Shell Commands in Notebook
- "%time" - Measures Execution Time of a Line/Statement in Notebook
- "%timeit" - Measures Execution Time of Line
- "%who" - Prints All Variables Initialized/Declared in Notebook of Specified Data Type
- "%who_ls" - Prints All Variables Initialized/Declared in Notebook of Specified Data Type as "List"
- "%whos" - Prints All Variables in Notebook with Details
- "%load" - Loads Code from Filename in Jupyter Notebook
- "%load_ext" - Load External Module in Jupyter Notebook
- "%unload_ext" - Unload External Module
- "%reload_ext" - Reload Externally Loaded Module
- "%tb" - Print Stack Trace of Last Failure
- "%env" - List, Get and Set Environment Variables in Notebook
- "%set_env" - Set Environment Variables in Notebook
- "%conda" - Execute 'Conda' Commands in Notebook
- "%pip" - Execute Python 'pip' Commands in Notebook
- "%dhist" - Prints History Of Visited Directories in Notebook
- "%history" - Prints History of Commands Executed in Notebook
- "%doctest_mode" - Inform IPython Kernel to Behave Like Normal Python Shell
- "%prun" - Profile Python Code using "profile" Module
- "%matplotlib" - Sets Matplotlib Backend for Plotting
- "%pdef" - Print Signature of Callable
- "%pdoc" - Print Docstring of a Callable
- "%precision" - Sets Precision of Floating Point Numbers
- "%psearch" - Search Namespace using Pattern
- "%psource" - Print Source Code of an Object
- "%pycat" - Shows Content of File with Syntax Highlighted
- "%pylab" - Loads Numpy and Matplotlib in Namespace
- "%recall" - Put History Commands Executed in Next Cell
- "%rerun" - Rerun Previously Executed Cell
- "%reset" - Reset Namespace (Remove All Existing User-defined Names)
- "%reset_selective" - Remove Variables Matching a Pattern
- "%run" - Execute Python Script in Notebook
- Cell Magic Commands (Starting with "%%")
- "%%bash" - Execute "bash" Script in Notebook
- "%%script" - Execute Perl, Python, Ruby, and Shell Scripts in Notebook
- "%%sh" - Execute Unix Shell Script in Notebook
- "%%html" - Render Contents of Cell as HTML
- "%%javascript" - Execute Contents of Cell as Javascript
- "%%js" - Execute Contents of Cell as Javascript
- "%%perl" - Execute Contents of Cell as Perl Script/Code
- "%%ruby" - Execute Contents of Cell as Ruby Code
- "%%latex" - Execute Contents of Cell as LaTex (Mathematical Formulas)
- "%%markdown" - Execute Contents of Cell as Markdown
- "%%writefile" - Write Contents of Cell to a File
- "%%time" - Measure Execution Time of Cell Code
- "%%timeit" - Measure Execution Time of Cell Code
- "%%prun" - Profile Cell Python Code
We'll now explain the usage of magic commands one by one with simple examples.
1. Line Magic Commands 
In this section, we'll explain the commonly used line magic command which can make the life of the developer easy by providing some of the useful functionalities in the notebook itself.
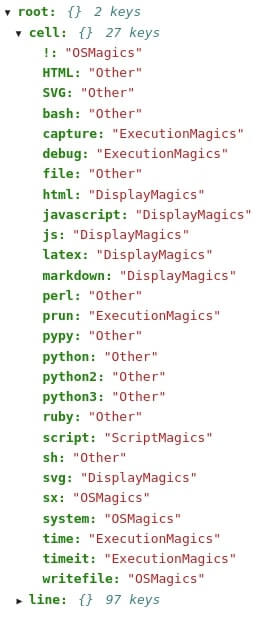
"%lsmagic" - List All Available Magic Commands in Jupyter Notebook
The %lsmagic commands list all the available magic commands with a notebook.
%lsmagic
If we run this command in Jupyter lab then it'll return an expandable tree-like structure for a list of commands as shown below.
"%magic" - Print Information About Magic Commands System in Notebook
The %magic commands print information about the magic commands system in the jupyter notebook. It kind of gives an overview of the magic commands system available in the notebook.
%magic
"%quickref " - Cheat-Sheet of Magic Commands
The %quickref line command gives us a cheat-sheet covering an overview of each magic command available.
%quickref
The following magic functions are currently available:

%alias:
    Define an alias for a system command.
%alias_magic:
    ::
%autoawait:

%autocall:
    Make functions callable without having to type parentheses.
%automagic:
    Make magic functions callable without having to type the initial %.
%autosave:
    Set the autosave interval in the notebook (in seconds).
%bookmark:
    Manage IPython's bookmark system.
"%alias_magic" - Give Any Magic Command Alias Name
The %alias_magic line command as its name suggests creates an alias for any existing magic command. We can then call the command by alias and it'll perform the same functionality as the original command. Below we have renamed the %pwd command to the %currdir command which displays the current working directory. We need to give a new name for the command followed by a command name to create an alias.
%alias_magic currdir pwd
%currdir
"%autocall" - Call Functions without Parenthesis in Notebook
The %autocall line command lets us call functions in a notebook without typing parenthesis. We can type function name followed by a list of argument values separated by a comma. Below we have created a simple function that adds two numbers. We have then turned on autocall by calling the magic command. After turning on autocall, we are able to execute the function without parenthesis. We have then turned off autocall and calling the function without parenthesis fails.
def addition(a,b):
    return a+b
%autocall
addition 5, 5
%autocall
addition 5, 5
"%automagic" - Call Line Magic Commands without "%" Prefix
The %automagic line command let us call magic command in jupyter notebook without typing % sign at the beginning. We can turn automagic on and off by executing the %automagic line command. Below we have explained the usage of the same.
%automagic
pwd
%automagic
pwd
"%pwd" - Prints Present Working Directory
The %pwd line command as its name suggests returns the present working directory.
%pwd
"%cd" - Change Working Directory in Notebook
The %cd line command lets us change our working directory as explained below.
%cd Desktop/
%pwd
"%system" - Execute Unix Shell Commands in Jupyter Notebook
The %system command lets us execute Unix shell commands in the jupyter notebook. We can execute any single line Unix shell command from the notebook. We have explained below the usage of the command with two simple examples.
If you want to execute UNIX commands in Python code and retrieve their results, then Python has a library named subprocess. It'll create child process and execute command. Please feel free to check below link in your free time to learn about it.
%system echo 'Hello World'
%system ls -lrt | grep python
"%sx" - Execute Unix Shell Commands in Notebook
The %sx command works exactly like the %system command.
%sx echo 'Hello World'
%sx ls -lrt | grep python
"%time" - Measures Execution Time of a Line/Statement in Notebook (using "time" Module)
The %time line command measures the execution time of the line which follows it using the 'time' python module. It returns both, the CPU and wall time of execution.
Below we have explained with a simple example of how to use command. It even returns the execution value of the command which we have kept in a variable. It's available as a cell command as well.
If you want to learn about Python 'time' module then please do check out our tutorial on it in your spare time.
%time out = [i*i for i in range(1000000)]
"%timeit" - Measures Execution Time of Line (using "timeit" Module)
The %timeit line command measures the execution time of the function using the timeit python module. It provides a few other functionalities as well. It executes the command given as input for 7 rounds where each round executes code 10 times totaling 70 times by default. It takes the best of each iteration in each round and gives time measurement with standard deviation. Below are some useful arguments of the command.
- -n LOOPS - It accepts integer value specifying number of iteration per round.
- -r RUNS - It accepts integer value specifying number of rounds to test timer.
- -t - This option forces %timeit to use time.time to measure time which returns wall time.
- -c - This option forces %timeit to use time.clock to measure time which returns CPU time.
- -q - This option instructs %timeit to not print results to the output.
- -o - This option returns TimeitResult object.
Below we have explained with simple example usage of the command.
%timeit out = [i*i for i in range(1000000)]
%timeit -n 5 -r 5 out = [i*i for i in range(1000000)]
"%who" - Prints All Variables Initialized/Declared in Notebook of Specified Data Type
The %who line command returns all variables of a particular type. We can give variable type followed the command and it'll return a list of all variables with that type. We can even give more than one type if we want to see variables of different type which are currently active in jupyter notebook and not collected by the garbage collector.
Below we have explained with few simple examples of how we can use %who.
a = 100
b = 5.5
c = [11,12,13]
d = {'key1':'val1', 'key2':'val2'}
e = "Hello World"

%who str
%who dict
%who float
%who list
def addition(a,b):
    return a + b

def division(a,b):
    return a / b if b!=0 else 0

%who function
%who function list
"%who_ls" - Prints All Variables Initialized/Declared in Notebook of Specified Data Type as "List"
The %who_ls commands work exactly like %who but it returns a list of variable names as a list of strings which is sorted as well.
%who_ls function
"%whos" - Prints All Variables in Notebook with Details (data type)
The %whos command also works like %who but it gives a little more information about variables that match the given type.
a = 100
b = 5.5
c = [11,12,13]
d = {'key1':'val1', 'key2':'val2'}
e = "Hello World"

%whos str
%whos dict
%whos float
%whos list
%whos function
"%load" - Loads Code from Filename in Jupyter Notebook
The %load command accepts the filename followed by it and loads the code present in that file in the current cell. It also comments execution of itself once the cell is executed. It can even accept URL where code is kept and loads it from there.
We can use the below-mentioned options along with the command if we want to load only a particular part of the file and not the whole file.
- -r - It accepts integer range which only loads code that falls into that range in the file.
- -s - It accepts class or function name and loads code of that class or function into the cell rather than the whole file.
Below we have explained the usage of the command with simple examples.
# %load profiling_example.py

from memory_profiler import profile

@profile(precision=4)
def main_func():
    import random
    arr1 = [random.randint(1,10) for i in range(100000)]
    arr2 = [random.randint(1,10) for i in range(100000)]
    arr3 = [arr1[i]+arr2[i] for i in range(100000)]
    tot = sum(arr3)
    print(tot)

if __name__ == "__main__":
    main_func()
# %load -r 5-10 profiling_example.py
def main_func():
    import random
    arr1 = [random.randint(1,10) for i in range(100000)]
    arr2 = [random.randint(1,10) for i in range(100000)]
    arr3 = [arr1[i]+arr2[i] for i in range(100000)]
    tot = sum(arr3)
# %load -s main_func profiling_example.py
@profile(precision=4)
def main_func():
    import random
    arr1 = [random.randint(1,10) for i in range(100000)]
    arr2 = [random.randint(1,10) for i in range(100000)]
    arr3 = [arr1[i]+arr2[i] for i in range(100000)]
    tot = sum(arr3)
    print(tot)
"%load_ext" - Load External Module in Jupyter Notebook
The %load_ext commands load any external module library which can then be used as a magic command in a notebook. Please make a note that only a few libraries that have implemented support for jupyter notebook can be loaded. The snakeviz, line_profiler and memory_profiler are examples of it.
Below we have loaded snakeviz as an extension in a notebook. We can then use %snakeviz to profile a line of code and visualize it.
If you are interested in learning about how to use snakeviz, line_profiler and memory_profiler with jupyter notebook then please feel free to check out tutorials on the same.
%load_ext snakeviz
def main_func():
    import random
    arr1 = [random.randint(1,10) for i in range(100000)]
    arr2 = [random.randint(1,10) for i in range(100000)]
    arr3 = [arr1[i]+arr2[i] for i in range(100000)]
    tot = sum(arr3)
    print(tot)

%snakeviz main_func()

"%unload_ext" - Unload External Module
The %unload_ext line command unload any external loaded extension.
%unload_ext snakeviz
"%reload_ext" - Reload Externally Loaded Module (Reinitialize)
The %reload_ext line command reloads externally loaded extension. We can reload it if it misbehaves.
%reload_ext snakeviz
"%tb" - Print Stack Trace of Last Failure
The %tb command stack trace of the last failure which had happened in the notebook.
Python has a module named 'traceback' that let us retrieve failure traceback in code. Please feel free to check below link if you are interested in it.
%tb
"%env" - List, Get and Set Environment Variables in Notebook
The %env line command can be used to get, set, and list environment variables.
If we call the command without any argument then it'll list all environment variables.
We can give the environment variable name followed by the command and it'll return the value of that environment variable.
We can also set the value of the environment variable using it which we have explained with an example below.
Python also let us set environment variables in code using 'os' module. Do check it out from below link.
%env DESKTOP_SESSION
%env HOME
%env HOME=/home/sunny/Desktop
%env HOME
"%set_env" - Set Environment Variables in Notebook
The %set_env command lets us set the value of environment variables.
%set_env HOME=/home/sunny
%env HOME
home = "/home/sunny/Desktop/"

%set_env HOME=$home
%env HOME
"%conda" - Execute 'Conda' Commands in Notebook
The %conda line command lets us execute the conda package manager command in the jupyter notebook. Below we are listing down a list of available conda environments on the system.
%conda env list
"%pip" - Execute Python 'pip' Commands in Notebook (Install/Uninstall Python Modules)
The %pip line command lets us install the python module using the pip package manager in the jupyter notebook.
%pip install sklearn
"%dhist" - Prints History Of Visited Directories in Notebook
The %dhist command lists down all directory which was visited in the notebook. It shows the history of directories visited.
%dhist
"%history" - Prints History of Commands Executed in Notebook
The %history line command list down the history of commands which were executed in a notebook. We can use the -n option to show commands which fall in a particular range in history. We can even store a history of commands executed to an output file using the -f option followed by the file name.
%history -n 6-9
%history -n 6-9 -p
%history -n 6-9 -p -f magic.out
!cat magic.out
"%doctest_mode" - Inform IPython Kernel to Behave Like Normal Python Shell
The %doctest_mode line command informs the IPython kernel to behave as much as a normal python shell which will influence how it asks for values and prints output.
%doctest_mode
a=10

a/0
%doctest_mode
"%prun" - Profile Python Code using "profile" Module
The %prun command lets us profile python code in jupyter notebook using the profile module. It lists down the time taken by various functions. Please feel free to check our tutorial on profile to learn about profiling.
It has a list of the below options which can be useful for different tasks.
- -l - This option accepts an integer argument followed by it which will restrict a number of lines of profiling output printed to standard output.
- -s - This option accepts string argument followed by it and will sort profiling argument based on that string. The string is one of the column names of the profiling output. Below is a list of possible values.
- calls
- tottime
- cumulative
- file
- module
- pcalls
- name
- line
- -T - This option saves profiling results to a file. We need to give the file name after this option to save the output to it.
- -q - This option prevents printing of profiling results to standard output.
Below we have explained the usage of %prun with simple examples. It’s also available as a cell command.
import random

%prun arr1 = [random.randint(1,10) for i in range(100000)]
559668 function calls in 0.140 seconds

   Ordered by: internal time

   ncalls  tottime  percall  cumtime  percall filename:lineno(function)
   100000    0.042    0.000    0.102    0.000 random.py:174(randrange)
   100000    0.042    0.000    0.060    0.000 random.py:224(_randbelow)
   100000    0.019    0.000    0.122    0.000 random.py:218(randint)
        1    0.018    0.018    0.140    0.140 <string>:1(<listcomp>)
   159664    0.014    0.000    0.014    0.000 {method 'getrandbits' of '_random.Random' objects}
   100000    0.005    0.000    0.005    0.000 {method 'bit_length' of 'int' objects}
        1    0.000    0.000    0.140    0.140 <string>:1(<module>)
        1    0.000    0.000    0.140    0.140 {built-in method builtins.exec}
        1    0.000    0.000    0.000    0.000 {method 'disable' of '_lsprof.Profiler' objects}
%prun -l 10 -s tottime -T prof_res.out arr1 = [random.randint(1,10) for i in range(100000)]
!cat prof_res.out
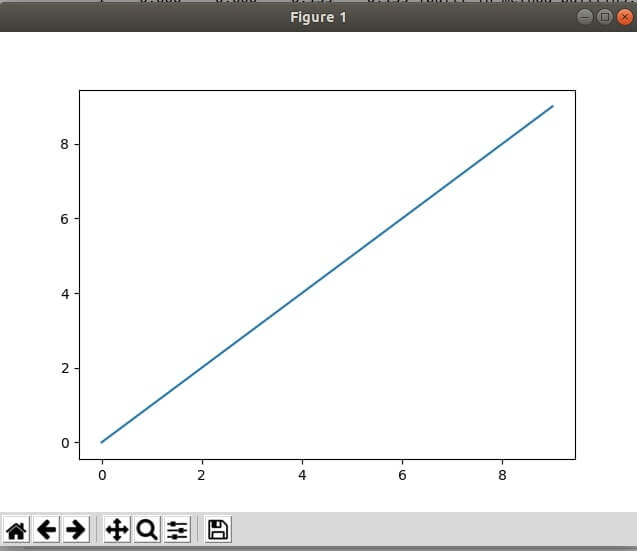
"%matplotlib" - Sets Matplotlib Backend for Plotting
The %matplotlib line command sets up which backend to used to plot matplotlib plots. We can execute a command with the --list option and it'll return a list of available backend strings. If we call command without any argument then it'll set TkAgg as backend.
%matplotlib --list
%matplotlib
import matplotlib.pyplot as plt

plt.plot(range(10), range(10))
plt.show()
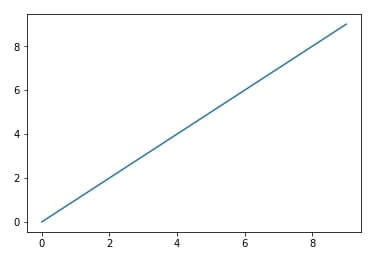
%matplotlib inline
import matplotlib.pyplot as plt

plt.plot(range(10), range(10))
plt.show()
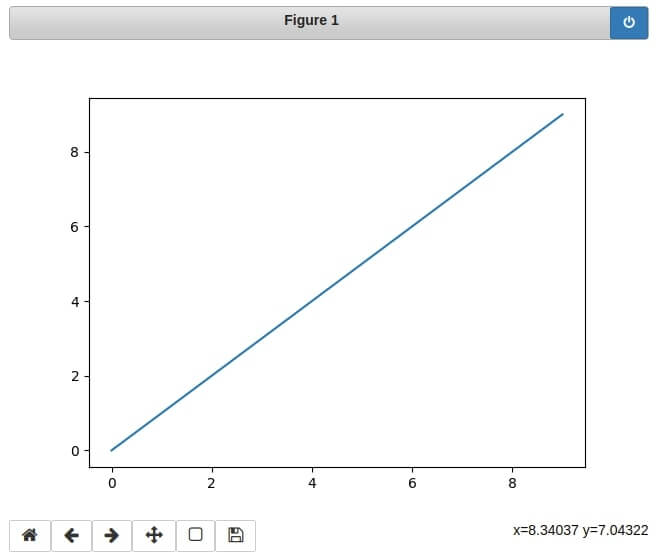
%matplotlib widget
#%matplotlib notebook
import matplotlib.pyplot as plt

plt.plot(range(10), range(10))
plt.show()
"%pdef" - Print Signature of Callable
The %pdef command prints the signature of any callable object. We can inspect the signature of functions using this line command which can be useful if a signature is quite long.
If you want to retrieve signature of any python callable in code then you can use Python module 'inspect'. Feel free to check below link to learn about it in detail.
def division(a, b):
    return a / b if b!=0 else 0

%pdef division
"%pdoc" - Print Docstring of a Callable
The %pdoc line command prints docstring of callable objects. We can print a docstring of the function which has a general description of arguments and inner working of the function.
You can use Python module 'inspect' we mentioned in previous command explanation to retrieve doctstring in code.
def division(a, b):
    '''
    This function divides first argument by second.
    It return 0 if second argument is 0 to avoid divide by zero error
    '''
    return a / b if b!=0 else 0

%pdoc division
Class docstring:
    This function divides first argument by second.
    It return 0 if second argument is 0 to avoid divide by zero error
Call docstring:
    Call self as a function.
"%precision" - Sets Precision of Floating Point Numbers
The %precision line command sets the precision of printing floating-point numbers. We can specify how many numbers to print after the decimal point. It'll round the number.
%precision 3
a = 1.23678

a
%precision 0
a
"%psearch" - Search Namespace using Pattern
The %psearch line command lets us search namespace to find a list of objects which match the wildcard argument given to it. We can search for variable names that have some string present in them using this command. We have explained the usage of the command below.
val1 = 10
val2 = 20
val3 = 50
top_val = 10000

%psearch val*
val1
val2
val3%psearch *val*
eval
top_val
val1
val2
val3
"%psource" - Print Source Code of an Object
The %psource command takes any object as input and prints the source code of it. Below we are using it to print the source code of the division function we had created earlier.
If you want to retrieve source code of any python object in code then you can use Python module 'inspect'. Feel free to check below link to learn about it in detail.
%psource division
def division(a, b):
    '''
    This function divides first argument by second.
    It return 0 if second argument is 0 to avoid divide by zero error
    '''
    return a / b if b!=0 else 0
"%pycat" - Shows Content of File with Syntax Highlighted
The %pycat line command shows us a syntax-highlighted file which is given as input to it.
%pycat profiling_example.py
from memory_profiler import profile

@profile(precision=4)
def main_func():
    import random
    arr1 = [random.randint(1,10) for i in range(100000)]
    arr2 = [random.randint(1,10) for i in range(100000)]
    arr3 = [arr1[i]+arr2[i] for i in range(100000)]
    tot = sum(arr3)
    print(tot)

if __name__ == "__main__":
    main_func()
"%pylab" - Loads Numpy and Matplotlib in Namespace
The %pylab command loads numpy and matplotlib to work into the namespace. After executing this command, we can directly call the numpy and matplotlib function without needing to import these libraries. We have explained the usage below.
%pylab
arr = array([1,2,3,4])

type(arr)
rng = arange(10)
print(rng)
type(rng)
plot(range(10), range(10))
"%recall" - Put History Commands Executed in Next Cell
The %recall command puts a history of the command executed in the next cell. We can give it input integer of range of integer and it'll put that many commands from history in next cell.
%recall 4
%quickref
%recall 1-4
%lsmagic
%magic prun
%magic prun
%quickref
"%rerun" - Rerun Previously Executed Cell
The %rerun command reruns the previously executed cell.
%rerun
%lsmagic
%magic prun
%magic prun
%quickref
"%reset" - Reset Namespace (Remove All Existing User-defined Names)
The %reset command resets namespace by removing all user-defined names.
%who_ls
%reset
val1
"%reset_selective" - Remove Variables Matching a Pattern
The %reset_selective works like %reset but let us specify a pattern to remove only names that match that pattern. Below we are only removing variables that have the string val in their name.
%who_ls
val1 = 10
val2 = 20
val3 = 50
top_val = 10000

a = 10
rng = range(10)

%who_ls
%reset_selective -f val
%who_ls
"%run" - Execute Python Script in Notebook
The %run command lets us run the python file in the jupyter notebook. We can also pass arguments to it followed by a file name as we do from shell/command prompt. We have created a simple profiling example mentioned below and run it for explanation purposes. It also accepts the -t option which measures the running time of the file.
profiling_example.py
from memory_profiler import profile

@profile(precision=4)
def main_func():
    import random
    arr1 = [random.randint(1,10) for i in range(100000)]
    arr2 = [random.randint(1,10) for i in range(100000)]
    arr3 = [arr1[i]+arr2[i] for i in range(100000)]
    tot = sum(arr3)
    print(tot)

if __name__ == "__main__":
    main_func()
%run profiling_example.py
%run -t profiling_example.py
2. Cell Magic Commands 
Cell magic commands are given at the starting of the cell and apply to the whole cell. It can be very useful when we want to perform some functionality at the cell level like measuring the running time of cells or profiling cell code. We'll now explain useful cell commands available in the jupyter notebook.
"%%bash" - Execute "bash" Script in Notebook
The %%bash cell command lets us execute shell commands from the jupyter notebook. We can include the whole shell script into the cell and it'll execute it like it was executed in a shell.
%%bash

ls -lrt | grep "python"
"%%script" - Execute Perl, Python, Ruby and Shell Scripts in Notebook
The %%script cell command lets us execute scripts designed in different languages like Perl, pypy, python, ruby, and Linux shell scripting. We need to give the language name followed by the command and it'll execute shell contents using the interpreter of that language.
%%script bash

ls -lrt | grep "python"
%%script sh

ls -lrt | grep "python"
"%%sh" - Execute Unix Shell Script in Notebook
The %%sh cell command let us execute UNIX shell commands into the jupyter notebook.
%%sh

ls -lrt | grep "python"
"%%html" - Render Contents of Cell as HTML
The %%html cell command renders the contents of the cell as HTML. We can keep HTML tags as input and it'll render them as HTML.
%%html

<h1>Heading Big</h1>
<h2>Heading Medium</h2>
<h3>Heading Small</h3>

# Comment
"%%javascript" - Execute Contents of Cell as Javascript
The %%javascript cell command will execute the contents of the cell as javascript. Below we have explained how we can use this cell command with a simple example. The output cell is available as element and we can modify it to append HTML. Please make a note that this command currently works only with Jupyter Lab, not with Jupyter Notebook.
%%javascript

// program to find the largest among three numbers

// take input from the user
const num1 = 12
const num2 = 10
const num3 = 35
let largest;

// check the condition
if(num1 >= num2 && num1 >= num3) {
    largest = num1;
}
else if (num2 >= num1 && num2 >= num3) {
    largest = num2;
}
else {
    largest = num3;
}

// display the result
element.innerHTML =  '<h1>The Largest Number is : ' + largest + '</h1>'

"%%js" - Execute Contents of Cell as Javascript
The %%js cell command works exactly like %%javascript.
%%js

// program to find the largest among three numbers

// take input from the user
const num1 = 12
const num2 = 10
const num3 = 35
let largest;

// check the condition
if(num1 >= num2 && num1 >= num3) {
    largest = num1;
}
else if (num2 >= num1 && num2 >= num3) {
    largest = num2;
}
else {
    largest = num3;
}

// display the result
element.innerHTML  = '<h1>The Largest Number is : ' + largest + '</h1>';
"%%perl" - Execute Contents of Cell as Perl Script/Code
The %%perl cell command executes cell content using Perl interpreter. We can use this command to execute Perl script in jupyter notebook.
%%perl

#!/usr/bin/perl
use strict;
use warnings;

print "Hello Bill\n";
%%perl

$size=15;             # give $size value of 15
$y = -7.78;           # give $y value of -7.78
$z = 6 + 12;
print $y, "\n";
print $z, "\n";
print $size, "\n";
$num = 7;
$txt = "It is $num";
print $txt;
"%%ruby" - Execute Contents of Cell as Ruby Code
The %%ruby cell command executes cell content using a ruby interpreter. We can use this command to execute the ruby script in the jupyter notebook.
%%ruby

print "Hello, World!"
%%ruby

tigers = 50
lions = 45

puts "There are #{tigers} Tigers and #{lions} Lions in the Zoo."
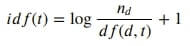
"%%latex" - Execute Contents of Cell as LaTex (Mathematical Formulas)
The %%latex cell command lets us execute cell content as latex code. We can write latex code and it'll create formulas out of it. We have explained the usage of the same below with simple examples.
%%latex

\begin{equation*}
   e^{\pi i} + 1 = 0
\end{equation*}

%%latex

$
idf(t)  = {\log_{} \dfrac {n_d} {df(d,t)}} + 1
$
"%%markdown" - Execute Contents of Cell as Markdown
The %%markdown cell command lets us execute cell contents as markdown.
Apart from markdown Jupyter notebook let us display many other types of contents in notebook including rich media contents like audio, video, image, etc. Please feel free to check below link to know about them in detail.
%%markdown

# H1 Heading
# H2 Heading

* List 1
* List 2

**Bold Text**

"%%writefile" - Write Contents of Cell to a File
The %%writefile cell command lets us save the contents of the cell to an output file.
%%writefile profiling_example.py

from memory_profiler import profile

@profile(precision=4)
def main_func():
    import random
    arr1 = [random.randint(1,10) for i in range(100000)]
    arr2 = [random.randint(1,10) for i in range(100000)]
    arr3 = [arr1[i]+arr2[i] for i in range(100000)]
    tot = sum(arr3)
    print(tot)

if __name__ == "__main__":
    main_func()
!cat profiling_example.py
"%%time" - Measure Execution Time of Cell Code
The %%time cell command works exactly like the %time line command but measures the time taken by code in the cell.
%%time

def main_func():
    import random
    arr1 = [random.randint(1,10) for i in range(100000)]
    arr2 = [random.randint(1,10) for i in range(100000)]
    arr3 = [arr1[i]+arr2[i] for i in range(100000)]
    tot = sum(arr3)
    print(tot)

main_func()
"%%timeit" - Measure Execution Time of Cell Code
The %%timeit cell command works exactly like the %timeit line command but measures the time taken by code in the cell.
%%timeit

def main_func():
    import random
    arr1 = [random.randint(1,10) for i in range(100000)]
    arr2 = [random.randint(1,10) for i in range(100000)]
    arr3 = [arr1[i]+arr2[i] for i in range(100000)]
    tot = sum(arr3)

main_func()
%%timeit -n 5 -r 5

def main_func():
    import random
    arr1 = [random.randint(1,10) for i in range(100000)]
    arr2 = [random.randint(1,10) for i in range(100000)]
    arr3 = [arr1[i]+arr2[i] for i in range(100000)]
    tot = sum(arr3)

main_func()
%%timeit -t -n 5 -r 5

def main_func():
    import random
    arr1 = [random.randint(1,10) for i in range(100000)]
    arr2 = [random.randint(1,10) for i in range(100000)]
    arr3 = [arr1[i]+arr2[i] for i in range(100000)]
    tot = sum(arr3)

main_func()
%%timeit -c -n 5 -r 5

def main_func():
    import random
    arr1 = [random.randint(1,10) for i in range(100000)]
    arr2 = [random.randint(1,10) for i in range(100000)]
    arr3 = [arr1[i]+arr2[i] for i in range(100000)]
    tot = sum(arr3)

main_func()
"%%prun" - Profile Cell Python Code
The %%prun cell command profiles code of the cell exactly like the %prun profiles one line of code.
%%prun

def main_func():
    import random
    arr1 = [random.randint(1,10) for i in range(100000)]
    arr2 = [random.randint(1,10) for i in range(100000)]
    arr3 = [arr1[i]+arr2[i] for i in range(100000)]
    tot = sum(arr3)
    print(tot)

main_func()
%%prun

def main_func():
    import random
    arr1 = [random.randint(1,10) for i in range(100000)]
    arr2 = [random.randint(1,10) for i in range(100000)]
    arr3 = [arr1[i]+arr2[i] for i in range(100000)]
    tot = sum(arr3)
    print(tot)

main_func()
%%prun -l 10 -s tottime -T prof_res.out

def main_func():
    import random
    arr1 = [random.randint(1,10) for i in range(100000)]
    arr2 = [random.randint(1,10) for i in range(100000)]
    arr3 = [arr1[i]+arr2[i] for i in range(100000)]
    tot = sum(arr3)
    print(tot)

main_func()
!cat prof_res.out
This ends our small tutorial explaining how we can use different line and cell magic commands available in the jupyter notebook.
Download Magic Commands Checklist
References
- IPython Full Magic Commands Docs
- cProfile and profile
- Snakeviz - Visualize Profiling Results in Python
- line_profiler - Line by Line Profiling of Python Code
- How to profiler memory usage in python using memory_profiler?
- How to Display Rich Media Contents (Image, Audio, Video, etc) in Jupyter Notebook?
 Sunny Solanki
Sunny Solanki
Intro: Software Developer | Youtuber | Bonsai Enthusiast
About: Sunny Solanki holds a bachelor's degree in Information Technology (2006-2010) from L.D. College of Engineering. Post completion of his graduation, he has 8.5+ years of experience (2011-2019) in the IT Industry (TCS). His IT experience involves working on Python & Java Projects with US/Canada banking clients. Since 2020, he’s primarily concentrating on growing CoderzColumn.
His main areas of interest are AI, Machine Learning, Data Visualization, and Concurrent Programming. He has good hands-on with Python and its ecosystem libraries.
Apart from his tech life, he prefers reading biographies and autobiographies. And yes, he spends his leisure time taking care of his plants and a few pre-Bonsai trees.
Contact: sunny.2309@yahoo.in


![YouTube Subscribe]() Comfortable Learning through Video Tutorials?
Comfortable Learning through Video Tutorials?
If you are more comfortable learning through video tutorials then we would recommend that you subscribe to our YouTube channel.
![Need Help]() Stuck Somewhere? Need Help with Coding? Have Doubts About the Topic/Code?
Stuck Somewhere? Need Help with Coding? Have Doubts About the Topic/Code?
 Stuck Somewhere? Need Help with Coding? Have Doubts About the Topic/Code?
When going through coding examples, it's quite common to have doubts and errors.
If you have doubts about some code examples or are stuck somewhere when trying our code, send us an email at coderzcolumn07@gmail.com. We'll help you or point you in the direction where you can find a solution to your problem.
You can even send us a mail if you are trying something new and need guidance regarding coding. We'll try to respond as soon as possible.
![Share Views]() Want to Share Your Views? Have Any Suggestions?
Want to Share Your Views? Have Any Suggestions?
 Want to Share Your Views? Have Any Suggestions?
If you want to
- provide some suggestions on topic
- share your views
- include some details in tutorial
- suggest some new topics on which we should create tutorials/blogs
 magic-commands, jupyter-notebook