Eli5.lime: Explain PyTorch Text Classification Network Predictions Using LIME Algorithm
Eli5 is a Python library that let us visualize the predictions made by the machine learning model to better understand the performance of our network. This can help us understand which parts of our data are contributing to the predictions and we can use this knowledge to improve our model. It can help us generalize our model as well. Eli5 primarily allows interpreting functionality for Machine learning libraries (Scikit-learn, XGBoost, CatBoost, LightGBM, lightning, etc). It does not provide a direct interface to work with deep learning libraries like Pytorch, tensorflow, mxnet, etc. Though it provides an implementation of LIME (Local Interpretable Model-Agnostic Explanations) algorithm through lime sub-module that can be used to explain predictions of deep neural networks. The current implementation available of lime through eli5 only supports an interpretation of networks working with text data.
As a part of this tutorial, we have explained how we can interpret the predictions made by PyTorch text classification network using LIME implementation available through 'eli5.lime'. We have taken the IMDB reviews dataset available from torchtext module and trained a simple neural network on it to classify reviews as positive or negative. Then, we have explained the predictions made by this trained network using lime implementation available through eli5. We have also tried to cover as much as the API of the sub-module in the tutorial.
We already have a detailed tutorial on Eli5 that explains how we can use it for scikit-learn. Please feel free to check the below link if you are interested in it.
If you are looking for a tutorial on the actual lime library which has a few more features compared to eli5.lime implementation then please feel free to check the below link. We have explained the steps of how LIME algorithm works internally as well in the tutorial hence we recommend that the reader goes through it.
Below, we have listed important sections of tutorial to give an overview of the material covered.
Important Sections Of Tutorial
- Prepare Dataset
- 1.1 Load Dataset
- 1.2 Build Vocabulary
- 1.3 Create Data Loaders
- Define Network
- Train Network
- Evaluate Network Performance
- Explain Network Predictions Using Eli5.lime.TextExplainer
- 5.1 Explain Correct Prediction
- 5.2 Explain Wrong Prediction
- 5.3 Try Different Classifier With TextExplainer
- 5.4 Provide Our Vectorizer to TextExplainer
- 5.5 Provide Tokenizer Pattern to TextExplainer
- 5.6 TextExplainer With All Default Arguments
- 5.7 Provide Multiple Text Samplers to TextExplainer
- 5.8 Ask TextExplainer To Take Word Position Into Consideration
Below, we have imported the necessary libraries and printed the versions that we have used in our tutorial.
import torch

print("PyTorch Version : {}".format(torch.__version__))
import torchtext

print("Torchtext Version : {}".format(torchtext.__version__))
import eli5

print("Eli5 Version : {}".format(eli5.__version__))
1. Prepare Dataset 
In this section, we have loaded our IMDB dataset and created data loaders for it that returns vectorized data using a step-by-step process. This vectorized data will be then used to train the neural network. We have used the word frequency vectorization approach to convert text data.
1.1 Load Dataset
Below, we have loaded IMDB datasets available from torchtext.datasets module. It returns train and test datasets separately. Both are instances of Datasets. The train and test datasets both have 25k text reviews. The labels of dataset are 'pos' (Positive Review) and 'neg' (Negative Review).
train_dataset, test_dataset = torchtext.datasets.IMDB()

train_dataset.num_lines, test_dataset.num_lines
1.2 Build Vocabulary
In this section, we have built the vocabulary that will be used to vectorize text data. To create a vocabulary, we have first created a tokenizer that splits the whole text data of a document into a list of words which is commonly referred to as tokens. Once the tokenizer splits text into a list of words, the vocabulary will be built from the words. We have created a tokenizer using get_tokenizer() function available from torchtext.data module. It's a simple tokenizer that splits a sentence into a list of words.
To build vocabulary, we have used build_vocab_from_iterator() function available from torchtext.vocab module. It takes an input function that yields a list of tokens. We have designed a small function that will be given as input to function build_vocab_from_iterator(). This small function takes a list of datasets as input. Then it loops through all datasets and all samples in them one by one tokenizing them. It yields tokenized results for each sample as per requirement of build_vocab_from_iterator() function. We have also reserved the 0th index in vocabulary for special character '<UNK>'. The words not found in the vocabulary will be mapped to this word.
By default, build_vocab_from_iterator() function considers all words in total text corpus which creates a very large vocabulary. To reduce vocabulary size a bit, we have asked it to consider words that appear at least 2 times in the text corpus.
When we called build_vocab_from_iterator() function to build vocabulary, we have given train and test datasets both. We have also printed the number of words in vocabulary at the end.
from torchtext.data import get_tokenizer
from torchtext.vocab import build_vocab_from_iterator

tokenizer = get_tokenizer("basic_english")
categories = ["Negative", "Positive"]

def build_vocab(datasets):
    for dataset in datasets:
        for _, text in dataset: ## Please make a note that in dataset first item is target class and second item is text of sample.
            yield tokenizer(text)

vocab = build_vocab_from_iterator(build_vocab([train_dataset, test_dataset]), specials=["<UNK>"], min_freq=2)
vocab.set_default_index(vocab["<UNK>"])
len(vocab.get_itos())
1.3 Create Data Loaders
In this section, we have created train and test data loaders that will be used during training to loop through data in batches. We have created train and test data loaded from train and test datasets with a batch size of 256. Both train and test data loaders call function given to collate_fn argument before returning one batch of data.
This function takes as input a single batch of data and then returns vectorized data. The input data to this function is a batch of text samples and their target values whereas the output from it is vectorized text data and target values. To vectorize input text data, we have used CountVectorizer available from scikit-learn. We have initialized CountVectorizer instance with vocabulary and tokenizer we had created in previous cells. The vectorize_batch function vectorizes input text data using this count vectorizer and returns it. The CountVectorizer used the word of frequency approach to vectorize data. Now each time, we loop through data loaders, it'll return vectorized text data for each batch.
We have assumed that the reader has a background on the word of frequency approach to vectorize text data. Please feel free to check the below tutorial if you want to know about it in detail and how CountVectorizer works.
from sklearn.feature_extraction.text import TfidfVectorizer, CountVectorizer
from torch.utils.data import DataLoader
from torchtext.data.functional import to_map_style_dataset

vectorizer = CountVectorizer(vocabulary=vocab.get_itos(), tokenizer=tokenizer)

def vectorize_batch(batch):
    Y, X = list(zip(*batch)) ## Please make a Note that labels are first.
    X = vectorizer.transform(X).todense()
    Y = [0 if i=='neg' else 1 for i in Y]
    return torch.tensor(X, dtype=torch.float32), torch.tensor(Y)

train_dataset, test_dataset  = torchtext.datasets.IMDB()
train_dataset, test_dataset = to_map_style_dataset(train_dataset), to_map_style_dataset(test_dataset)

train_loader = DataLoader(train_dataset, batch_size=256, shuffle=True, collate_fn=vectorize_batch)
test_loader  = DataLoader(test_dataset, batch_size=256, collate_fn=vectorize_batch)
for X, Y in train_loader:
    print(X.shape, Y.shape)
    break
2. Define Network 
In this section, we have designed a simple neural network of 3 dense layers that will be used to classify IMDB reviews. The three dense layers have 64, 32, and 2 output units. The first two layers apply relu activation function to the outputs.
Please make a NOTE that we have covered in detail how to design a neural network using PyTorch. Please feel free to check the below link if you are looking for some background on it.
from torch import nn
from torch.nn import functional as F

class TextClassifier(nn.Module):
    def __init__(self):
        super(TextClassifier, self).__init__()
        self.seq = nn.Sequential(
            nn.Linear(len(vocab), 64),
            nn.ReLU(),

            nn.Linear(64, 32),
            nn.ReLU(),

            nn.Linear(32, 2),
            #nn.ReLU(),

            #nn.Linear(64, 4),
        )

    def forward(self, X_batch):
        return self.seq(X_batch)
3. Train Network 
Now, we have trained our network designed in the previous section on train data. To train our network, we have designed a simple training function. The function takes model, loss function, optimizer, train data loader, validation data loader, and a number of epochs as input. It then executes the training loop number of epochs time. During each epoch, it loops through whole training data in batches. For each batch, it performs a forward pass through the network to make predictions, calculates loss, calculates gradients, and updates network parameters. It records training loss for each batch and prints the average loss at the end of each epoch. We have also created one helper function that calculates validation loss and validation accuracy at the end of each epoch for verification purposes.
from tqdm import tqdm
from sklearn.metrics import accuracy_score
import gc

def CalcValLossAndAccuracy(model, loss_fn, val_loader):
    with torch.no_grad():
        Y_shuffled, Y_preds, losses = [],[],[]
        for X, Y in val_loader:
            preds = model(X)
            loss = loss_fn(preds, Y)
            losses.append(loss.item())

            Y_shuffled.append(Y)
            Y_preds.append(preds.argmax(dim=-1))

        Y_shuffled = torch.cat(Y_shuffled)
        Y_preds = torch.cat(Y_preds)

        print("Valid Loss : {:.3f}".format(torch.tensor(losses).mean()))
        print("Valid Acc  : {:.3f}".format(accuracy_score(Y_shuffled.detach().numpy(), Y_preds.detach().numpy())))


def TrainModel(model, loss_fn, optimizer, train_loader, val_loader, epochs=10):
    for i in range(1, epochs+1):
        losses = []
        for X, Y in tqdm(train_loader):
            Y_preds = model(X)

            loss = loss_fn(Y_preds, Y)
            losses.append(loss.item())

            optimizer.zero_grad()
            loss.backward()
            optimizer.step()
        gc.collect()

        print("Train Loss : {:.3f}".format(torch.tensor(losses).mean()))
        CalcValLossAndAccuracy(model, loss_fn, val_loader)
Below, we have trained our network using the function designed in the previous cell. We have initialized a number of epochs to 5 and the learning rate to 0.0001. Then, we have initialized network, cross entropy loss function, and Adam optimizer. At last, we have called our training function with the necessary parameters to train the network. We can notice from the loss and accuracy getting printed after each epoch that our model is doing a good job at IMDB reviews classification task.
from torch.optim import Adam

epochs = 5
learning_rate = 1e-4

loss_fn = nn.CrossEntropyLoss()
text_classifier = TextClassifier()
optimizer = Adam(text_classifier.parameters(), lr=learning_rate)

TrainModel(text_classifier, loss_fn, optimizer, train_loader, test_loader, epochs)
4. Evaluate Network Performance 
In this section, we have evaluated the performance of our network by calculating accuracy, classification report and confusion matrix metrics on test predictions. We have designed a simple helper function to make predictions on test data using a test data loader. The metrics are calculated using functions available from scikit-learn.
If you are interested in learning about various ML metrics available from sklearn then please feel free to check the below tutorial where we have covered the majority of them.
We can notice from the results that our model has ~89% accuracy. The accuracy can be improved further if we try different network architecture but we'll go ahead with it and explain predictions made by it using eli5.lime.
def MakePredictions(model, loader):
    Y_shuffled, Y_preds = [], []
    for X, Y in loader:
        preds = model(X)
        Y_preds.append(preds)
        Y_shuffled.append(Y)
    gc.collect()
    Y_preds, Y_shuffled = torch.cat(Y_preds), torch.cat(Y_shuffled)

    return Y_shuffled.detach().numpy(), F.softmax(Y_preds, dim=-1).argmax(dim=-1).detach().numpy()

Y_actual, Y_preds = MakePredictions(text_classifier, test_loader)
from sklearn.metrics import accuracy_score, classification_report, confusion_matrix

print("Test Accuracy : {}".format(accuracy_score(Y_actual, Y_preds)))
print("\nClassification Report : ")
print(classification_report(Y_actual, Y_preds, target_names=["Negative", "Positive"]))
print("\nConfusion Matrix : ")
print(confusion_matrix(Y_actual, Y_preds))
5. Explain Network Predictions Using Eli5.lime.TextExplainer 
In this section, we have explained how we can explain predictions made by our model using LIME algorithm implementation available through eli5.lime. We have created a visualization that highlights the words in the text that contribute positively and negatively to the prediction category.
In order to explain predictions, we need to perform the below steps.
- First, we need to create an instance of TextExplainer.
- Then, we need to call fit() method on it with our selected text sample and function that takes text sample as input to make predictions.
- At last, we need to call show_prediction() method on TextExplainer instance to create visualization explaining text sample that was fit using fit() method.
We'll explain the above steps with examples now.
Below, we have simply retrieved 10k text samples from the test dataset as we'll be selecting samples from it to explain.
test_dataset = torchtext.datasets.IMDB(split="test")

X_test, Y_test = [], []
for y, x in test_dataset:
    Y_test.append(0 if y == "neg" else 1)
    X_test.append(x)

X_test, Y_test = X_test[:10000], Y_test[:10000] ## Taking only 10k test samples

gc.collect()
5.1 Explain Correct Prediction
Below, we have first created an instance of TextExplainer. It has the below-mentioned parameters that we can tweak.
- n_samples - This parameter accepts integer specifying number of samples that will be generated from original input sample given during fit() call to train our local machine learning classifier. Default is 5000.
- clf - This is a classifier that will be trained using samples generated for LIME algorithm. The LIME algorithm trains the local ML algorithm to mimic the behavior of our neural network. By default, logistic regression with elasticnet regularization trained with SGD (SGDClassifier) is used.
- vec - This parameter accepts vectorizer instances that can be used to vectorize text data for our local ML model.
- token_pattern - This parameter accepts a regular expression pattern that can be used to tokenize text data.
- sampler - This parameter accepts instance of MaskingTextSampler or MaskingTextSamplers which is used to generate modified versions of text data from input sample.
- MaskingTextSampler(token_pattern=None,bow=True,random_state=None) - This is single sampler used to generate samples for local ML model. The token_pattern parameter accepts regular expression used to tokenize text data. The bow parameter refers to bag-of-words approach which is True by default.
- MaskingTextSamplers(sampler_params, token_pattern=None, random_state=None, weights=None) - This is multiple samplers used to generate samples for local ML model. The first parameter is a list of dictionaries where an individual dictionary represents parameters of MaskingTextSampler. The weights parameter can be used to assign weights to individual samplers.
- position_dependent - This parameter accepts boolean value. If set to True it takes into account the sequence in which words are in the sample. This can help improve results if a few words have some meaning when they appear together (some context).
- char_based - This parameter accepts boolean values specifying whether to use character-based vectorization.
- random_state - This is integer or numpy.random.RandomState. It is used to reproduce the same results again.
Below, we have created a TextExplainer instance with default parameters of MaskingTextSampler sampler.
from eli5.lime import TextExplainer
from eli5.lime.samplers import MaskingTextSampler, MaskingTextSamplers

explainer = TextExplainer(random_state=123, sampler=MaskingTextSampler())
In the below cell, we have defined a simple function that takes as input list of text samples and returns probabilities predicted by the model for them. It first vectorizes input text documents, performs a forward pass through the network to make predictions, and then converts predictions to probabilities using softmax() function. This function will be required by fit() method of TextExplainer.
Then, we have selected the first text sample from test data and made predictions on it using our trained model. We have printed actual category and predicted category as well as probability.
At last, we have called fit() method on TextExplainer instance by giving text sample and prediction function as input. This call will run LIME algorithm which generates 5000 samples and trains a local ML model on them to mimic the performance of our neural network.
import numpy as np
def predict_proba(X_docs):
X_vect = torch.tensor(vectorizer.transform(X_docs).todense(), dtype=torch.float32)
preds = text_classifier(X_vect)
preds = F.softmax(preds, dim=-1).detach().numpy()
preds = np.array([pred / pred.sum() for pred in preds])
return preds
print("Actual Label : {}".format(categories[Y_test[0]]))
pred_probs = predict_proba(X_test[:1])
print("Predicted Label : {}".format(categories[pred_probs.argmax(axis=1)[0]]))
print("Probability : {:.3f}".format(pred_probs.max(axis=1)[0]))
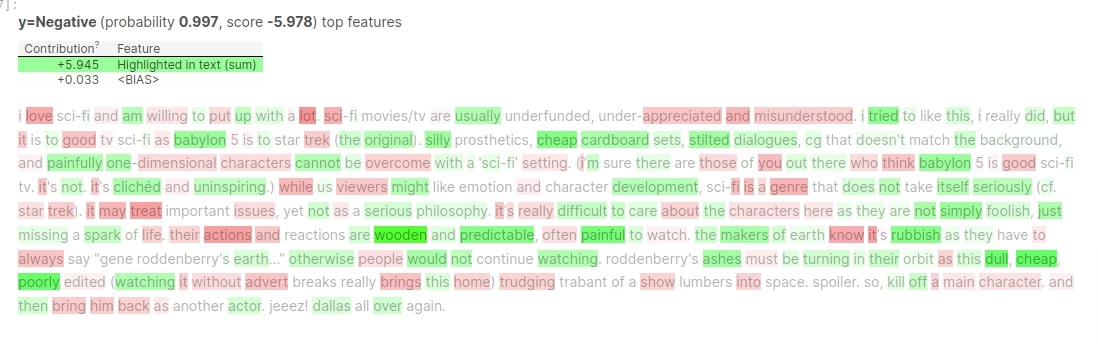
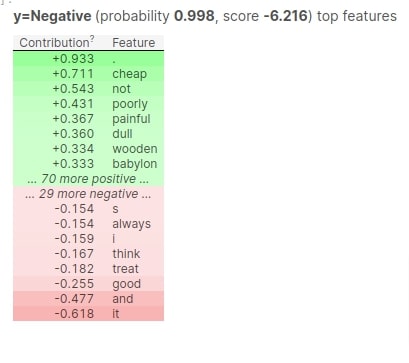
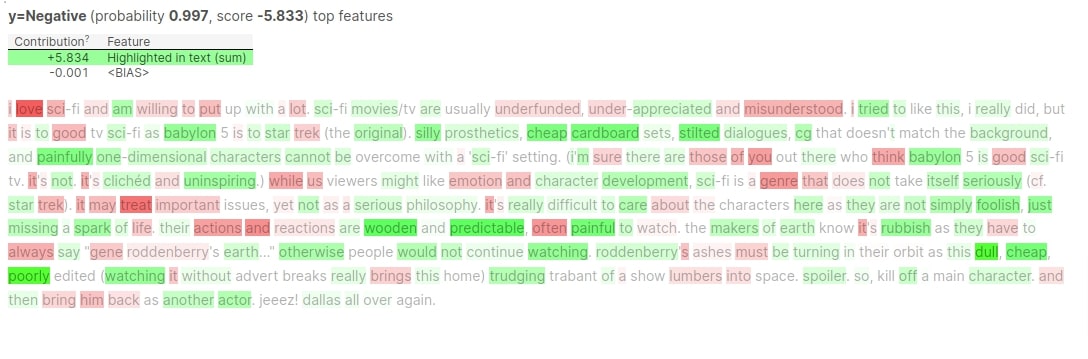
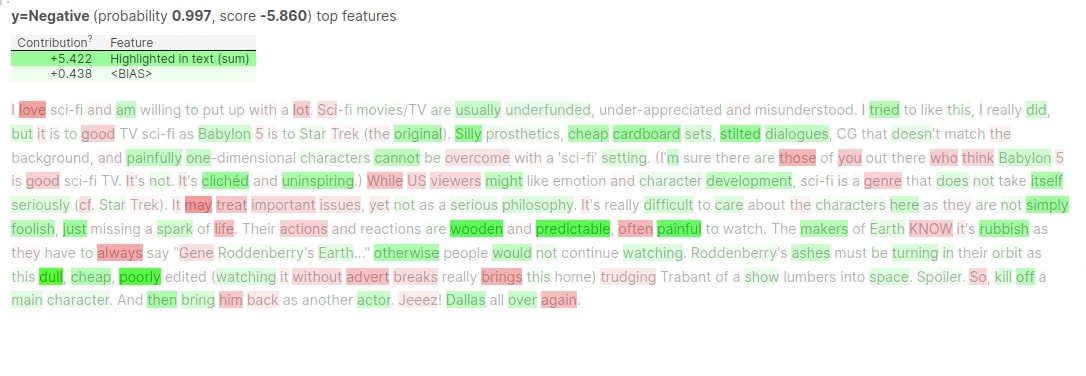
explainer.fit(X_test[0], predict_proba)
In the below cell, we have called show_prediction() method on TextExplainer instance to create a visualization showing words that contributed to prediction. We need to give the name of all target classes/categories to target_names parameter. The show_prediction() method has a parameter named targets that accepts a list of categories that we should explain if we have more than 2 categories and we want to create an explanation for a few of them. By default, it generates explanations for all categories.
We can notice from the highlighted green words that words like 'cheap', 'cliched', 'stilted', 'painful', 'predictable', 'rubbish', 'dull', 'poorly', 'uninspiring', etc has contributed to predicting negative review.
explainer.show_prediction(target_names=categories)
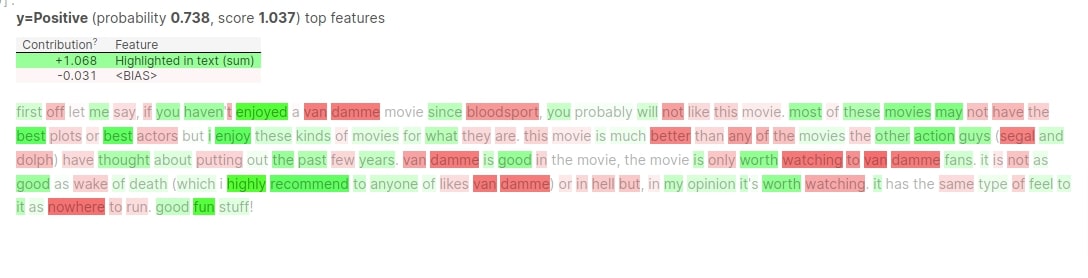
5.2 Explain Wrong Prediction
In this section, we have explained one wrong prediction using a lime text explainer. In order to do that, we have first predicted labels for all test samples and found out indexes of samples that are predicted wrong. Then, we have selected one sample from the wrong prediction and made predictions on it using our model. For the selected sample, the actual label is negative but our model predicts a positive label.
Then, we have created a visualization using TextExplainer instance by following the same steps as earlier. We can notice from the visualization that the presence of words like 'enjoyed', 'best', 'highly', 'recommend', 'worth', 'fun', 'good', etc have seem to contribute to predicting category as positive.
X_test_vect = vectorizer.transform(X_test).todense()
Y_logits = text_classifier(torch.tensor(X_test_vect, dtype=torch.float32))
Y_probs = F.softmax(Y_logits, dim=-1)
Y_preds = Y_probs.argmax(dim=-1).detach().numpy()
del X_test_vect
gc.collect()

wrong_preds = np.argwhere(Y_preds !=Y_test)
idx = wrong_preds.flatten()[0]

print("Actual    Label : {}".format(categories[Y_test[idx]]))
pred_probs = predict_proba(X_test[idx:idx+1])
print("Predicted Label : {}".format(categories[pred_probs.argmax(axis=1)[0]]))
print("Probability     : {:.3f}".format(pred_probs.max(axis=1)[0]))
explainer.fit(X_test[idx], predict_proba)
explainer.show_prediction(target_names=categories)
gc.collect()
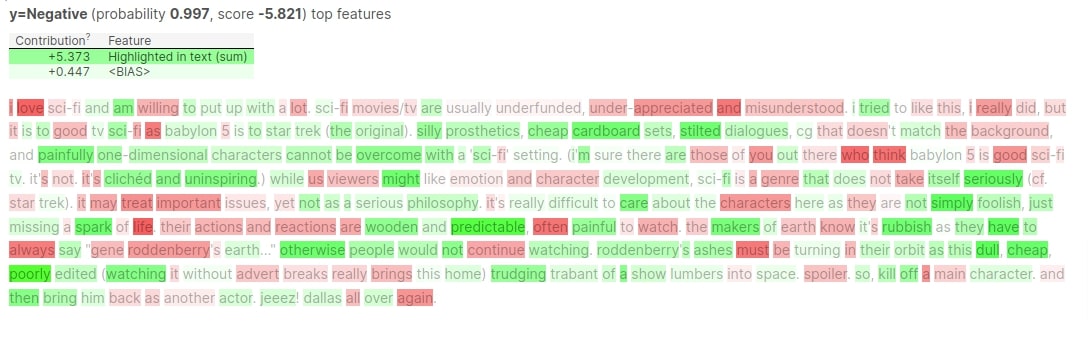
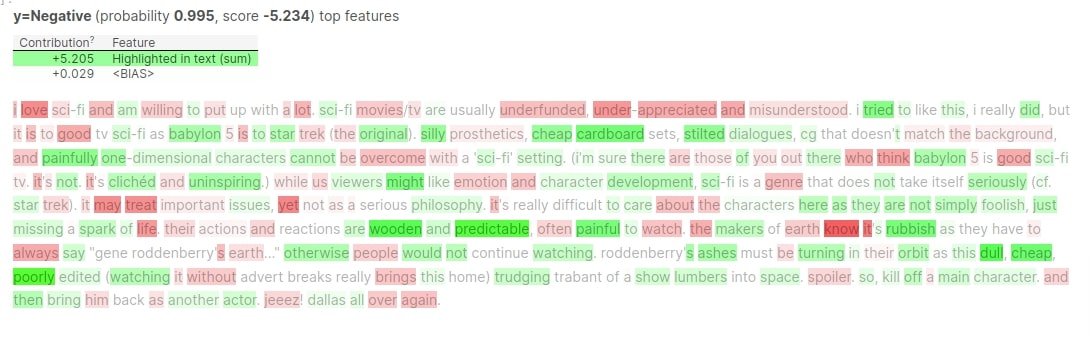
5.3 Try Different Classifier With TextExplainer
The LIME algorithm from eli5 internally uses SGDClassifier available from scikit-learn but TextExplainer() constructor let us specify our own classifier using clf parameter. We can provide any estimator available from scikit-learn that returns weights of features.
Below, we have provided LogisticRegression classifier available from sklearn when creating TextExplainer object. Then, we have created an explanation using that explainer instance. We can notice from the visualization that the model is doing quite a good job at predicting labels using the right words that should contribute to prediction.
from eli5.lime import TextExplainer
from eli5.lime.samplers import MaskingTextSampler, MaskingTextSamplers
from sklearn.linear_model import LogisticRegression
from sklearn.tree import DecisionTreeClassifier

explainer = TextExplainer(random_state=123, sampler=MaskingTextSampler(), clf=LogisticRegression(max_iter=10000))

print("Actual    Label : {}".format(categories[Y_test[0]]))
pred_probs = predict_proba(X_test[:1])
print("Predicted Label : {}".format(categories[pred_probs.argmax(axis=1)[0]]))
print("Probability     : {:.3f}".format(pred_probs.max(axis=1)[0]))
explainer.fit(X_test[0], predict_proba)
explainer.show_prediction(target_names=categories)
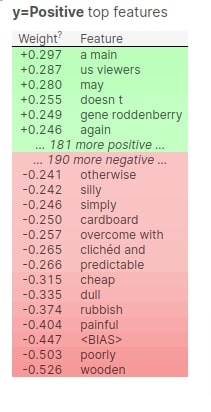
We can also call show_weights() method on TextExplainer object if we want to see results in tabular form as shown below.
explainer.show_weights(target_names=categories, targets=['Negative', "Positive"])
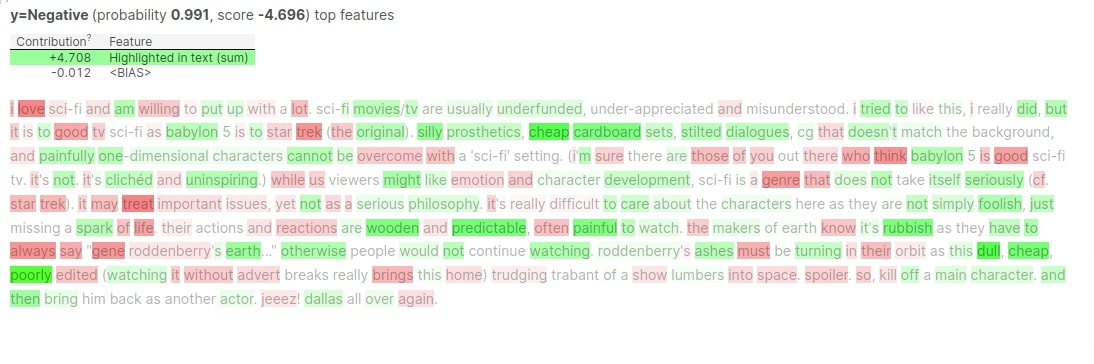
5.4 Provide Our Vectorizer to TextExplainer
The TextExplainer() constructor lets us provide our own vectorizer if we don't want it to create one internally. We can provide a vectorizer using vec argument of the constructor. It'll then use this vectorizer to vectorize text data.
Below, we have created an explainer object with our vectorizer and then generated an explanation. The results are generated in tabular form by default in this case.
from eli5.lime import TextExplainer
from eli5.lime.samplers import MaskingTextSampler, MaskingTextSamplers

explainer = TextExplainer(random_state=123, sampler=MaskingTextSampler(), vec=vectorizer)

print("Actual    Label : {}".format(categories[Y_test[0]]))
pred_probs = predict_proba(X_test[:1])
print("Predicted Label : {}".format(categories[pred_probs.argmax(axis=1)[0]]))
print("Probability     : {:.3f}".format(pred_probs.max(axis=1)[0]))
explainer.fit(X_test[0], predict_proba)
explainer.show_prediction(target_names=categories, top=(8,8))
5.5 Provide Tokenizer Pattern to TextExplainer
Just like vectorizer, TextExplainer constructor lets us provide our tokenizing pattern as well using the token_pattern parameter. It accepts regular expressions specifying how to create tokens. This pattern will then be used internally to tokenize text documents.
Below, we have created an explainer object by providing our own tokenizing pattern which simply captures words. Then, we have created an explanation using this explainer instance. The results are almost the same as earlier though.
from eli5.lime import TextExplainer
from eli5.lime.samplers import MaskingTextSampler, MaskingTextSamplers

explainer = TextExplainer(random_state=123, sampler=MaskingTextSampler(), token_pattern=r"\w+")
explainer.fit(X_test[0], predict_proba)
explainer.show_prediction(target_names=categories)
5.6 TextExplainer With All Default Arguments
In this section, we have created an explainer object with all default arguments and created visualization explaining prediction.
from eli5.lime import TextExplainer
from eli5.lime.samplers import MaskingTextSampler, MaskingTextSamplers

explainer = TextExplainer(random_state=123)
explainer.fit(X_test[0], predict_proba)
explainer.show_prediction(target_names=categories)
5.7 Provide Multiple Text Samplers to TextExplainer
In this section, we have explained how we can give multiple samplers for creating text samples to TextExplainer() constructor. It accepts a parameter named sampler that accepts instances of MaskingTextSamplers which can be used to provide samplers of different types. The MaskingTextSamplers instance accepts list of dictionaries specifying parameters of different MaskingTextSampler instances. These samplers will be used to create text samples to train our local ML algorithm (SGDClassifier).
Below, we have explained with a simple example how we can provide multiple samplers to explainer constructors.
Please make a NOTE that 'MaskingTextSamplers' and 'MaskingTextSampler' are different.
from eli5.lime import TextExplainer
from eli5.lime.samplers import MaskingTextSampler, MaskingTextSamplers

explainer = TextExplainer(random_state=123, sampler=MaskingTextSamplers([{"bow":True, "token_pattern": r"\w+"}, {"bow": False, "token_pattern": r"\w+"}]))
explainer.fit(X_test[0], predict_proba)
explainer.show_prediction(target_names=categories)
5.8 Ask TextExplainer To Take Word Position Into Consideration
By default, the vectorizer created by the explainer object does not consider the positioning of words. There can be context hidden in the positioning of words like a few words next to each other can have meaning ('not good' has context, but if we separate them into words 'not' and 'good' then they lose context). If we scramble them when using the bag of words approach then it loses that context. We can inform the explainer instance to take the position of words into consideration by setting position_dependent parameter to True. It'll create a vectorizer of a different kind that will keep position details. This makes the explainer more powerful in some cases.
Below, we have created an explainer object by setting position_dependent parameter to True and then created a visualization explaining predictions using it. The results are almost the same as our previous examples in our case though.
from eli5.lime import TextExplainer
from eli5.lime.samplers import MaskingTextSampler, MaskingTextSamplers

explainer = TextExplainer(random_state=123, sampler=MaskingTextSampler(), position_dependent=True)
explainer.fit(X_test[0], predict_proba)
explainer.show_prediction(target_names=categories)
This ends our small tutorial explaining how we can use LIME algorithm implementation available from Eli5 python library to explain the predictions of text classification network created using PyTorch. Please feel free to let us know your views in the comments section.
References
 Sunny Solanki
Sunny Solanki
Intro: Software Developer | Youtuber | Bonsai Enthusiast
About: Sunny Solanki holds a bachelor's degree in Information Technology (2006-2010) from L.D. College of Engineering. Post completion of his graduation, he has 8.5+ years of experience (2011-2019) in the IT Industry (TCS). His IT experience involves working on Python & Java Projects with US/Canada banking clients. Since 2020, he’s primarily concentrating on growing CoderzColumn.
His main areas of interest are AI, Machine Learning, Data Visualization, and Concurrent Programming. He has good hands-on with Python and its ecosystem libraries.
Apart from his tech life, he prefers reading biographies and autobiographies. And yes, he spends his leisure time taking care of his plants and a few pre-Bonsai trees.
Contact: sunny.2309@yahoo.in


![YouTube Subscribe]() Comfortable Learning through Video Tutorials?
Comfortable Learning through Video Tutorials?
If you are more comfortable learning through video tutorials then we would recommend that you subscribe to our YouTube channel.
![Need Help]() Stuck Somewhere? Need Help with Coding? Have Doubts About the Topic/Code?
Stuck Somewhere? Need Help with Coding? Have Doubts About the Topic/Code?
 Stuck Somewhere? Need Help with Coding? Have Doubts About the Topic/Code?
When going through coding examples, it's quite common to have doubts and errors.
If you have doubts about some code examples or are stuck somewhere when trying our code, send us an email at coderzcolumn07@gmail.com. We'll help you or point you in the direction where you can find a solution to your problem.
You can even send us a mail if you are trying something new and need guidance regarding coding. We'll try to respond as soon as possible.
![Share Views]() Want to Share Your Views? Have Any Suggestions?
Want to Share Your Views? Have Any Suggestions?
 Want to Share Your Views? Have Any Suggestions?
If you want to
- provide some suggestions on topic
- share your views
- include some details in tutorial
- suggest some new topics on which we should create tutorials/blogs
 eli5, lime, pytorch, text-classification