ipyparallel - Parallel Processing in Python
Table of Content
- Introduction
- Architecture of ipyparallel
- Common Steps to Run Code in Parallel using ipyparallel
- 1. Create Cluster
- 2. Create Client to Interact with Cluster
- 3. Run Functions in Parallel on IPython Engines
- References
Introduction 
With the increase in data collection and availability of many cores on a single computer, it has become the need of an hour to write code that utilizes multiple cores of computer efficiently utilizing underlying hardware. It has even become very important to write code which can run on clusters of computer due to datasets getting gigantic. Day by day python and jupyter notebook are becoming de-facto choice by many people to perform data analysis and machine learning tasks. The fields of data science and machine learning many times involve quite a large dataset that might not get handled by a single core of a computer or even a single computer. As are a result of this python has a bunch of libraries for running things in parallel like dask, pyspark, ipyparallel, etc. All of these libraries provide unique APIs for parallel processing.
As a part of this tutorial, we'll be introducing ipyparallel and how to design programs that run in parallel using it. Due to flexible architecture of ipyparallel, it supports various types of parallel processing approaches like single program, multiple data parallelism, multiple programs, multiple data parallelism, message passing interface, task farming and combination of these approaches as well as custom approaches defined by users as well. We'll start by giving small insights into how ipyparallel works internally to run things in parallel. We'll then dive into the coding part where we'll explain various examples of running things in parallel using ipyparallel API.
Architecture of ipyparallel 
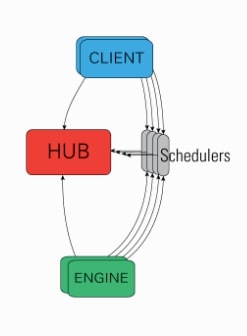
The ipyparallel architecture consists of below-mentioned components:
- IPython Engine: It extension of ipython jupyter kernel which accepts request to run code in parallel, runs code and returns results. In order to perform parallel/distributed processing, we need to start multiple instances of the ipython engine.
- IPython Controller: It provides an interface for communication between
IPython ClientsandIPython Engines. It consists of a bunch of processes out of which one ishuband fewschedulers.- Hub: It most important component of the ipython cluster which keeps track of clients, engines, schedulers, task requests, and responses.
- Schedulers: The scheduler is responsible for assigning client requests to engines. While the engine is running a task, it blocks and schedulers are components that are interacting with clients during this time.
- IPython Clients: The clients are processes responsible for connecting with cluster and sending requests to run in parallel.
ipyparallelprovides two kinds of an interface through the client to run things in parallel.- A Direct interface where each client addresses engines directly with which it wants to run tasks.
ipyparallelprovidesDirectViewclass for this interface. - A Load Balanced interface where client contacts schedulers which are responsible for assigning tasks to particular engines of its choice.
ipyparallelprovidesLoadBalancedViewclass for this interface.
- A Direct interface where each client addresses engines directly with which it wants to run tasks.
This ends our small introduction to ipyparallel architecture. We'll now start with the coding part where we'll introduce the usage of ipyparallel API. So without further delay, let’s get started.
Common Steps to Run Code in Parallel using ipyparallel 
Create clusterspecifying number of engines which creates controller and engines both.Create clientwhich provides an interface to connect to a controller. The client object is a generally list of view type(DirectVieworLoadBalancedView).- Calling functions like
apply(),apply_sync(),map(),map_sync(), etc on list ofViewobjects.
1. Create Cluster [Controller & Engines] 
In order to perform parallel computing with ipyparallel we first need to create cluster which consists of engines and controller. It's responsible for running tasks in parallel. We can easily create a cluster by running command mentioned below passing it a number of engines needed per cluster. Below we have executed command with 8 engines running. Generally, it is advisable to keep engines the same as the number of cores of PC on a single computer.
- ipcluster start -n 8
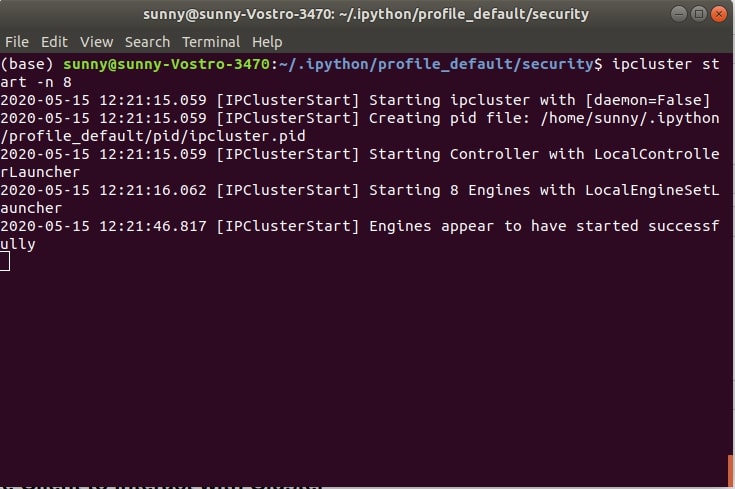
We can see from the above shell screen-shot that cluster seems to have started. A controller, engines, and clients are independent processes in ipyparallel. In ideal cases, all of these will be on separate computers hence clients and engines need some way to connect and authenticate to the controller. This information is stored in JSON files.
- ipcontroller-client.json: It holds information for the client to connect to the controller.
- ipcontroller-engine.json: It holds information for engines to connect to the controller.
In our case, it’s on the same PC so that both files are available in the default profile's security directory.
!ls ~/.ipython/profile_default/security/
Creating Profile 
The ipyparallel will use default profile for creating clusters if we don't have created any profile. We can create our own profile by calling below command passing its profile name and it'll create a profile.
ipython profile create --parallel --profile=myprofile
!ls ~/.ipython/
Starting Cluster with Custom Profile
We can start cluster by using settings mentioned in our profile by setting our profile name when creating cluster as mentioned below.
ipcluster start -n 8 --profile myprofile
We can see that when we started cluster with a personal profile, it created a client and engines JSON files in that profile's security directory.
!ls ~/.ipython/profile_myprofile/security
2. Create Client to Interact with Cluster 
The second step as a part of running code in parallel using ipyparallel is a creation of the client to connect with the controller to run tasks in parallel. The process of creating a client is quite simple.
We first need to import necessary libraries for the tutorial.
import ipyparallel

import sys
import time

print("Python Version : ", sys.version)
print("IPyparallel Version : ", ipyparallel.__version__)
We can create a client by simply calling the Client method ipyparallel and it'll create the client by connecting to cluster started in the previous step.
Please make a note that you need to start cluster first in shell as explained in previous step and keep it running else execution of client creation will fail.
client = ipyparallel.Client()
#client = ipyparallel.Client(profile="myprofile")
type(client), client.ids
2.1 Direct View Creation 
Our client object created in the previous step is a wrapper with a list of direct view objects. As we have discussed above direct view lets us connect with individual engines directly. We can access individual engines by indexing client object as explained below.
client[0], client[1], client[2], client[3], client[4], client[5], client[6], client[7]
This approach provides us with flexibility when we want to submit different tasks to different engines. We can also get all direct views in a single object which will keep them combined and whenever any task is submitted to it then it'll be submitted to all engines. If we want to run some tasks on multiple engines then we can submit a task to combined direct view and it'll run on all of them.
direct_view = client[:]

direct_view
2.2 Load Balanced View Creation 
As we discussed above in the introduction section, the 2nd type of interface provided by ipyparallel for running things in parallel is load-balanced approach. It lets us submit tasks to a controller and it'll decide on which engine to run tasks. We do not need to worry about assigning tasks to a particular engine like a direct view.
We can call load_balanced_view() on client object and it'll return load-balanced view.
load_balanced_view = client.load_balanced_view()

load_balanced_view
3. Run Functions in Parallel on IPython Engines 
We are done with the creation of a cluster (controller & engines), client, views (direct & load balanced) in order to run tasks in parallel on a cluster. We'll now explain various methods provided by ipyparallel to run things in parallel with various examples.
Example 1: apply() 
The method that we'll introduce is apply() which accepts function along with its argument which is required to run in parallel. We can submit any function to run in parallel using apply()
We have created a function named slow_add() which adds two numbers. We have introduced a sleep time of 1 second in it to mimic real-life situations where function takes longer to run.
def slow_power(x, i=5):
    import time
    time.sleep(1)
    return x**i
Direct View Execution
Below we are calling apply() function on direct view object created in one of the previous steps. When we submit tasks using apply(), it creates AsyncResult object. We need to call result() on AsyncResult object in order to retrieve results from it.
res = direct_view.apply(slow_power, 5,5)
res
Please make a note that we'll be using jupyter notebook cell magic commands %time and %%time for measuring run time of particular line and particular cell respectively.
%time res.result()
We can see from the above example that apply() method called on direct view multiplexed it to all engines and run it on all of them in parallel.
We can also run the same function on only one engine by subscripting client object which points to single-engine as explained below.
res = client[0].apply(slow_power, 4, 4)

%time res.result()
Below we have explained another example where we are submitting tasks to only 3 engines out of total 8.
res = client[0:3].apply(slow_power, 3, 3)

%time res.result()
Load Balanced Execution
We can also call apply() function on load-balanced view but unlike direct view, it'll run it on single-engine and return a result. As we discussed in the introduction, in case of a load-balanced approach, the controller decides by it self on which engine to run a task, unlike direct view approach where the user can submit a task to a particular engine, a subset of engines, or to all engines as explained in previous examples.
res = load_balanced_view.apply(slow_power, 5, 5)

%time res.result()
Example 2: apply_async() 
The apply_async() command works exactly like apply() command of the previous step. It submits tasks to engines and returns AsyncResult object. We can later call result() method on it to get results of execution.
Direct View Execution
res = direct_view.apply_async(slow_power, 2, 2)

res
%time res.result()
Load Balanced View Execution
res = load_balanced_view.apply_async(slow_power, 2, 2)

%time res.result()
Example 3: apply_sync() 
The third function that we would like to introduce is apply_sync(). This function unlike apply() and apply_async() does not complete immediately and does not return AsyncResult object.
The apply_sync() method instead blocks until all engines have completed the execution of tasks submitted to them. When we call apply_sync() with the task, the controller submits tasks to engines and then method waits until all engines have completed execution and return results.
Direct View Execution
Below we can see the result of the execution of a function on all 8 engines using a direct view. We can notice that it did not return AsyncResult object, instead returned results of execution. It completes in 1 second due to parallelism.
%time direct_view.apply_sync(slow_power, 2, 2)
Load Balanced View Execution
%time load_balanced_view.apply_sync(slow_power, 2, 2)
The benefit of using apply_async() or apply() over apply_sync() is that they won't block other things from executing. We can submit tasks using async methods and continue doing other things. We can later on-call result() method on AyncResult object to collect the results of executions.
Example 4: map() 
The map() is the same as map() available form python but it runs function passed to it in parallel on engines.
Below we are executing first in serial slow_power() function 10 times and can notice that it takes 10 seconds to execute. We'll then try parallel execution.
%%time

[slow_power(i, 5) for i in range(10)]
Direct View Execution
Below we are calling map() function on a direct view which will submit it on all engines. We can notice that it takes 2 seconds because we have 8 engines.
%%time

res = direct_view.map(slow_power, range(10))

res.result()
Load Balanced View Execution
It works almost the same as the direct view in this case.
%%time

res = load_balanced_view.map(slow_power, range(10))
res.result()
Example 5: map_sync() 
The map_sync() function gives the same functionality as map() function but instead of returning AsyncResult object like map() which can be evaluated later to of results, it returns results directly by executing all of the tasks.
Direct View Execution
%%time

res = direct_view.map_sync(slow_power, range(10))
res
Load Balanced View Execution
%%time

res = load_balanced_view.map_sync(slow_power, range(10))
res
The benefit of using map() over apply_sync() is that it won't block other things from executing. We can submit tasks using async methods and continue doing other things. We can later on-call result() method on the AyncResult object to collect the results of executions.
Example 6: apply() with shared data 
The direct-view object also lets us keep data global which can be accessed by all engines for their calculation purpose. We can declare our constants using this functionality and then it'll be available to all engines hence we don't need to give them separately each time.
Below we have redefined function slow_power() again but this time we are not providing power to raise it to. We'll be keeping power details as global variables and methods will access it to complete.
def slow_power(x):
    import time
    time.sleep(1)
    return x**i
Below we are setting global variable i to a value of 10 which will raise all numbers to 10 when we submit numbers to the slow_power() method.
We are using apply a function to submit function to each engine separately. We then collect results by calling result() on each AsyncResult object.
%%time

direct_view["i"] = 10

res = []
for i in range(len(direct_view)):
    res.append(client[i].apply(slow_power, i))

[r.result() for r in res]
We can notice from the above output that all of the slow_add() executions took the value of a variable i from the global definition of that variable. It raised all numbers passed to it to the power of 10.
Example 7: apply_async() with shared data 
Below we are explaining the same example as the previous step but with the apply_async() method.
%%time

direct_view = client[:]
direct_view["i"] = 5

res = []
for i in range(len(direct_view)):
    res.append(client[i].apply_async(slow_power, i))

[r.result() for r in res]
Example 8: execute() 
The ipyparallel provides a method named execute() which can let us work on global variables declared and perform simple computation on them to create new globals.
Below we are first creating a global variable named i with a value of 5. We are then raising it to the power of 5 with execute() method.
%%time

direct_view = client[:]
direct_view["i"] = 5

client[:].execute("a=i**5")
direct_view["a"]
Example 9: scatter() & gather() 
The scatter() and gather() method as their name suggests provides functionality to distribute data to various engines and then collect it.
Below we are distributing a list of 8 numbers to 8 engines. We can then access them to check which engine has what value for that variable.
This lets us create a global variable per engine, unlike the previous examples where we had created a global variables available to each engine.
direct_view.scatter('a',list(range(8)))
direct_view['a']
client[0]["a"], client[1]["a"]
direct_view.scatter('b',list(range(16)))
direct_view['b']
We can notice from examples that it divides data equally into all engines.
Below we have defined a simple function named slow_add() which added number passed to it to global variable a defined for that engine.
We can see that each a value for each engine got added to the number passed to the method.
def slow_add(num):
    return a[0] + num

res = direct_view.apply(slow_add, 10)

res.result()
The gather() method lets us collect variable value distributed on engines as explained below. It'll combine them.
res = direct_view.gather('a')

res.result()
res = direct_view.gather('b')

res.result()
Please make a note that execute(), scatter() and gather() are only available with direct view. The same way we can set global variable using direct view only.
This ends our small tutorial on ipyparallel API usage. Please feel free to let us know your views in the comments section.
References 
Below are list of other parallel processing library tutorials.
- Python Module - multiprocessing
- Python Module - concurrent.futures
- dask.delayed - Parallel Computing in Python
- dask.distributed - Parallel Processing in Python
- dask.bag - Parallel Computing in Python
- dask - Global Variable, Queues, Locks and Publish-Subscribe
- joblib - Parallel Processing in Python
- Python Module - subprocess
 Sunny Solanki
Sunny Solanki
Intro: Software Developer | Youtuber | Bonsai Enthusiast
About: Sunny Solanki holds a bachelor's degree in Information Technology (2006-2010) from L.D. College of Engineering. Post completion of his graduation, he has 8.5+ years of experience (2011-2019) in the IT Industry (TCS). His IT experience involves working on Python & Java Projects with US/Canada banking clients. Since 2020, he’s primarily concentrating on growing CoderzColumn.
His main areas of interest are AI, Machine Learning, Data Visualization, and Concurrent Programming. He has good hands-on with Python and its ecosystem libraries.
Apart from his tech life, he prefers reading biographies and autobiographies. And yes, he spends his leisure time taking care of his plants and a few pre-Bonsai trees.
Contact: sunny.2309@yahoo.in


![YouTube Subscribe]() Comfortable Learning through Video Tutorials?
Comfortable Learning through Video Tutorials?
If you are more comfortable learning through video tutorials then we would recommend that you subscribe to our YouTube channel.
![Need Help]() Stuck Somewhere? Need Help with Coding? Have Doubts About the Topic/Code?
Stuck Somewhere? Need Help with Coding? Have Doubts About the Topic/Code?
 Stuck Somewhere? Need Help with Coding? Have Doubts About the Topic/Code?
When going through coding examples, it's quite common to have doubts and errors.
If you have doubts about some code examples or are stuck somewhere when trying our code, send us an email at coderzcolumn07@gmail.com. We'll help you or point you in the direction where you can find a solution to your problem.
You can even send us a mail if you are trying something new and need guidance regarding coding. We'll try to respond as soon as possible.
![Share Views]() Want to Share Your Views? Have Any Suggestions?
Want to Share Your Views? Have Any Suggestions?
 Want to Share Your Views? Have Any Suggestions?
If you want to
- provide some suggestions on topic
- share your views
- include some details in tutorial
- suggest some new topics on which we should create tutorials/blogs
 python, parallel-processing